
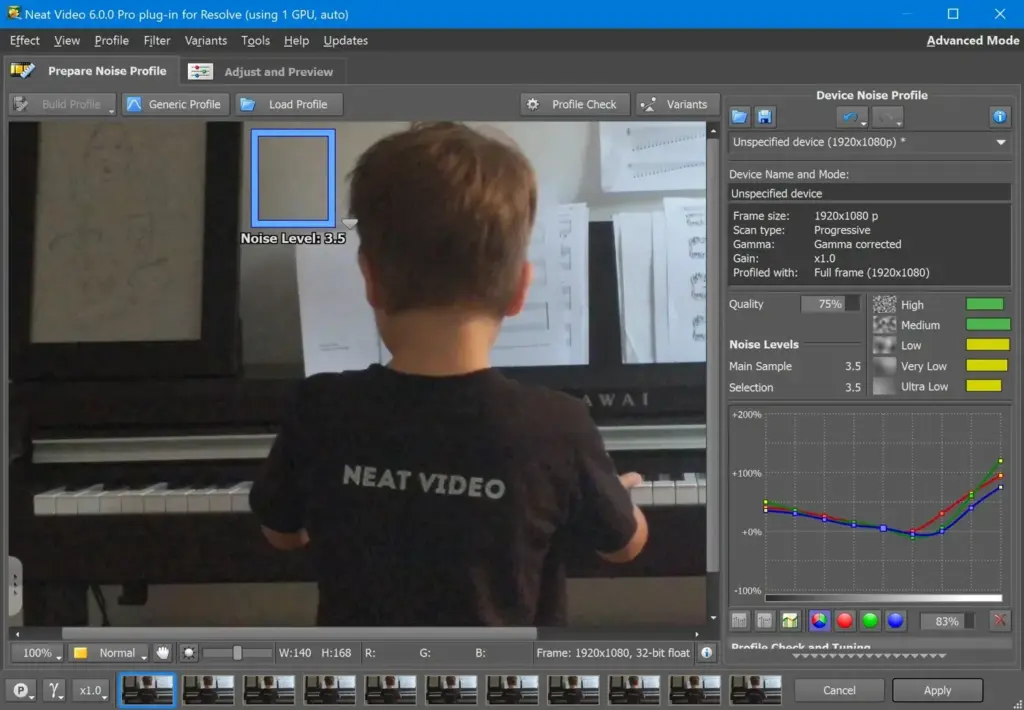
This neat video review finds the benchmark plug-in for removing noise from video. It profiles the noise in your footage, then filters across time and space while preserving detail. It works inside major editors and compositors, and suits anyone shooting in low light, though it costs extra and needs a capable GPU.
Verdict From This Neat Video Review
Neat Video does one job and does it extremely well: it removes noise from video. Noise appears when you shoot at high ISO, in dim rooms, with older cameras or when lifting shadows in grading, and the plug-in cleans it while keeping texture and edges.
It works by analyzing a clean patch of footage to build a noise profile, then filtering in both space and time. Using neighboring frames lets it separate random noise from real detail far better than a simple blur, which is why professionals rely on it for corporate, documentary and wedding work.
It is a plug-in, not an editor, and it needs a supported host such as Premiere Pro, After Effects, DaVinci Resolve, Final Cut Pro or others. It is also an extra cost, so the question is whether your footage warrants it. If you regularly shoot in poor light, the answer is usually yes.
Performance and Quality
Quality is the headline. When the profile is good, noise falls away while skin, fabric and edges stay natural, and motion is handled with care. Speed depends heavily on the graphics card, since the plug-in can use GPU acceleration, and processing 4K footage on a modest graphics card can be slow. Rendering is the main cost, so many editors apply it to final clips only, or render a cleaned version of problem shots. Plug-in stability is good, though host software versions and driver updates occasionally need attention.
Key Features
Noise Profiling
The plug-in analyzes a flat, uniform area of a frame to measure the noise pattern of your specific camera and settings. A good profile is the foundation of the result. The origin of that grain is explained in photon shot noise and read noise and banding.
Temporal and Spatial Filtering
Temporal filtering compares neighboring frames to separate noise from detail, while spatial filtering smooths within each frame. Combining them gives a cleaner picture than either alone. It works best on static or slowly moving subjects, and settings can be tuned for fast action.
Fine Controls
Separate sliders for luminance and chroma noise, high, mid and low frequency control, and sharpening let you shape the result. The plug-in offers presets for common cameras and situations, and you can save your own profiles for repeated use.
Host and Format Support
It runs inside many editors and compositors, and works with a range of formats and bit depths. Footage shot in log gamma benefits from cleaning before grading, a topic covered in log footage. Higher bit depth footage, as in 8-bit versus 10-bit video, holds up better after noise reduction.
GPU and Multi-Core Acceleration
Support for graphics cards and multiple processor cores speeds up processing considerably. A tuning tool helps find the best settings for your hardware. Faster hardware is the best way to reduce render times on high-resolution projects.
Learning Curve
The basic workflow is simple: place the effect, prepare the profile, adjust the strength and preview. Getting the best out of it takes practice, because over-filtering gives a waxy look and under-filtering leaves grain. Start at moderate settings, zoom in to check detail on skin and hair, and compare against the original. Most editors find a good routine after a handful of clips.
Where It Fits in a Workflow
Apply noise reduction early, before sharpening, heavy contrast and color grading, since those steps amplify noise. In many editors that means adding it to a clip or an adjustment layer at the start of the effects chain. Some users prefer to denoise problem clips in a separate pass and render them out, which keeps timeline playback smooth. Grading tools are covered in Lumetri color basics.
Prevention Still Matters
No plug-in replaces good exposure. Shooting at a lower ISO, using faster lenses and following ideas such as exposing to the right will reduce noise at the source. Neat Video is best treated as a rescue and polish tool, one that lets you shoot in difficult light and still deliver clean results.
Built-In Alternatives
Several editors include their own denoisers. They are convenient and often good enough for light grain, but dense noise in dark areas usually reveals the gap. Compare them on your own footage with the same clip before paying, since results depend on the camera and lighting.
Practical Tips For Cleaner Results
Choose a flat, evenly lit area with no detail when building the noise profile, and make sure it is large enough for the plug-in to measure reliably. Re-profile when the lighting or camera settings change, because one profile rarely fits every clip. Check the result at full size, in motion, before committing a render. Finally, keep the original footage untouched so you can return to it if a client wants a grittier look than the cleaned version delivers.
Pricing
Neat Video is sold as a paid license, typically with separate editions for home, standard and pro use, and with versions for specific host applications. A free demo version is usually available that adds a watermark, so you can test it on your own clips before buying.
Editions, host support and upgrade terms change, so check the vendor site for current pricing. Because it is a one-off purchase rather than a subscription in most cases, it can be cost-effective for people who regularly handle noisy footage, while occasional users may find the price hard to justify.
Pros and Cons
What Works Well
- Class-leading noise removal that preserves detail
- Works inside many major editors
- Temporal and spatial filtering with fine controls
- Reusable profiles and presets
- GPU acceleration speeds up rendering
What Holds It Back
- Extra cost on top of your editor
- Slow rendering on weaker hardware
- Over-filtering gives a waxy look
- Needs a good noise profile to shine
Who It Is For
It suits videographers who shoot in low light, event and wedding filmmakers, documentary makers and anyone working with older or small-sensor cameras. It is also valuable for editors who rescue footage they did not shoot themselves.
If you mainly shoot in bright light at base ISO, or you only need a touch of grain removal, your editor’s built-in tool may be enough. For anyone who does need more, the demo is a low-risk way to confirm the gain. Understanding the trade-off between sensitivity and grain, as explained in ISO explained, also helps you decide how much cleaning your footage will need.
Alternatives
Noise reduction is available in several forms.
| Alternative | Best Reason To Pick It |
|---|---|
| DaVinci Resolve Studio noise reduction | Built-in temporal and spatial denoise in a full editor |
| Adobe Premiere Pro tools | Basic built-in options for light noise |
| Topaz Video AI | AI-based denoise and upscaling |
| Red Giant and other plug-ins | Alternative filters with different styles |
For heavy noise, Neat Video remains the reference point. For light grain, check what your editor already provides first.
Common Questions
What does Neat Video do?
It removes noise and grain from video by profiling the noise and filtering across space and time.
Which editors does Neat Video work with?
It supports many hosts, including Premiere Pro, After Effects, DaVinci Resolve and Final Cut Pro. Check the vendor site for the current list.
Is Neat Video free?
No. A demo version lets you test it with a watermark, and full use needs a paid license.
Does Neat Video make video look soft?
It can if overused. Moderate settings and a good noise profile keep detail while removing grain.
Try It Yourself
See what it can do on your own photos and footage.
Some links are affiliate links: if you buy through them we may earn a small commission at no extra cost to you. How this works.