
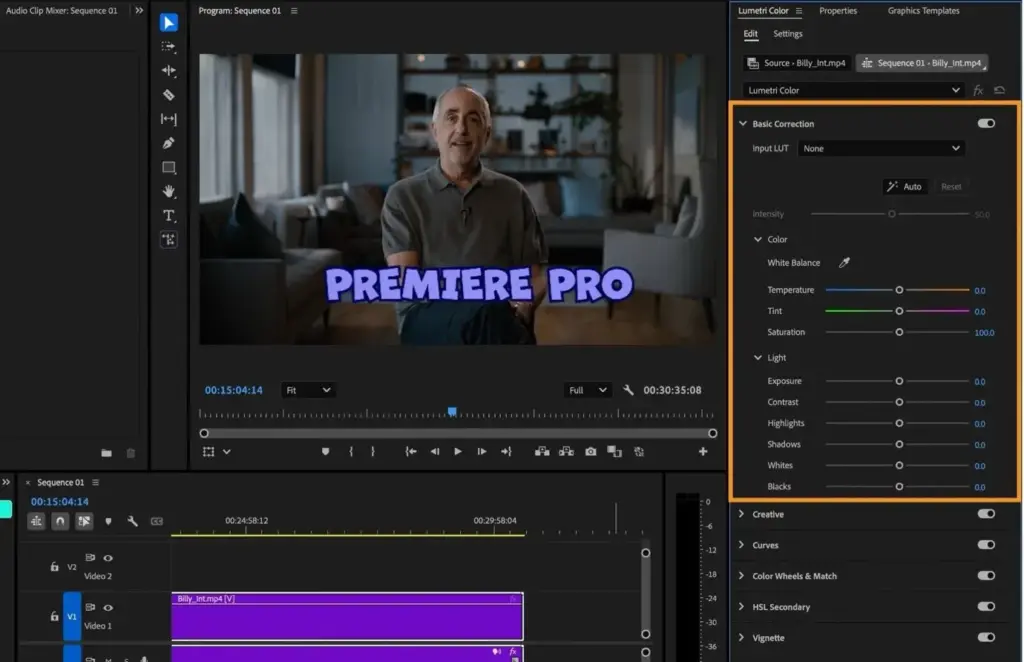
Lumetri Color is the main color correction panel in Adobe Premiere Pro. Its Basic Correction section handles white balance, exposure, contrast, highlights, shadows and saturation in one place, and working through the controls from top to bottom gives a consistent, balanced starting point before any creative grading.
Why It Matters
Footage rarely arrives looking right. Different cameras, light sources and settings create clips with mismatched brightness and color, and a scene cut together from several clips looks amateur until those differences are fixed.
Lumetri Color gives you a fast, visual way to correct footage inside the editor, without sending clips to a separate program. A simple, repeatable order of adjustment saves time and produces matching shots.
Beginner Lumetri Color Basic Correction For Beginners
Open the Color workspace, select a clip on the timeline and look at the Lumetri Color panel. The sections are Basic Correction, Creative, Curves, Color Wheels and Match, HSL Secondary and Vignette. As a beginner, stay in Basic Correction first. It follows a logical order: set the input, balance the color, then adjust tone.
Controls In Basic Correction
- Input LUT and HDR white point let you apply a conversion for log footage or set the white level for HDR work.
- White Balance has a dropper and Temperature and Tint sliders to remove color casts.
- Tone has Exposure, Contrast, Highlights, Shadows, Whites and Blacks to set brightness and contrast.
- Saturation changes the overall color strength.
- The Auto button gives a quick starting point you can refine.
What Each Tone Slider Does
| Slider | Affects | Use It To |
|---|---|---|
| Exposure | Overall brightness | Set the midtones so the subject looks right |
| Contrast | Difference between dark and bright areas | Add punch or flatten a harsh clip |
| Highlights | The bright part of the image | Recover detail in skies or windows |
| Shadows | The dark part of the image | Open up detail in dark areas |
| Whites and Blacks | The very top and bottom of the range | Set the brightest and darkest points |
A Reliable Order Of Work
- Apply the correct input LUT first if the footage was shot in a log profile.
- Use the white balance dropper on something that should be neutral gray or white, then fine-tune Temperature and Tint.
- Set Exposure so the subject looks natural, then adjust Contrast to taste.
- Pull Whites and Blacks so the brightest highlights and deepest shadows sit near the ends of the scale, checking with the scopes.
- Adjust Highlights and Shadows to recover detail, then set Saturation last.
Common Mistakes
- Starting with saturation before fixing exposure and white balance, which leads to chasing color all over again.
- Judging color on an uncalibrated or too-bright screen and getting mismatched results on other displays.
- Pushing Highlights and Shadows too far, which gives a flat, muddy HDR-like look.
- Correcting each clip separately without comparing it to its neighbor on the timeline.
A Worked Example
Say an interview clip looks blue and a little dark. Click the white balance dropper on a gray wall, which pulls the whole image toward neutral. Raise Exposure slightly until the face is bright enough, then lower Highlights to keep the window from clipping. The clip now looks natural, and you have changed only a few sliders in a clear sequence.
Correct First, Grade Second
Color correction fixes technical problems so the image looks right. Color grading is the creative choice that follows, such as a warmer or moodier look. Keep them separate. When a clip is corrected first, grading tools behave predictably and a look applied to many clips lands in the same place. Many editors do the correction in Basic Correction and the grade in the Creative panel or with a look on an adjustment layer.
Matching Shots In A Scene
Put two clips side by side and compare skin tone, overall brightness and the color of whites. Fix the clip that looks wrong and copy its settings to others with paste attributes where it helps. Do not aim for pixel-identical clips, since light does change in real scenes. Aim for natural continuity that the viewer never notices.
Why The Order Matters
Controls interact. White balance changes the relative strength of red, green and blue, which shifts apparent brightness, and exposure changes how much room the highlights have left. If you set saturation first and then correct white balance, the color you carefully adjusted moves again. Working from input to white balance to tone to saturation means each step builds on a stable base, and you spend less time undoing earlier moves. It also makes your results repeatable across a project, so a client revision rarely forces a full redo.
Handy for this: Monitor Calibrator — colors you can trust. (affiliate link)
Advanced Accuracy, Scopes And Efficient Habits
Use Scopes, Not Just Your Eyes
Your eyes adapt to what is on screen, so a clip that looks fine can still be clipped or off in color. The waveform shows brightness from black to white and the vectorscope shows hue and saturation. Learn to read them with the Lumetri scopes lesson. A skin tone should lie along the skin tone line on the vectorscope, and highlights should not flatten at the top of the waveform.
Working With Log And LUTs
Log footage looks flat by design because it preserves dynamic range. A technical conversion LUT in the Input LUT slot brings it into a normal range, after which you correct as usual. Read log footage and LUTs explained for the reasoning. Apply creative looks after correction, and reduce their strength if they clip or shift skin tones.
Bit Depth And Headroom
Heavy changes to 8-bit footage can cause banding in skies and gradients, because there are fewer tonal steps to stretch. Ten-bit footage tolerates larger corrections. The differences are covered in 8-bit versus 10-bit video. When correcting 8-bit clips, make smaller moves and avoid stacking several strong adjustments one after another.
Speed With Adjustment Layers And Presets
Rather than adding Lumetri to every clip, place it on an adjustment layer for a whole scene, then correct individual clips only when they differ. Save useful settings as Lumetri presets, and use Color Match to get a head start when several clips have to share a look. For isolating a face or sky, see masking and tracking. A tidy structure makes later changes quick and consistent.
Try It
- Place two clips from different cameras side by side and open Lumetri Color.
- Correct white balance first, then exposure, then contrast, on the first clip.
- Match the second clip to the first, using the waveform to compare brightness.
- Add a creative look on an adjustment layer and compare with and without it.
Common Questions
Is Lumetri Color the same as color grading?
It is the tool for both. Basic Correction fixes technical problems, while the Creative, Curves, Color Wheels and HSL Secondary sections handle stylistic grading.
What should I adjust first in Lumetri?
Apply the input LUT if needed, then set white balance, then exposure and contrast. Saturation and creative changes come last.
Why does my footage look flat?
It may be shot in a log or flat picture profile. Apply the right conversion LUT or adjust contrast and saturation to bring the image into a normal range.
Can I apply one correction to several clips?
Yes. Copy and paste attributes, save a Lumetri preset, or place the effect on an adjustment layer that covers all the clips.
Related Lessons
- Lumetri Scopes for accurate checking of brightness and color.
- Premiere Color Match for fast matching between clips.
- Log Footage to learn why flat clips need conversion.
- LUTs Explained for looks and conversions.
- Adjustment Layers In Premiere to correct many clips at once.
Gear That Helps With This
Hand-picked kit that makes this lesson easier to put into practice.
Some links are affiliate links: if you buy through them we may earn a small commission at no extra cost to you. How this works.