
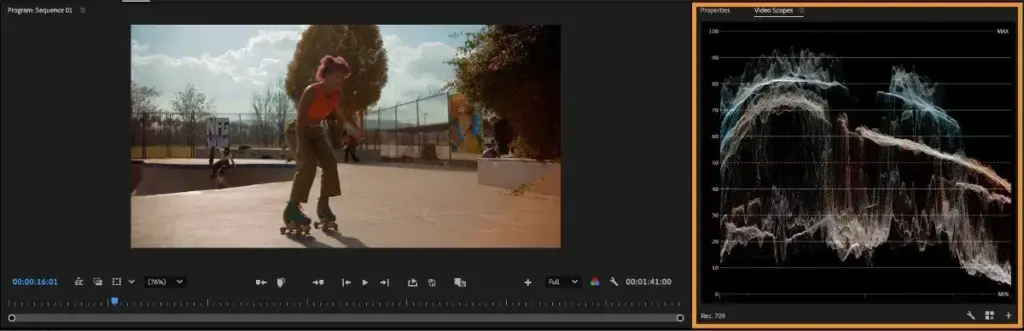
Lumetri scopes are graphs in Premiere Pro that measure the brightness and color of your video objectively. The waveform shows exposure, the vectorscope shows hue and saturation, the histogram shows tonal distribution and the RGB parade shows color balance, so you can grade accurately even when your monitor is not perfect.
Why It Matters
Your eyes adapt, and monitors vary, so a shot that looks fine on one screen can look dark or tinted on another. Scopes give numbers and shapes that do not change with room lighting or screen settings.
They also save time. A single glance at the waveform shows clipped highlights or crushed blacks, and the vectorscope shows a color cast immediately, so you fix problems before they reach the viewer.
Beginner Reading Lumetri Scopes In Premiere Pro
Open Window, then Lumetri Scopes, or switch to the Color workspace. Right-click the panel to choose which scopes to show and set the scale to 8-bit or float. The waveform is the most useful for exposure, with the scale running from 0 at the bottom for pure black to 100 for the brightest white, or 0 to 255 in 8-bit mode. Image brightness is plotted left to right to match the frame, so you can see where in the picture each tone sits.
The Main Scopes
- Waveform: shows luminance across the frame, used to set black and white points.
- RGB Parade: shows red, green and blue separately side by side, used to spot color casts.
- Vectorscope YUV: shows hue and saturation in a circle with a skin tone line.
- Histogram: shows how many pixels exist at each brightness level.
- Audio meters are separate, and not part of the color scopes.
What To Look For
| Scope | Healthy Sign | Warning Sign |
|---|---|---|
| Waveform | Tones between about 5 and 95 with a clean range | Flat line at the top (clipped) or at the bottom (crushed) |
| RGB Parade | Red, green and blue levels similar in neutral areas | One channel clearly higher or lower |
| Vectorscope | Skin tones along the skin line | Skin tones off the line, or a mass far from the center |
| Histogram | Spread across the range with no pile at the edges | Spikes at the left or right edge |
| Waveform in HDR | Highlights matching the nits target | Peaks above the mastering limit |
A Quick Grading Routine With Scopes
- Open the Lumetri Color panel and the waveform scope side by side.
- Adjust exposure and contrast until the darkest areas sit near 0 to 5 and the brightest near 95 to 100 without flat tops.
- Check the RGB parade on a neutral object and balance temperature and tint until the three channels align.
- Use the vectorscope to confirm skin tones sit near the skin tone line, and reduce overall saturation if the trace goes beyond the outer boxes.
- Compare shots in a sequence by checking that each waveform looks similar.
Common Mistakes
- Grading only by eye on an uncalibrated monitor.
- Setting white to 100 on every shot even when the scene has no true white.
- Raising saturation until the vectorscope touches the edge, which makes color look artificial.
- Forgetting that scopes show the current frame, so each shot should be checked on its own.
A Worked Example
A clip looks slightly blue. The RGB parade shows blue higher than red across the whole frame, and the vectorscope trace leans toward the blue area. Increasing warmth in the Basic Correction section brings the channels together, and the skin tone moves back to the diagonal line. The picture now looks neutral without guessing, which would be difficult by eye alone.
Understanding The Waveform Shape
Wide, dense areas show large regions of similar brightness, such as a sky or a wall. Narrow lines show small details. Bright windows appear as peaks at the top, and shadows as dense areas near the bottom. Learning to match shapes to image regions makes the waveform nearly as readable as the picture itself.
Using Scopes On Log Footage
Log footage looks flat, and its waveform sits in a narrow band with highlights well below 100. This is normal, and the scopes help confirm that the recording has full information. After a conversion or an adjustment, the waveform should expand to fill the usable range.
Calibrating Trust In Your Display
Scopes do not replace a good display, they check it. Compare what the waveform says with what you see: if a shot looks bright but the waveform sits low, your monitor may be too bright. Over time you learn how your screen relates to the numbers and begin to trust both. Reference a known test chart or well-exposed footage occasionally to confirm that your grading environment has not drifted.
Scopes In Everyday Editing
You do not need to grade a film to benefit. For a simple interview, check that faces sit around 60 to 70 on the waveform, that the background does not clip, and that every camera angle matches. Two minutes with the scopes at the start of the edit prevents mismatched shots and saves repeated fixes later when the project is nearly finished.
Common Reading Mistakes
A trace that touches 100 is not always bad, since a small specular highlight can reach the limit. Likewise, a vectorscope trace that spreads far from the center can be natural in a colorful scene. Judge scopes in context: look at the image, then use the graph to confirm or question what you see rather than following the numbers blindly.
Handy for this: Fast Wide-Angle Lens — gather more starlight. (affiliate link)
Advanced Beyond The Basics
Waveform Types And Luma Versus RGB
You can set the waveform to show luma, RGB, YC or YC without chroma. Luma is the best choice for pure brightness, and YC with chroma shows how color adds to brightness. Switching types makes it easier to detect legal range problems, which is important for broadcast. Compare with video scopes for the general concepts that apply across programs.
Matching Shots And Scenes
Place the waveforms of two clips next to each other to make them match, then tweak the color. This workflow is the base of color matching in Premiere and fast scene continuity. For repeatable results see Lumetri color basics, and apply corrections across many clips with adjustment layers.
Gamma, Log And Color Spaces
Scopes read the values in the working color space. If a conversion is wrong, the waveform will look wrong, and a correct reading is only possible when the footage is interpreted correctly. See log footage, exposing log and LUTs explained for the flow from flat footage to a finished look.
Delivery Limits
Broadcast rules limit the signal range, and platforms may clip values beyond them. Keep highlights below the legal limit if required, and check saturation on the vectorscope. Export settings are in Premiere export settings, where the color space and range are defined at the end of the process.
Try It
- Open a clip in the Color workspace and show the waveform and RGB parade.
- Adjust exposure until blacks and whites sit within the range without clipping.
- Fix a color cast by aligning the RGB parade on a neutral object.
- Place the vectorscope on screen and check skin tones against the skin line.
Common Questions
What does the waveform show in Premiere Pro?
It shows luminance across the frame, so you can judge exposure, contrast and clipping objectively.
Why use a vectorscope?
It shows hue and saturation, so you can check skin tones, color casts and saturation limits.
What is the RGB parade for?
It displays red, green and blue levels side by side, which makes color casts obvious.
Do I still need a calibrated monitor?
A calibrated monitor still helps, but scopes give a reliable measurement even when the display is imperfect.
Related Lessons
- Video Scopes for the general concepts behind each scope.
- Lumetri Color Basics to apply what scopes show.
- Premiere Color Match to match shots.
- Log Footage to read flat footage correctly.
- Exposing Log to record clean log footage.
Gear That Helps With This
Hand-picked kit that makes this lesson easier to put into practice.
Some links are affiliate links: if you buy through them we may earn a small commission at no extra cost to you. How this works.