
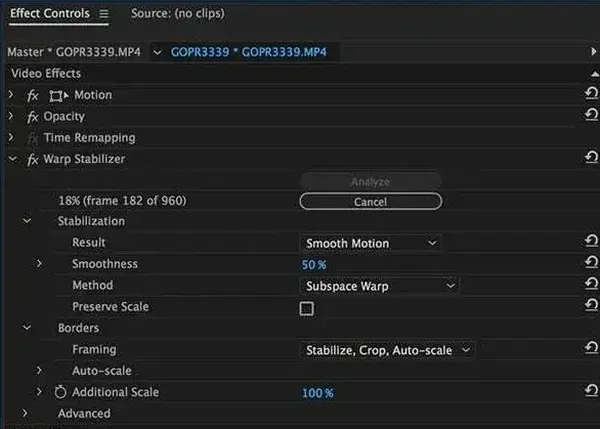
Warp Stabilizer is an effect in Premiere Pro and After Effects that analyzes shaky footage and smooths its movement by warping and cropping the frame. It can turn bumpy handheld clips into steady shots, but it works best on modest shake and can cause wobbling or crop if pushed too far.
Why It Matters
Handheld footage has natural bumps from walking, breathing and unsteady hands. A tripod or gimbal prevents this, but you will not always have one. A software stabilizer can rescue clips that would otherwise be unusable.
Using it well means knowing when it helps and when it hurts. The effect changes the image by scaling and distorting frames, so it is not a free fix, and understanding its settings helps you keep quality.
Beginner Using The Warp Stabilizer Effect
Find the effect in the Effects panel under Video Effects, then Distort. Drag it onto a clip, and Premiere starts analyzing automatically.
Basic Steps
- Place the clip on the timeline and select it.
- Apply Warp Stabilizer from the Effects panel.
- Wait for analysis in the background, shown by a banner on the picture, then stabilizing.
- Play the clip, and check the edges and any wobbling.
- Adjust smoothness or switch the result type if needed.
Key Settings
| Setting | What it does |
|---|---|
| Result: Smooth Motion | Keeps natural camera movement but smooths it |
| Result: No Motion | Tries to lock the frame in place |
| Smoothness | Percentage of smoothing, higher means more |
| Method | Position, Position Scale Rotation, Perspective, or Subspace Warp |
| Framing | Stabilize only, Stabilize and Crop, or Crop and Auto-Scale |
| Auto-Scale | Maximum amount of zoom allowed |
Choosing Smooth Motion Or No Motion
- Smooth Motion is the default and works for walking shots, pans and moving subjects.
- No Motion suits static shots that should have been on a tripod, such as an interview or a landscape.
- Increase smoothness above 50 percent for stronger smoothing, but expect more cropping.
Common Mistakes
- Applying it to very shaky or blurry footage, which produces strange warping.
- Leaving Subspace Warp on for clips with a lot of movement, causing wobble.
- Forgetting that it crops the frame, which lowers resolution.
- Using it for footage with fast moving subjects that confuse the analysis.
A Quick Practice
Record a ten-second handheld clip while standing still, and apply the effect with Smooth Motion at the default settings. Then try No Motion and compare how the picture behaves.
Handy for this: Camera Gimbal — smooth handheld footage. (affiliate link)
Advanced Advanced Settings, Rolling Shutter And Alternatives
Methods Explained
Position removes only horizontal and vertical movement, which keeps the image natural but corrects less. Position, Scale and Rotation adds those corrections and handles most handheld shake. Perspective applies corner pinning for more complex corrections. Subspace Warp, the default, bends different areas of the frame separately for the strongest stabilization, but can introduce warping on scenes with strong depth. If you see wobbling, switch to a simpler method.
Rolling Shutter Reduction
CMOS sensors read the image line by line, so quick movement can cause a jelly-like wobble. Warp Stabilizer includes a rolling shutter ripple option, set to automatic reduction by default, which can reduce it. If the footage already has severe rolling shutter, it may need extra correction first. Learn the cause in rolling shutter and consider electronic shutter limits.
Framing And Crop Choices
Stabilize, Crop, Auto-Scale zooms the picture to remove empty edges created by the movement. Stabilize Only leaves the edges, which may show black or repeating areas. The auto-scale slider limits how much zoom is allowed, and large values may reduce sharpness. If you know you will need to stabilize a shot, frame a little wider than needed and shoot at a higher resolution, such as 4K for a 1080p delivery. That gives space to crop without losing quality.
Better Shooting Reduces The Need
The best stabilization is done in the camera. Use a lens or body with image stabilization, hold the camera close to your body, bend your knees while walking, and use a strap or a gimbal for moving shots. Shoot at a shutter speed that does not add blur, as software cannot remove motion blur. Read image stabilization, steady walking shots, gimbal basics and handheld video.
Other Stabilization Tools
After Effects has its own Warp Stabilizer and a tracker based method for locking footage. DaVinci Resolve offers stabilization in its edit and color pages, and Filmora has a stabilization feature for quick use. Compare options in After Effects stabilization, Filmora stabilization and stabilizing without a tripod. For tripod footage, see stabilization on a tripod.
Performance And Workflow
Analysis takes time, especially on 4K clips. Let it finish before editing, and consider applying stabilization after cutting the clip, so you do not analyze unused footage. If playback is slow, render the clip or use proxies. See Premiere render preview. Nest the clip first if you need to apply other effects before or after the stabilizer, as covered in nested sequences.
Preparing Clips For Better Stabilization
Trim the clip to the section you need before applying the effect, since analysis time grows with length. Avoid stabilizing clips with a lot of subject movement filling the frame, because the software may confuse the subject’s movement with camera shake. If a person walks across a shot while you pan, try Position, Scale and Rotation and a lower smoothness value. Clips with large areas of sky, water or blank walls are harder to analyze because there are few features to track, so expect less stable results.
Fixing Common Warp Stabilizer Problems
- If you see an “unable to stabilize” message, the footage may be too blurry or have too few features. Try a different clip portion or another tool.
- If the frame breathes in and out, the auto-scale is changing. Set a fixed framing method or lower the smoothness.
- If edges show black, use Stabilize, Crop, Auto-Scale or increase the maximum scale.
- If the clip plays back slowly, wait for analysis to finish and render the preview before judging the result.
When Not To Stabilize
Some movement is part of the look. A slightly shaky camera can add urgency to action or documentary scenes, and over-smoothing can make footage feel artificial, like a floating camera. Stabilize enough to remove distracting bumps, and leave natural motion. Decide based on the story, not only on the technical result.
Try It
- Apply Warp Stabilizer to a handheld clip and wait for the analysis to finish.
- Compare Smooth Motion and No Motion results.
- Try Position, Scale and Rotation instead of Subspace Warp and watch for warping.
- Lower the Auto-Scale limit and see how the framing changes.
Common Questions
What does Warp Stabilizer do?
It analyzes camera movement in a clip and corrects it by moving, scaling and warping frames, producing smoother footage.
Why does my footage look wobbly after stabilizing?
Subspace Warp can distort scenes with depth or fast movement. Switch the method to Position, Scale and Rotation, or reduce smoothness.
Does Warp Stabilizer reduce quality?
It usually crops and scales the image, which reduces resolution slightly. Shooting at a higher resolution than your delivery size helps.
Can it fix very shaky footage?
Not completely. Severe shake and motion blur produce artifacts. It is best for moderate handheld movement.
Related Lessons
- Rolling Shutter to understand wobble in fast movement.
- Steady Walking Shots to shoot smoother footage.
- Gimbal Basics for in-camera stabilization.
- After Effects Stabilize for another approach to locking footage.
- Premiere Timeline Basics to work comfortably with clips and effects.
Gear That Helps With This
Hand-picked kit that makes this lesson easier to put into practice.
Some links are affiliate links: if you buy through them we may earn a small commission at no extra cost to you. How this works.