
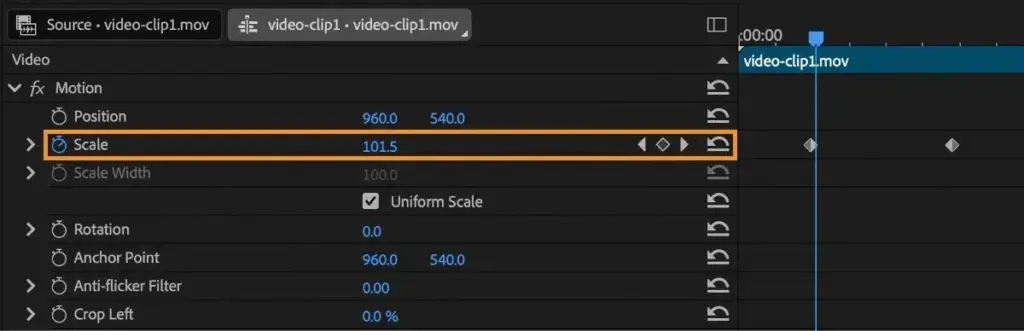
Premiere keyframes are markers on a clip that store a property value at a specific time, so Adobe Premiere Pro can animate the change between them. You can animate position, scale, rotation, opacity, audio level and effect settings, and use easing to make the motion start and stop smoothly instead of moving at a constant speed.
Why It Matters
Keyframes are the basis of almost every animation in video editing, from a slow push-in on a photo to a title that slides into place or music that fades under dialogue.
Plain keyframes move at a steady pace, which looks mechanical. Learning to ease them gives motion a natural weight and makes simple edits look professional.
Beginner Premiere Keyframes For Beginners
A keyframe is a snapshot of a value at one moment. If you set scale to 100 at the start and 120 at the end, Premiere fills in the values between them, creating a slow zoom. Each animatable property has a stopwatch icon in the Effect Controls panel that turns on keyframing.
Adding A Keyframe
- Select the clip and open the Effect Controls panel.
- Move the playhead to where the animation should begin.
- Click the stopwatch beside Scale, Position or Opacity to enable keyframes.
- Move the playhead to the end point and change the value. A second keyframe appears.
- Play the clip to see the motion.
Common Properties To Animate
| Property | Typical Use |
|---|---|
| Scale | Slow zoom into a still or a shot |
| Position | Slide a title or logo into place |
| Rotation | Spin or tilt a graphic |
| Opacity | Fade a clip or graphic in and out |
| Audio level | Dip music under speech |
Smoothing The Motion
Right-click a keyframe and choose an interpolation type. Ease In slows the start of a move, Ease Out slows the arrival, and Bezier gives handles for fine control. Linear keeps a constant speed, and Hold keeps the value until the next keyframe, which is useful for sudden changes. Apply Ease In and Ease Out to almost every position or scale move to avoid a robotic look.
Quick Tips
- Use fewer keyframes. Two or three often give a cleaner move than many.
- Use shift-drag or the arrow keys to nudge keyframes by whole frames.
- Zoom in on the timeline in the Effect Controls panel so you can place keyframes exactly.
- Copy and paste keyframes between clips to keep moves consistent.
Common Mistakes
- Forgetting to turn on the stopwatch, so changes apply to the entire clip.
- Changing the value at the wrong time and creating an extra keyframe.
- Leaving all keyframes linear so the motion starts and stops abruptly.
- Animating position so quickly that the viewer cannot read the title.
Planning An Animation
Before adding keyframes, decide where the motion starts, where it ends and how long it takes. Short moves of about half a second suit small graphics. Long camera-style pushes on stills often last the full length of the clip. Write the start and end values on paper if you need to match several clips.
Handy for this: Fast Wide-Angle Lens — gather more starlight. (affiliate link)
Advanced Interpolation, Graphs And Control
Temporal And Spatial Interpolation
Temporal interpolation controls how a value changes over time, which determines speed. Spatial interpolation controls the shape of a motion path, such as a curved or straight route for position. Position keyframes show a path in the Program Monitor, and you can drag the handles to bend it. A curved path feels more organic than a straight line between two points.
Using The Value And Speed Graphs
Expanding a property in the Effect Controls panel reveals a graph. The value graph shows the property over time, while the speed graph shows how fast it changes. Dragging a Bezier handle changes the acceleration. A steep line at the beginning and a gentle slope at the end gives a fast start with a soft landing. After Effects uses a similar editor, described in After Effects graph editor, and the principles transfer to both programs.
Easing For Different Moods
- Slow in and fast out suits an item leaving the frame.
- Fast in and slow out suits a graphic arriving and settling.
- Symmetrical easing suits a gentle zoom on a still image.
- Hold keyframes make cut-like jumps for stylized animation.
Speed, Frame Rate And Motion Blur
Fast motion at a low frame rate can look choppy because the eye sees gaps between frames. Motion blur, from a normal shutter angle, helps hide this, and some effects can add synthetic blur, such as the Transform effect. Premiere’s basic motion controls do not add blur by themselves. Understand how shutter angle affects movement in shutter angle.
Keyframing Effects And Audio
Most effects, such as Lumetri color, Gaussian Blur and Crop, can also be keyframed. In the audio, you can use the rubber band on the clip or the Audio Clip Mixer to set levels over time. See Premiere audio keyframes for ducking and fades. Animated adjustments can reveal a color grade gradually or blur a face only during part of a shot.
Working Efficiently
- Group related changes onto an adjustment layer, covered in adjustment layers in Premiere, so one set of keyframes affects many clips.
- Save common animations as presets through the Effects Presets features, as in Premiere effects presets.
- Use nested sequences to animate a group of clips as one object.
- Check the result at full size, since small jitter is easy to miss in a reduced preview.
Final judgment comes from playing the move back at full speed several times. If the move distracts from the picture, shorten it, ease it more, or remove it. Subtle motion is usually better than large motion.
Try It
- Place a still photo on the timeline and set the clip duration to 6 seconds.
- Enable the Scale stopwatch at the start and set 100. At the end, set 115.
- Right-click both keyframes and apply Ease In and Ease Out, then play the result.
- Open the graph, adjust the handles to change how the zoom starts and settles, and compare with the linear version.
Common Questions
Why are my keyframes jumping instead of moving smoothly?
You may have Hold keyframes, or the first keyframe is missing. Right-click each keyframe and choose Linear, Ease In or Bezier, and check that the stopwatch is on.
How many keyframes do I need for a slow zoom?
Two are enough: one at the start and one at the end. Add easing so the start and end of the zoom are not abrupt.
Can I copy keyframes from one clip to another?
Yes. Select the keyframes in Effect Controls, copy them and paste onto another clip with the playhead at the starting point. You can also copy the whole effect.
What is the difference between Ease In and Ease Out?
Ease In slows a change as it approaches a keyframe and Ease Out slows it as it leaves one. Using both gives a gentle start and finish.
Related Lessons
- Premiere Timeline Basics to get around clips and tracks while animating.
- Premiere Audio Keyframes for fades and ducking with the same idea.
- After Effects Graph Editor for deeper control of easing curves.
- Premiere Speed Ramping to change clip speed with keyframes.
- Essential Graphics for animating titles and lower thirds.
Gear That Helps With This
Hand-picked kit that makes this lesson easier to put into practice.
Some links are affiliate links: if you buy through them we may earn a small commission at no extra cost to you. How this works.