
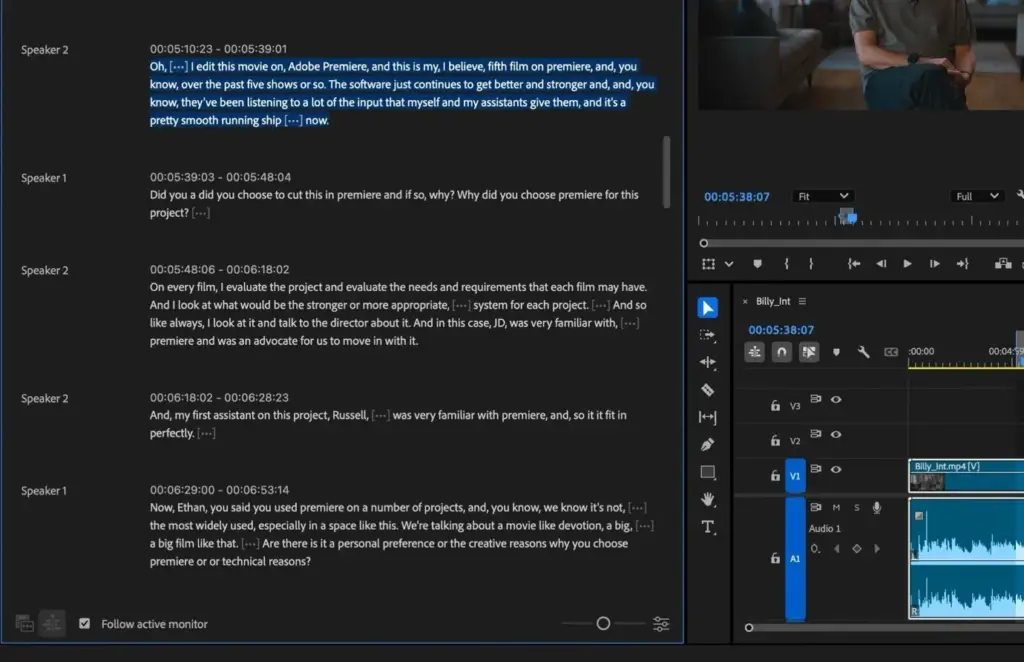
Text-based editing is a method of cutting video by working on its transcript. In Premiere Pro, you transcribe your footage, then select sentences, delete words or insert passages into the timeline, and the matching video and audio are cut for you, which makes rough cuts of interviews and talks very fast.
Why It Matters
Dialogue-heavy projects such as interviews, podcasts, tutorials and talking-head videos can take hours to cut by listening and scrubbing. Reading is faster than listening, so seeing the entire conversation as text lets you find the best lines in minutes.
It also brings editing within reach of people who think in words. A writer or producer can mark selects in the transcript, and an editor can finish the pacing, polish and picture work.
Beginner Text-Based Editing Basics
What You Need
– Premiere Pro with the text-based editing panel, or a workspace that includes it.
– Footage with clear, well-recorded speech.
– A project and a sequence set up with your clips.
Step By Step
Menu names can differ between versions, but the process is the same.
1. Open the Text-Based Editing workspace or the Text panel.
2. Choose Transcribe sequence or Transcribe a clip, select the language and start.
3. When it finishes, read the transcript and correct any wrong words.
4. Select text you want to keep and use Insert or Overwrite to place it in the timeline.
5. To remove a passage, select the text and delete it. The matching video and audio are removed, and the gap closes with a ripple delete.
6. Play the sequence and refine.
Cutting Pauses And Filler Words
The panel can detect pauses and common filler words such as um and uh. Review the list and delete them in one step, or tick only those that sound distracting. Leave a few natural pauses so the talk does not sound robotic.
Why It Is Faster
Instead of hunting through a timeline, you skim the transcript like a document. Highlight the strongest answers, drag them in order and look for repeated or off-topic sections to delete.
Common Mistakes
– Trusting the transcript and not listening to the cut result.
– Deleting too tightly so breaths and rhythm disappear.
– Cutting mid-word because the time stamp was slightly off.
– Forgetting to add cutaways to cover jump cuts.
Handy for this: Camera Gimbal — smooth handheld footage. (affiliate link)
Advanced Using Text-Based Editing In A Real Workflow
Prepare For A Better Transcript
Accuracy depends on audio quality. Record close to the speaker, reduce room echo and avoid overlapping voices. If a recording is noisy, clean it first with the tools in noise reduction or speech enhancement. For interview recording advice, see interview setup and room tone, since a recorded room tone also helps hide edit gaps.
Rough Cut, Not Final Cut
Treat the transcript cut as a rough assembly. It decides what is said and in what order, but not how the picture feels. After assembling, switch to the timeline for pacing, trimming, J-cuts and L-cuts, music and cutaways. The trim tools covered in trim tools and the layout basics in timeline basics are your next step.
Multi-Speaker Projects
For interviews with a host and a guest, use speaker labels in the transcript so each person’s lines are easy to find. For multiple cameras, combine text-based editing with multi-cam sequences, as described in multi-camera editing. Cut by transcript first, then switch angles to match who is speaking.
Marking Selects With Markers
As you read, add markers to the best quotes, and label them by theme. Later you can organize the sequence into sections such as introduction, problem, solution and conclusion. See markers for ways to track them and share notes with a team.
Combining With Captions
The same transcript can generate captions, so cutting the transcript before captioning avoids re-timing text. After editing, create captions from the edited sequence, which have the correct timing for the final cut. See Premiere captions for the steps and style settings.
Watching For Pitfalls
Because text edits ignore picture, always check cuts for jump cuts, mismatched backgrounds and clipped breaths. A cut between two sentences from different moments can change the speaker’s posture or voice tone abruptly. Cover those moments with B-roll, a zoom or a quick transition. If you work with b-roll, plan it with B-roll shooting in mind.
Version Control
Duplicate your sequence before big text edits, and name versions with dates and notes. This lets you go back to a fuller version if a client wants a deleted point restored.
Podcasts, Tutorials And Talks
Text-based editing is ideal for long speech-led content. For a podcast, transcribe the full recording and delete tangents, false starts and repeated explanations by selecting text. For a tutorial, move steps into the right order by dragging passages, then check that the on-screen actions still match the speech. For a conference talk, trim long pauses and filler words, and keep the speaker’s natural rhythm so the result still sounds like them.
Checking Audio After Every Pass
Deleting words can create clicks where two sounds meet. After each editing pass, play through the cuts and add short audio crossfades at any joins that pop. A fade of a few frames is usually enough. Level the dialogue so that cuts from different takes sound consistent, and add a light bed of room tone under any gap you have closed.
Handling Mistakes In The Transcript
Automatic transcripts misread names, brands and technical terms. Correct them in the text panel so that captions and search both work properly. If a word is wrong only in the transcript, your edit still follows the audio, so fix the spelling without moving the cut. When the speaker has a strong accent or the audio is poor, expect more errors and plan extra time to proofread.
Sharing The Rough Cut
A transcript-based assembly is easy to review with others. Export the text with your cuts to show a client or producer what remains, and ask for comments on the words, not the picture. Once the story is approved, lock the order and move on to visuals. This split keeps feedback focused and prevents endless re-cutting of the timeline.
Speed Tips
Learn the keyboard shortcuts for playing, selecting a sentence and deleting it, so you can move through a transcript without the mouse. Work in passes: first remove whole sections that do not belong, then tighten sentences, then handle pauses. Each pass makes the next faster and keeps you from fussing over details that will vanish later.
Limits To Remember
Text editing cannot see the picture, so it will not know when a speaker gestures at something or when a graphic is on screen. It also cannot judge emotion or comic timing. Keep those decisions for the timeline, where you can see and hear the result in context.
Try It
- Record or pick a three minute talking head clip and transcribe it in Premiere Pro.
- Fix any wrong words, then highlight the three best sentences and insert them in order.
- Run pause and filler word detection and delete only the distracting ones.
- Switch to the timeline and add cutaways over the jump cuts.
Common Questions
What is text-based editing?
It is editing video by working on a written transcript. Selecting or deleting text selects or removes the matching video and audio in the timeline.
Is text-based editing accurate?
It depends on audio quality and the language. Clear, close-miked speech gives good results, and you should always proofread and listen to the edit.
Can I remove um and uh automatically?
Yes. Premiere Pro can detect filler words and pauses so you can review and delete them. Keep a few natural pauses for a human sound.
Does text-based editing replace the timeline?
No. It is best for rough assembly of speech. You still use the timeline for pacing, transitions, music, graphics and fine trimming.
Related Lessons
- Premiere Captions for turning the transcript into subtitles.
- Premiere Trim Tools to refine cuts after the rough assembly.
- Premiere Timeline Basics for the layout you will return to.
- Premiere Markers to tag the best quotes.
- Interview Setup for recording clean dialogue to begin with.
Gear That Helps With This
Hand-picked kit that makes this lesson easier to put into practice.
Some links are affiliate links: if you buy through them we may earn a small commission at no extra cost to you. How this works.