
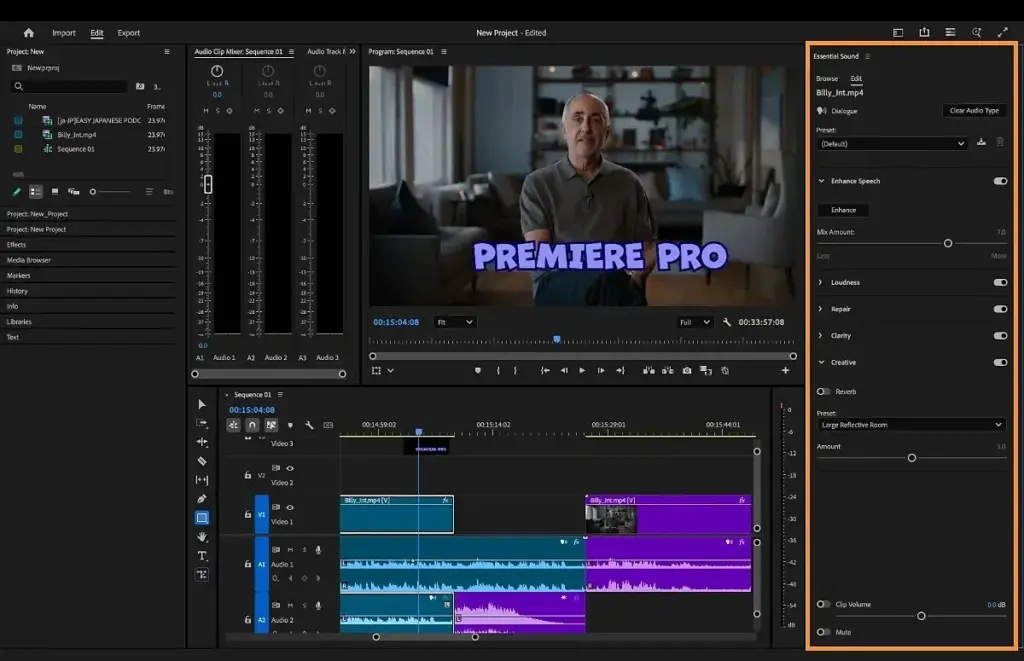
The Essential Sound panel is a Premiere Pro workspace panel that lets you tag each audio clip as dialogue, music, sound effects or ambience, then offers a matching set of simple controls for loudness, noise repair, clarity, ducking and volume. It gives a quick, consistent mix without needing a deep audio background.
Why It Matters
Many video projects need decent sound more than a perfect studio mix. Voices should be clear and at a steady level, music should sit under speech, and background noise should not distract. Doing this with separate effects takes time and knowledge.
The Essential Sound panel packages common audio tasks into one place. You pick a clip type, and Premiere shows the controls that matter for it. For short videos, interviews, tutorials and social posts it can save a lot of time while keeping the result tidy and predictable.
Beginner Using The Essential Sound Panel
Open The Panel
Choose Window, then Essential Sound, or switch to the Audio workspace. Select one or more clips on the timeline. The panel shows four tags: Dialogue, Music, SFX and Ambience.
Tag Each Clip
1. Select a voice clip and click Dialogue.
2. Select the music clip and click Music.
3. Select sound effects and click SFX.
4. Select room tone or background sound and click Ambience.
Tagging does not change the sound until you adjust settings. It tells Premiere which controls to show and how to treat the clip.
Dialogue Controls
– Loudness with an Auto-Match button that sets the clip to a consistent level.
– Repair with options for reducing noise, rumble, hum, reverb and harsh S sounds.
– Clarity with dynamics, EQ presets and speech enhancement.
– Creative for reverb effects.
– Volume for a final level change.
Music Controls
Music clips offer loudness matching, ducking, volume and a Duration option that remixes a track to fit a given length. Ducking lowers music under speech automatically, which saves many manual keyframes.
Basic Rules
– Tag every clip, so the mix stays consistent.
– Turn on one control at a time and listen.
– Do not stack strong repair settings, since they can make voices sound thin or watery.
Common Mistakes
– Using noise reduction at maximum, which creates a robotic tone.
– Leaving a music track untagged, so ducking is not available.
– Matching loudness before removing long pauses and clicks.
– Ignoring the meters while using headphones that hide problems.
Handy for this: Shotgun Microphone — clean, clear sound. (affiliate link)
Advanced A Dialogue And Music Workflow In The Essential Sound Panel
Order Of Work
Start by cleaning the edit: remove mistakes, long silences and loud pops. Then tag the clips and apply repair, because noise reduction works best on a clean file. Next apply Auto-Match loudness to the dialogue so all speakers sit at a similar level, then adjust the Volume slider for fine changes. Finally add music, tag it and turn on ducking. For general level ideas, read audio levels and audio for video.
Repair Settings In Practice
Reduce Noise removes steady hiss, such as air conditioning or camera preamp noise. Start at a low value, since 10 to 30 percent is often enough. Reduce Rumble cuts low frequency sounds from traffic or handling. DeHum removes mains hum from lights and electronics. DeEss tames sharp S sounds. Reduce Reverb helps with echoey rooms but cannot fix a very bad one. If you need more control, use the tools in Premiere audio noise reduction. Outdoor clips may also need help from wind noise fixes.
Clarity And EQ
The Clarity group includes Dynamics, EQ and Enhance Speech. Dynamics evens out loud and quiet words, EQ presets shape the tone, and Enhance Speech cleans a voice using processing in the software. Use these sparingly, and always compare with the effect switched off. A good test is to listen on laptop speakers and headphones to check that the voice is clear in both.
Ducking Music
In the Music tag, turn on Ducking and choose to duck against Dialogue clips. Set the amount, sensitivity and fade, then click Generate Keyframes. Premiere adds volume keyframes to the music track, which you can adjust by hand later. Learn more in auto-ducking and audio keyframes. Check the transitions, since fast fades sound abrupt and slow ones leave speech buried.
Loudness Targets
Loudness is measured in LUFS. Broadcast often needs about -23 LUFS, while many online videos aim for roughly -14 to -16 LUFS. Check the requirements of the platform you publish on, and use the loudness meter to confirm the finished mix. Peaks should stay below 0 dBFS with a small safety margin.
Mixing With The Timeline
Keep dialogue, music and effects on separate tracks. This makes it easier to see the structure and to apply different settings. For layout tips, see Premiere timeline basics. Use track mixers or submixes when many clips share the same treatment.
Ambience And Sound Effects
Ambience gives a scene a sense of place, and a low bed of room tone hides edits. Tag these clips as Ambience and keep their level low, so they support the dialogue. SFX clips such as doors and footsteps usually need only level adjustment. Pan them slightly if they belong to one side of the picture.
When To Leave The Panel
The Essential Sound panel is a quick tool, not a full studio. For complex repair, precise equalization or careful compression, use dedicated effects or an audio editor. You can still start with the panel and then add effects on top.
Summary
Tag clips, repair lightly, match loudness, duck music and check the meters. These steps produce clean, balanced audio for most videos in a short time.
Try It
- Place a voice clip and a music clip on separate audio tracks.
- Tag the voice as Dialogue and click Auto-Match, then tag the music as Music.
- Turn on Ducking for the music against dialogue and generate keyframes.
- Play the result on headphones and laptop speakers and adjust the volume slider until speech is clear.
Common Questions
What is the Essential Sound panel in Premiere Pro?
It is a panel that tags clips as dialogue, music, effects or ambience and shows simple controls for loudness, repair, clarity, ducking and volume.
How do I make music lower when someone speaks?
Tag the music clip as Music, turn on Ducking, choose Dialogue as the clip type to duck against and click Generate Keyframes.
Does the Essential Sound panel replace other audio tools?
It handles many common jobs quickly, but complex repair and mixing may need dedicated effects or an audio editor.
What loudness should I aim for?
It depends on where you publish. Broadcast often uses about -23 LUFS, and many online platforms are near -14 to -16 LUFS, so check the platform guidelines.
Related Lessons
- Audio Levels to understand safe volume ranges.
- Auto-Ducking for more music ducking detail.
- Premiere Audio Noise Reduction for stronger repair tools.
- Wind Noise for outdoor recording problems.
- Audio For Video for better recording at the start.
Gear That Helps With This
Hand-picked kit that makes this lesson easier to put into practice.
Some links are affiliate links: if you buy through them we may earn a small commission at no extra cost to you. How this works.