
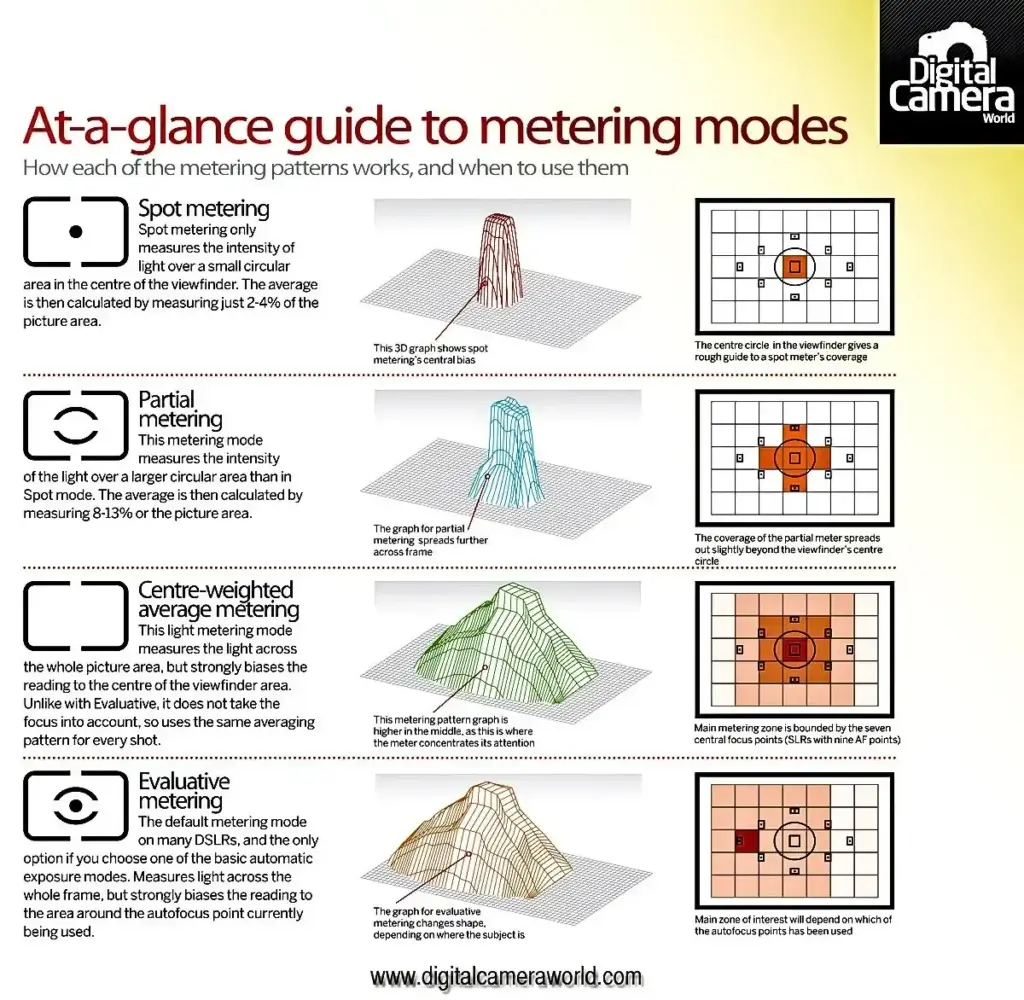
Metering modes are the ways a camera measures light to choose exposure. Matrix or evaluative mode reads the whole frame and applies scene recognition, center-weighted mode favors the middle, and spot mode reads only a tiny area. The best choice depends on how evenly lit the scene is and how much you trust the camera.
Why It Matters
Every automatic exposure begins with a measurement, and the metering mode decides what gets measured. A wrong choice leads to the same problems again and again: faces too dark against a bright window, or a pale subject in front of a dark stage.
Understanding the options means you can pick the right one in a few seconds and know when to stop trusting the default. Good metering also reduces the number of corrections needed later in editing.
Beginner Choosing Between Evaluative, Center-Weighted And Spot
Cameras offer three families of metering. Brand names vary, so the same mode may be called matrix, evaluative or multi-zone depending on the maker, but the ideas are shared.
Matrix Or Evaluative Metering
The camera divides the scene into many zones, measures each one, and compares the pattern against stored knowledge of typical scenes. It also looks at focus position, color and distance. This is the best general-purpose choice and the default for good reason. It handles landscapes, travel photos, snapshots and most mixed lighting well.
Center-Weighted Metering
The camera reads the whole frame but gives most weight to a circle in the middle. It is predictable, because the result depends on a simple rule you can understand. Portraits, street scenes with a central subject and video work often suit it, and the exposure changes smoothly as you pan.
Spot Metering
The camera reads a very small circle, usually about 1 to 5 percent of the frame. Spot metering is the most precise and the most demanding, since you must aim it at the right tone. It excels for backlit subjects, stage performers under spotlights, and the moon against a dark sky. The follow-up lesson on spot metering technique goes further.
| Mode | Area measured | Best for | Weak spot |
|---|---|---|---|
| Matrix / Evaluative | Entire frame, analyzed | General shooting, landscapes | Unusual or extreme scenes |
| Center-Weighted | Whole frame, center favored | Portraits, video, steady scenes | Off-center subjects |
| Spot | Tiny area | Backlight, spotlights, the moon | Needs careful aim |
| Partial | Around 6 to 10 percent | Backlit portraits on some Canon bodies | Not on every camera |
A Simple Starting Rule
Leave the camera on matrix for everyday shooting. Switch to spot when the subject is much brighter or darker than the background. Use center-weighted when you want predictable behavior or are filming and need exposure to change gradually. If a mode keeps giving results you dislike, add exposure compensation instead of changing everything at once.
Common Mistakes
- Switching to spot mode and leaving it on, then wondering why the next scene is wrong.
- Aiming spot metering at a bright sky or a deep shadow by accident.
- Expecting matrix metering to read your mind in a scene with a bright background and a small, dark subject.
Handy for this: Carbon Fiber Tripod — sharp at slow shutter speeds. (affiliate link)
Advanced How Scene Recognition Weighs Zones, And When To Override It
What Matrix Metering Does Behind The Scenes
Modern matrix systems measure many segments, from a few dozen on older bodies to several thousand on recent ones with color sensors. The algorithm compares the brightness map with a library of scenes, then weights the zones near the active focus point, discounts very bright sky areas, and protects highlights when it suspects a backlit subject. Makers tune these rules differently, so two brands can give different exposures for the same scene. The software also tends to favor keeping highlights from clipping, which can leave subjects a little dark.
Subject Detection Changes The Weighting
Cameras with face, eye, animal or vehicle detection can meter on the detected subject. Many bodies now offer a mode that weights the face or eye, so a backlit person is exposed correctly even when the background is bright. That makes matrix mode far more capable than it was a decade ago, and it lowers the need to switch to spot manually. The focus point matters here, because many matrix systems give extra weight to the area under the active autofocus point, so moving it toward a shaded face changes the exposure even though the metering mode has not changed. Read how detection operates in subject detection autofocus.
When To Override The Algorithm
Override when the scene is extreme or when consistency matters more than convenience. A sequence of frames shot while panning across bright and dark areas can change brightness with every frame under matrix metering. In that case, meter once, switch to Manual, and fix the exposure. Time-lapse, video and product work benefit from the same approach. Also override when the tone of the main subject matters, as with a bride’s white dress or a coal-black cat, since the meter will aim for gray.
Metering Through The Lens Versus Handheld Meters
The meter in a camera measures light reflected from the scene, which is why dark and bright subjects fool it. A handheld incident meter measures the light falling on the subject instead, so the reading ignores subject tone completely and a white shirt or black coat is exposed correctly with no compensation. Studio photographers and cinematographers often prefer it for that reason. In a camera, the closest equivalent is metering from a gray card held in the same light as the subject, then locking the exposure.
Highlight-Weighted Metering
Some cameras add a highlight-weighted mode that biases the reading to prevent bright areas from clipping, which is useful for stage lighting and bright window scenes. It trades shadow detail for highlight safety, so check the histogram. Most photographers who shoot RAW prefer to expose carefully to protect highlights and recover shadows later, as described in expose to the right.
Try It
- Photograph a backlit friend or a lamp-lit object in front of a bright window using matrix metering, and review the face.
- Switch to center-weighted and shoot the same scene. Note how the exposure changes.
- Switch to spot, aim the circle at the face, and shoot again. Compare the three results on the histogram.
- Return the camera to matrix metering when you finish so the next shoot starts from a safe default.
Common Questions
Which metering mode is best for beginners?
Matrix or evaluative metering is the best starting point. It handles most scenes automatically, and you can add exposure compensation when the result is too bright or too dark.
When should I use spot metering?
Use it when the subject and background differ greatly in brightness, such as a backlit performer, a spotlit stage or the moon. Aim the spot at the tone that matters most.
Do metering modes work in Manual mode?
Yes. The meter still reads the scene and shows you an exposure scale, even though you set aperture, shutter and ISO yourself. The mode simply decides what that scale measures.
Why do two cameras meter the same scene differently?
Each maker designs its own scene-recognition rules and tone curves. Sensor, lens and picture style settings also alter what the meter reports, so small differences are normal.
Related Lessons
- Spot Metering Technique to learn how to place tones on purpose.
- Exposure Compensation to correct whichever mode you choose.
- Middle Gray to understand what every meter is trying to produce.
- Reading Histograms to confirm a reading was right.
- Manual Mode Photography to lock in exposure when scenes change.
Gear That Helps With This
Hand-picked kit that makes this lesson easier to put into practice.
Some links are affiliate links: if you buy through them we may earn a small commission at no extra cost to you. How this works.