
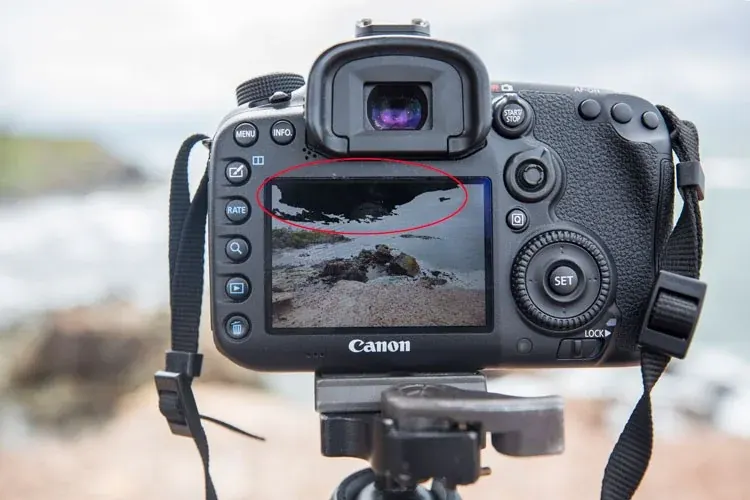
Highlight warnings, often called blinkies, are flashing marks on a camera review screen that show where the image is so bright that it has lost detail. They are based on the JPEG preview, not the RAW file, so they are cautious guides that warn you of possible clipping and help you lower exposure in time.
Why It Matters
Blown highlights are the hardest error to fix. Once a sky or a white shirt reaches the maximum value, no detail remains, and no software can recreate it. A quick glance at the warning on the back of the camera can save a whole shoot.
The warning also teaches you how your camera handles bright light, so you learn to trust the screen where it is reliable and to cross-check with the histogram where it is not.
Beginner How Highlight Warnings Work
When you review a photo, the camera checks each pixel of the preview image. Where one or more channels reach the maximum value, usually 255 in an 8-bit JPEG, the area flashes black and white or shows a colored overlay. Because the preview is a processed JPEG, a picture style with strong contrast or high saturation can make the warning appear earlier than it would on the RAW data. In practice, this makes the warning conservative, which is useful when you want to protect highlights.
Where To Find And Use Them
- Turn on highlight alert in the playback or display menu of the camera.
- Look for flashing areas in the review image after a shot.
- Some cameras show the warning live in the viewfinder or screen, often called zebras, particularly on mirrorless models and video modes.
- Assign a button to switch the highlight display on and off quickly.
- Check the warning together with the histogram, which shows the full distribution of tones.
Blinkies Versus Histogram Versus Zebras
| Tool | What It Shows | Best Used For |
|---|---|---|
| Highlight warning (blinkies) | Where clipping occurs in the image | Spotting small bright areas on review |
| Histogram | How many pixels at each brightness level | Judging overall exposure and shifts |
| RGB histogram | Per-channel clipping | Catching a single clipped color channel |
| Zebras | Live stripes above a chosen brightness | Exposing video or live view |
| Highlight-weighted metering | Meter bias toward bright areas | Protecting highlights automatically |
A Quick Protection Routine
- Enable highlight alert and set the camera to show it on playback.
- Take a test shot and check for flashing areas on bright parts of the scene.
- If the flashing area covers something important, such as a face or a detailed cloud, lower exposure by a third or a full stop.
- Retake and check again until blinkies appear only on tiny areas such as specular highlights on metal or water.
- Confirm with the histogram that the right edge is not crowded.
Common Mistakes
- Panicking over every blinking pixel, including tiny highlights such as the sun or a reflection that will never hold detail.
- Ignoring blinkies because the image looks fine on the small screen.
- Underexposing so much that shadows turn to noise while chasing zero blinkies.
- Believing the warning applies to RAW files exactly, when it comes from the processed preview.
A Worked Example
You photograph a bride in a white dress outdoors. The first shot shows blinkies across the fabric and no texture is visible on the dress. Lowering exposure compensation by two thirds of a stop clears most of the warning, and the dress shows folds and lace. The face is now slightly darker, but easy to lift in editing, whereas a blown dress could never be repaired.
Which Areas Can Be Allowed To Clip
Not all highlights deserve protection. Specular reflections on chrome, glints on water and the sun itself are naturally at the limit of brightness, and viewers expect them to be white. Clipped areas matter when they hold texture, such as clouds, skin, snow or white clothing. Learn to judge the importance of the flashing area, not just the fact that it flashes.
Use Custom Picture Styles With Care
A high-contrast or vivid picture style can make the preview image look punchy and trigger the warning sooner. If you shoot RAW, a neutral or flat style gives a preview closer to the actual data. Some photographers make a custom setting with low contrast just for exposure checking. Whatever the style, learn how your camera behaves by comparing the warning with the final RAW file in editing software.
Handy for this: Speedlight Flash — add light anywhere. (affiliate link)
Advanced Preview Versus RAW And Smarter Exposure
Why The Preview Lies
The preview is a JPEG created with your white balance and picture style applied. White balance multipliers can push the red or blue channel to the maximum earlier than the RAW data would, since RAW holds extra headroom above those values. As a result, a camera can show blinkies when the RAW file still has some recoverable detail. The size of this margin varies by model, and testing it is worth the effort. See dynamic range explained for the larger context.
Per-Channel Clipping
A single channel such as red can clip in a sunset or a flower while the other two channels are fine. The overall brightness histogram may look safe, but detail in the saturated color is lost. The RGB histogram shows each channel separately, and some cameras can show the warning per channel. Check reading histograms to learn how to interpret each graph, and use RAW versus JPEG to understand why RAW still helps.
Exposing To The Right Without Blowing Out
Brighter exposures reduce noise because they collect more light, but they raise the risk of clipping. The method of balancing the two is described in expose to the right. Highlight warnings let you push exposure as far as is safe: increase until blinkies begin to appear on important areas, then back off a third of a stop. Use exposure compensation to do this quickly.
Metering And Setup Choices
Spot or highlight-weighted metering helps in scenes with a bright sky or white subject, as covered in metering modes compared. Assigning a custom button to toggle the highlight display makes it faster to check during a shoot, which is explained in custom buttons. In high-contrast scenes where no single exposure holds everything, bracket, or accept deep shadows and protect the highlights, since shadow detail recovery is far easier than recovering clipped whites.
Try It
- Turn on the highlight alert in your camera menu and assign a button to show or hide it.
- Photograph a bright sky or a white object at three exposure levels and review each for blinkies.
- Compare the warning with the histogram for each shot.
- Open the RAW files in editing software and see how much highlight detail is actually recoverable.
Common Questions
Are blinkies accurate for RAW files?
Not exactly. They are based on the JPEG preview, which is more clipped than the RAW data, so they are a cautious warning and RAW often has a little more headroom.
Should I try to remove all blinkies?
No. Small specular highlights and the sun can clip without harm. Protect highlights that hold texture, such as clouds, skin and white fabric.
What is the difference between blinkies and zebras?
Both mark bright areas. Blinkies appear on playback after a shot, while zebras are live stripes shown while composing, mostly in video and live view.
Do highlight warnings work in video?
Many cameras offer zebra patterns in video mode, which serve the same purpose. Set the level according to the format and camera guidance.
Related Lessons
- Reading Histograms for the graph that complements blinkies.
- Expose To The Right to push exposure safely.
- Dynamic Range Explained for how much headroom your camera has.
- Exposure Compensation Guide to adjust brightness quickly.
- Shadow Detail Recovery to see why protecting highlights is safer.
Gear That Helps With This
Hand-picked kit that makes this lesson easier to put into practice.
Some links are affiliate links: if you buy through them we may earn a small commission at no extra cost to you. How this works.