
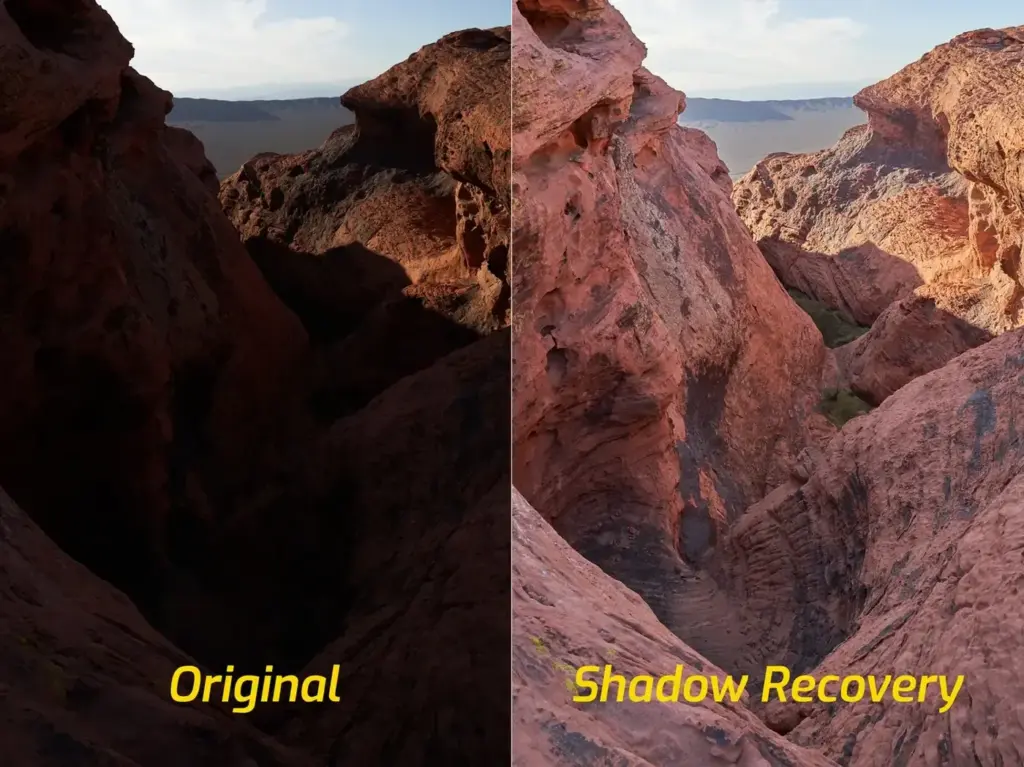
Shadow recovery means brightening dark parts of a photo in editing to reveal detail that looks black at first. RAW files hold extra tonal information, so shadows can often be lifted by two to four stops, but noise, banding and color shifts rise quickly, so exposure at capture remains the best protection.
Why It Matters
Cameras can record far more than you see in a flat dark area. Knowing how much detail is hidden and when noise destroys it lets you decide when to bracket, add light or accept dark shadows.
It also changes how you expose. Because highlights cannot be recovered once clipped, photographers often protect them and lift shadows later, but that approach has costs, which this lesson explains.
Beginner Shadow Recovery In RAW Files
A RAW file stores linear sensor data, where the darkest tones have few values to describe them. For example, a 14-bit file holds 16,384 levels, but the darkest stop contains only about 8 of them, and the brightest stop contains half of all the values. When you lift shadows, those few levels are stretched, and noise and banding can appear. Even so, modern sensors have low read noise, and moderate shadow lifts of two or three stops are often clean at base ISO.
What Limits Shadow Recovery
- Photon shot noise: fewer photons in the dark means more random variation.
- Read noise from the sensor electronics, which dominates the deepest shadows.
- Bit depth, which limits the number of tonal steps available.
- ISO choice: high ISO has less shadow room in some cameras.
- JPEG files, which have already compressed the tonal range and recover far less.
Typical Recovery Limits
| Situation | Realistic Lift | Typical Result |
|---|---|---|
| RAW at base ISO, modern sensor | 2 to 4 stops | Clean detail with mild noise |
| RAW at high ISO | 1 to 2 stops | Visible noise and color blotches |
| JPEG | About 1 stop | Banding and posterization quickly |
| Underexposed RAW by 3 stops | Usable with noise reduction | Loss of color accuracy |
| Deep black with no signal | None | Pure noise |
A Safe Shadow Recovery Workflow
- Open the RAW file and set exposure so the highlights are correct.
- Raise the shadows slider moderately and check the darkest areas at 100 percent.
- Use the blacks slider to restore contrast so the image does not look flat.
- Apply noise reduction to the shadow regions if grain appears.
- Check for color shifts and banding in smooth gradients and back off if they appear.
Common Mistakes
- Lifting shadows without checking noise at full size.
- Recovering shadows from a JPEG and expecting RAW results.
- Underexposing deliberately to protect highlights without considering shadow noise.
- Making the image flat by raising shadows without restoring black point.
A Worked Example
A backlit portrait is exposed for the sky, and the face is nearly black. In the RAW file, raising shadows by 60 and exposure on a mask by 1.5 stops reveals skin detail, with some noise in the darkest parts of the hair. Noise reduction and a slight contrast boost give a believable result. The same recovery on a JPEG would show banding and patchy color.
Expose To The Right As Prevention
Brighter exposure collects more light and reduces noise in shadows. Pushing exposure until highlights are almost clipped, as in exposing to the right, then reducing it in editing, can cut shadow noise by a stop or more. Use the histogram and highlight warnings to avoid clipping.
When To Add Light Instead
If shadows are too deep and detail matters, add fill with a reflector or flash. A little light on the face saves far more quality than any slider. See reflectors and diffusers and ambient and flash for options.
Practical Test For Your Camera
Photograph the same scene at proper exposure and at minus one, two, three and four stops, all in RAW at base ISO. Brighten each underexposed frame in editing to match the proper one and compare at 100 percent. The point where noise becomes unacceptable is your camera practical limit, and it tells you how much margin you have in real shooting.
Recovering Shadows In Video
Video has less room than stills, since most files are 8-bit or 10-bit with compression. Lifting shadows in log footage can show banding and blocky noise, so expose log footage correctly and avoid heavy lifts. Higher bit depth and RAW video, where available, give much better results in the shadows.
Creative Choices
Not every shadow needs detail. Deep shadows add mood, shape and contrast, and lifting everything can make an image look flat and artificial. Decide what the picture needs, and leave some areas dark on purpose. A strong black point often improves an image more than extra shadow detail would.
Handy for this: Speedlight Flash — add light anywhere. (affiliate link)
Advanced Sensors, Noise And Dynamic Range
Why Noise Appears
Noise rises in shadows because the signal is small compared with the noise floor. Both photon shot noise and electronic read noise matter, as covered in photon shot noise and read noise and banding. Cameras with dual gain or backside illumination reduce read noise, as discussed in dual gain sensors.
ISO Invariance
On some sensors, raising ISO in camera gives no better shadow quality than underexposing at a low ISO and lifting in editing. These are called ISO invariant. See ISO invariance for how to test your camera, and whether it is worth exposing darker to protect highlights.
Dynamic Range And Bit Depth
Dynamic range sets the total span of tones the camera can capture, as explained in dynamic range explained, while bit depth sets the steps within it, per RAW bit depth. Together they determine how far shadows can be lifted before the image falls apart.
Tools For Recovery
Software tools such as masks and noise reduction improve results. Use luminosity selections with luminosity masks or Lightroom masks to lift only the darks, and apply Lightroom denoise when needed. Applying changes locally gives cleaner, more natural looks than global slider moves.
Try It
- Take a high-contrast scene in RAW at base ISO and expose for the highlights.
- Open the file and lift the shadows by two and then four stops.
- Zoom to 100 percent and note where noise and banding appear.
- Repeat with a brighter exposure and compare the quality of the shadows.
Common Questions
How many stops of shadow recovery can I expect?
From a clean RAW file at base ISO, about two to four stops is often usable. JPEG files allow far less.
Does shadow recovery add noise?
It reveals existing noise by brightening it. Brighter exposure at capture reduces this problem.
Is it better to underexpose and lift shadows?
It protects highlights but increases shadow noise. A slightly brighter exposure with careful highlight control is usually better.
Why do recovered shadows look flat?
Lifting shadows reduces contrast. Restore the black point and add contrast so the image has depth.
Related Lessons
- Expose To The Right to reduce shadow noise at capture.
- Dynamic Range Explained for how much the sensor records.
- Photon Shot Noise for why shadows are noisy.
- ISO Invariance to test your camera.
- Lightroom Denoise to clean recovered shadows.
Gear That Helps With This
Hand-picked kit that makes this lesson easier to put into practice.
Some links are affiliate links: if you buy through them we may earn a small commission at no extra cost to you. How this works.