
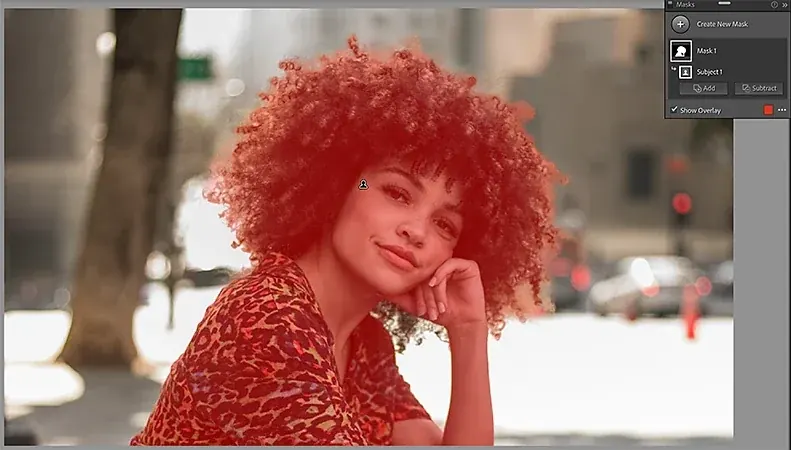
Lightroom masks are selections that limit an adjustment to part of a photo. The Masking panel offers tools that find a subject, sky or background automatically, plus brushes and gradients. You choose an area, then change exposure, color or detail only inside it, leaving the rest of the picture untouched.
Why It Matters
Most photographs need different treatment in different places. A sky may need darkening while a face needs brightening. Global sliders cannot do both without harming something.
Masks let you shape light and color the way a darkroom printer once did with burning and dodging. Good use of masks gives polished, natural results; careless use leaves halos and glowing edges.
Beginner Lightroom Masks For Beginners
In the Develop module, open the Masking panel and click Create New Mask. Choose a tool, and Lightroom shows the selection with a colored overlay. Then use sliders such as exposure, contrast, temperature and saturation. Those sliders affect only the masked area.
The Automatic Selections
| Mask Type | What It Selects | Typical Use |
|---|---|---|
| Select Subject | The main person or object | Brighten a subject or add contrast |
| Select Sky | The sky area | Darken, add color or contrast |
| Select Background | Everything except the subject | Dim, desaturate or add clarity changes |
| People masks | Face, skin, hair, eyes and more | Portrait retouching |
Basic Steps
- Click the Masking icon below the histogram.
- Choose Select Subject, Select Sky or Select Background and wait for the analysis.
- Check the overlay by pressing O to toggle it. Look for missed areas and edges.
- Adjust sliders for the masked area, such as lowering exposure on a bright sky.
- Use Add or Subtract to refine the selection with a brush or another tool.
Quick Tips
- Make small adjustments. Natural looking edits usually change a mask by less than one stop.
- Name each mask, such as Sky or Face, so you can find it later.
- Use the Invert option to flip a selection, for example to change everything except the subject.
- Check the result at 100 percent as well as zoomed out, since edge problems show at high zoom.
Common Mistakes
- Pushing a sky mask too far and creating a dark halo along the horizon or tree edges.
- Trusting the automatic selection without looking at the overlay.
- Applying a large clarity or sharpening boost to a mask and creating unnatural texture.
- Forgetting that masks are non-destructive, so you can always lower an amount or delete the mask.
How To Review A Mask Quickly
Press O to show the red overlay, zoom to 100 percent, and walk around the edges of the subject. Then switch the overlay to a black and white view if your version offers it, which makes gaps easier to see. Finally, push the adjustment slider briefly to an extreme and watch where it applies, then back it off to a natural value.
Handy for this: Pen Tablet — precise retouching. (affiliate link)
Advanced Refining Edges, Combining Masks And Workflow
Combine And Intersect
Each mask can contain several components. Add components to build up an area, subtract to remove parts, and intersect to keep only where two selections overlap. For example, intersect a subject mask with a luminance range to affect only the bright parts of a person. The lesson on luminance and color range masks shows how to use range limits as a refinement tool.
Edge Quality And Halos
Automatic selections are based on machine analysis and can leave a gap or soft fringe along hair, leaves or fine edges. The result is a halo when you apply strong changes. Reduce the amount of the adjustment, feather the mask, or subtract the troublesome area with a small brush. Using a Color Range or Luminance Range intersect on the sky mask can tighten the edge around bright sky seen through branches.
Brush, Linear And Radial Masks
Manual tools still matter. A brush with Auto Mask snaps to edges of similar tone, while linear and radial gradients give smooth falloff for vignettes and horizon shading. See gradient filters in Lightroom for how to build natural looking graduated effects. Use a brush to add areas that the subject detection missed, such as a lens-flare patch or the underside of a chin.
Choosing The Right Order
- Do global corrections first, such as exposure, white balance and contrast.
- Then add large masks for sky and subject.
- Finish with small, specific masks such as eyes, teeth or a hotspot.
- Check noise and color in masked regions, because lifting shadows can reveal grain.
Copying, Syncing And Presets
Masks can be copied to other photos, though automatic ones are recalculated on each image, so the result may differ from the original. Use settings synchronization for similar shots and then review each one. You can save mask adjustments in a preset, which is helpful for repeated tasks such as a sky darkening look. The lesson on Lightroom presets explains how presets store these changes.
Performance
Masking uses the graphics processor. On large files or slower computers, the panel may lag when many masks are stacked. Keep the number of masks manageable, enable GPU acceleration in preferences if it is available, and use smart previews for browsing. If a particular photo becomes slow, merging adjustments into a final export early can help.
Portrait Masks In Practice
People masks split a face into parts such as skin, eyebrows, eyes, lips and hair, each with its own mask and sliders. Use the eye mask to add a small amount of exposure and clarity, and the skin mask to lower texture a little instead of blurring it. Keep changes modest. Over-smoothed skin and glowing eyes are the most obvious signs of heavy editing, and viewers notice them at once.
Apply one correction per mask when you can. Separate masks for teeth, eyes and skin are easier to adjust later than one mask carrying many sliders. See Lightroom portrait editing for a full workflow that builds on these tools.
Try It
- Open a landscape photo with a bright sky and an interesting foreground.
- Create a Select Sky mask and lower exposure slightly while adding a little contrast.
- Create a Select Subject or brush mask for the foreground and lift shadows gently.
- Toggle the overlay, zoom in on the horizon, and fix any halos by subtracting the problem edge.
Common Questions
What is the difference between Select Subject and Select Background?
Select Subject finds the main object or person, while Select Background selects everything else. They are close to opposites, so you can use whichever is easier to adjust and invert if needed.
Why does my sky mask leave a halo?
The selection edge does not perfectly follow the horizon or leaves. Lower the amount of the adjustment, refine with a brush subtraction or add a luminance range intersect.
Are Lightroom masks destructive?
No. Masks are stored as instructions with the catalog or sidecar file, and the original image is not changed. You can edit or remove them at any time.
Do masks work on raw and JPEG files?
Yes, but raw files give more room for strong changes. JPEG masks may show banding or noise when you push the sliders far.
Related Lessons
- Luminance And Color Range Masks to refine a selection by tone or color.
- Gradient Filters In Lightroom for smooth graduated edits.
- Lightroom Basic Panel to set global tone before masking.
- Adjustment Brush for painting local changes by hand.
- Lightroom Presets to save repeatable mask-based looks.
Gear That Helps With This
Hand-picked kit that makes this lesson easier to put into practice.
Some links are affiliate links: if you buy through them we may earn a small commission at no extra cost to you. How this works.