
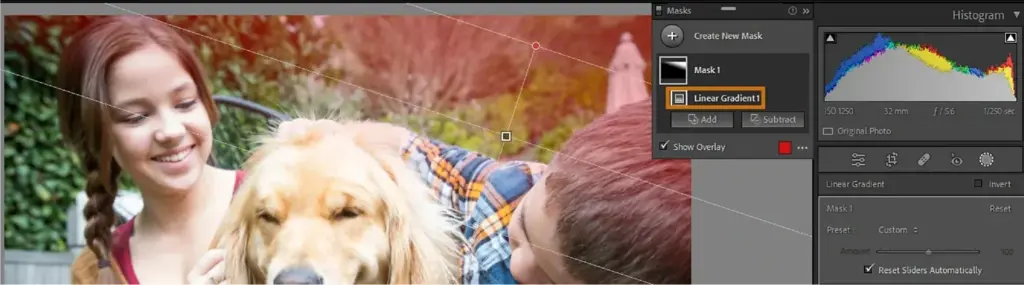
Gradient filters in Lightroom are masks that apply an adjustment gradually across part of a photo. The linear gradient fades an effect in one direction, such as darkening a sky, and the radial gradient affects a circular area, such as a vignette or a spotlight. You can change exposure, color and detail inside the mask.
Why It Matters
Cameras struggle with scenes that have bright skies and dark foregrounds. A single global adjustment cannot fix both, but a gradient mask can correct one part of the image and leave the rest alone.
Gradients give a natural look that matches how light falls in real scenes, which is why they are among the most used local tools in landscape, architecture and portrait editing.
Beginner Gradient Filters For Beginners
In the Masking panel of Lightroom, you choose a Linear Gradient or Radial Gradient. You drag on the picture to place the mask, then use sliders to change exposure, contrast, color and other settings. The change fades smoothly, so there is no visible edge.
Linear Gradient
- Open the picture in the Develop module and choose Masking.
- Select Linear Gradient.
- Drag from the edge of the area you want to change toward the center of the picture.
- Lower the exposure to darken a bright sky, or raise it to lift a dark foreground.
- Adjust highlights, contrast and color until the result looks natural.
Radial Gradient
The radial gradient makes an oval shape. Use it inside to brighten a subject, or invert it to darken the area around the subject. It also works as a subtle vignette or as a pretend spotlight. Adjust feather to control how soft the edge is.
Typical Settings
| Goal | Gradient | Adjustment |
|---|---|---|
| Darker, richer sky | Linear from the top | Exposure minus 0.5 to minus 1.5, highlights down |
| Brighter foreground | Linear from the bottom | Exposure plus 0.3 to plus 0.8, shadows up |
| Draw attention to a face | Radial, inside | Exposure plus 0.3, clarity or texture lightly |
| Soft vignette | Radial, inverted | Exposure minus 0.5, feather high |
| Cooler sky | Linear from the top | Temperature slightly cooler, saturation slightly up |
Good Habits
- Keep adjustments small and check the whole picture at the end.
- Place the gradient so the transition falls along the horizon or a natural boundary.
- Use range masks to limit the effect to certain colors or brightness.
- Press the overlay key to see the mask area.
Common Mistakes
- Darkening the sky so much that it looks unnatural against the land.
- Letting the gradient cross a tall object, such as a mountain or a tree, and creating a halo.
- Forgetting to refine the mask where the subject overlaps the sky.
- Using the same strength in every picture instead of judging each scene.
A Beginner Check
Look at the picture without the overlay. If you can see where the mask starts and ends, reduce the strength or increase the feather. A good gradient is almost invisible.
Handy for this: ND And Polarizing Filters — control light and glare. (affiliate link)
Advanced Refining Masks And Building Natural Results
Range Masks And Subtractions
Once a gradient is placed, you can refine it with a range mask based on luminance or color, which limits the effect to bright areas or to certain hues. You can also subtract from the mask with a brush or another mask, such as a subject selection, so the adjustment does not spill over a person or a mountain. This avoids the halos that appear around objects when a gradient crosses an edge. For selection tools, see Lightroom masking and select sky in Lightroom.
Combining Several Gradients
Complex scenes need more than one mask. Use a linear gradient for the sky, another for the foreground and a radial gradient to guide the eye to the main subject. Name each mask so you can find it later, and adjust them one at a time. Keep the combined effect subtle, since too many strong masks can make a picture look processed.
Matching Light Direction
Natural results come from following the light in the scene. If the sun is on the left, use a radial gradient that brightens the left side, and keep shadows on the right. Do not darken the sky in a way that contradicts the direction of the sunlight. Study light direction to judge where light should fall.
Local Color And Detail
- Use temperature and tint to warm a foreground or cool a sky.
- Lower highlights to bring back cloud detail.
- Add a small amount of dehaze to the sky for depth, and remove it from the land.
- Use texture and clarity sparingly, since they add noise to skies.
- Reduce noise within the mask if you lift shadows strongly.
A Landscape Workflow
- Make global adjustments first, such as exposure, white balance and contrast.
- Add a linear gradient to control the sky and match the horizon.
- Add a second gradient to lift the foreground.
- Use a radial gradient to emphasize the focal point.
- Compare before and after, and reduce the strength of each mask by a little.
Presets And Speed
Save common gradient settings as presets for your usual scenes, such as a sunset sky or a dark foreground. Copy and paste masks between pictures from the same shoot, and then adjust the position. Batch work this way takes minutes. Compare approaches with Lightroom presets and with graduated neutral density filters, which do something similar at the time of shooting.
When To Use Filters Instead
A physical graduated filter balances the exposure before the picture is recorded, which can help with sensors that clip bright skies. A digital gradient works on the recorded data, so highlights that are clipped cannot be recovered. Shoot raw and protect highlights with exposure, and use the gradient to refine the look.
Gradients And Raw Headroom
Local adjustments on raw files use the full sensor data, so you can lower exposure in a sky much further than with a JPEG. Check the histogram after strong changes and watch for banding in smooth skies, which can appear when you push 8-bit files hard. Working on raw files and exporting at high quality keeps the gradients smooth.
Try It
- Pick a landscape photo with a bright sky and a darker foreground.
- Add a linear gradient from the top, lower exposure and highlights, and check the horizon.
- Add a second linear gradient from the bottom to lift the foreground.
- Add a radial gradient around the main subject, and compare with and without the masks.
Common Questions
What is the difference between linear and radial gradients?
A linear gradient fades an adjustment in a straight line across the picture, and a radial gradient affects an oval area. Use linear for skies and foregrounds and radial for spotlighting or vignettes.
How do I stop halos around mountains?
Subtract the subject from the mask, or use a luminance range mask so the effect only applies to the sky. Reduce the strength and feather the transition.
Can I use more than one gradient in a photo?
Yes. Add as many masks as you need, and name them so you can adjust each one later.
Do digital gradients replace physical filters?
Not entirely. Filters balance exposure at capture, so they protect highlights. Gradients work on recorded data and cannot recover clipped areas.
Related Lessons
- Lightroom Masking for all mask types.
- Select Sky In Lightroom for automatic sky masks.
- Graduated ND Filters for the physical version.
- Lightroom Presets to save and reuse settings.
- Light Direction for matching natural light.
Gear That Helps With This
Hand-picked kit that makes this lesson easier to put into practice.
Some links are affiliate links: if you buy through them we may earn a small commission at no extra cost to you. How this works.