
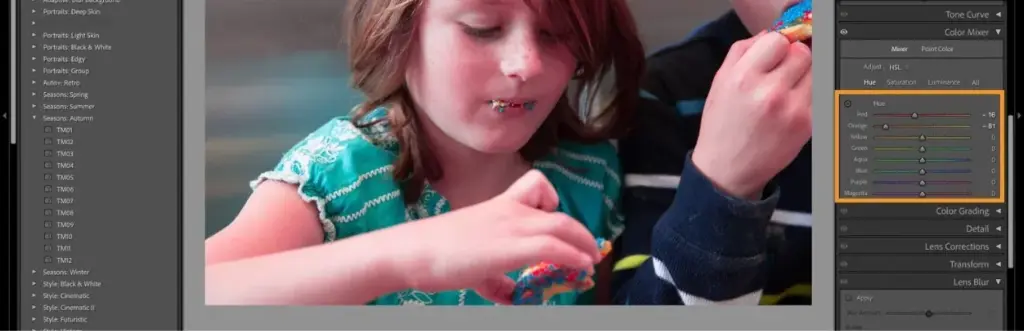
The color mixer in Lightroom, also called HSL, lets you change the hue, saturation and luminance of eight color ranges independently. Use it to deepen a blue sky, tame orange skin, shift yellow-green foliage or darken one color without touching the rest of the photo, all with simple sliders.
Why It Matters
Global saturation and vibrance treat every color alike, and that is rarely what a photo needs. A scene may have a perfect sky and ugly, neon grass. The color mixer lets you fix one without hurting the other.
It is also the tool that gives images a consistent look. Photographers who shift greens toward teal and orange toward warm gold are using the same panel, and small moves create a distinctive style.
Beginner How The Color Mixer In Lightroom Works
Open the Color Mixer panel in the Develop module, or the Color panel in Lightroom. You will see three modes, Hue, Saturation and Luminance, and eight color channels: red, orange, yellow, green, aqua, blue, purple and magenta. Hue changes which color a range shows, saturation changes its intensity, and luminance changes its brightness. Choose the targeted adjustment tool, drag it up or down on the picture and Lightroom moves the sliders for the colors under the cursor.
What Each Control Does
- Hue shifts a color toward its neighbor, for example orange toward red or yellow.
- Saturation raises or lowers the strength of that color range.
- Luminance makes the range lighter or darker, which is how you darken a blue sky without adding noise.
- The targeted adjustment tool picks the right color range by clicking in the image.
- Reset a single channel by double-clicking its slider.
Common Fixes By Subject
| Subject | Typical Move | Why It Works |
|---|---|---|
| Blue sky | Luminance of blue down, saturation of blue slightly up | Darker sky adds depth and contrast |
| Skin tones | Orange saturation down a little, luminance up | Smoother and brighter skin without affecting the background |
| Grass and foliage | Yellow and green hue toward green, saturation down | Reduces neon or sickly yellow greens |
| Sunsets | Orange and red saturation up modestly | Warms the sky while keeping detail |
| Water | Aqua luminance down, hue slightly toward blue | Richer sea and lake color |
A Simple Color Cleanup
- Open the Color Mixer panel and select Luminance mode first, as it changes tone without shifting color.
- Use the targeted adjustment tool on the sky and drag down until it looks richer.
- Switch to Hue and nudge greens toward the color you want.
- Switch to Saturation and reduce any color that looks too loud, usually yellow and green.
- Toggle the panel off and on to compare, and back off any move that looks artificial.
Common Mistakes
- Pushing saturation of a single range so far that edges and gradients look posterized.
- Moving hue sliders a long way, so skin turns green or the sky turns purple.
- Editing skin only in the mixer when a mask would give cleaner control.
- Starting in Saturation mode and ignoring Luminance, which often has the biggest visual effect.
A Worked Example
A coastal photo has a pale blue sky, turquoise water and yellow-green grass on the cliff. Lower blue luminance by 20 so the sky darkens, reduce aqua saturation by 10 to calm the water and shift yellow hue toward green by 15 with saturation down by 12. The scene now has clean separation of color, and none of the changes touched the warm sand or the white foam.
Order Of Operations
Set white balance and exposure first, because color adjustments depend on them. A wrong white balance shifts all hues, and the mixer cannot fix that cleanly. After tone and white balance, use the mixer for fine control, then add grading and masks. This order avoids chasing your own changes and keeps the edit stable.
Watching For Artifacts
Strong changes can show banding in smooth gradients, such as a clear sky, or harsh edges where two colors meet. If you see this, reduce the move or spread it across adjacent channels. Small coordinated shifts, such as orange and yellow together, blend better than one extreme slider.
Handy for this: Monitor Calibrator — colors you can trust. (affiliate link)
Advanced Skin, Style And Alternatives
Skin Tones With The Mixer
Skin lives mostly in the orange and red channels, with some yellow. Lower orange saturation and raise orange luminance for a softer look, and use red for blush and lips. Keep the changes small, because the entire frame is affected if the same colors appear elsewhere. For precise work see portrait editing in Lightroom and the masking tools in Lightroom masks, which isolate the skin before adjusting.
Color Grading Versus The Mixer
The mixer changes colors that are already in the image, by range. Color grading adds color to shadows, midtones and highlights regardless of what is there. They complement each other: fix individual colors with the mixer, then add a mood with Lightroom color grading. Understanding the difference prevents using the wrong tool and fighting it.
Calibration And Starting Points
Before you refine colors, a camera profile and the calibration panel set the foundation of how each color renders. See the camera calibration panel, and test different profiles from the Basic panel. Presets from presets often use the mixer heavily, so studying them is a good way to learn what each channel can do.
Black And White Conversion
In black and white, the mixer becomes a set of virtual color filters. Darkening blue makes skies dramatic, and lightening orange brightens skin. The process is explained in black and white in Lightroom, and it is one of the most powerful uses of the same sliders. Spend time experimenting with luminance sliders on a monochrome image to see how tones separate.
Try It
- Open a landscape photo and go to the Color Mixer panel.
- Darken the sky with the blue luminance slider and use the targeted tool to confirm the range.
- Shift the greens in hue by a small amount and reduce yellow saturation.
- Compare the before and after, and undo any move that looks artificial.
Common Questions
What is HSL in Lightroom?
HSL stands for hue, saturation and luminance. They are the three controls of the color mixer, each available for eight color ranges.
How do I darken a blue sky in Lightroom?
Open the color mixer, go to Luminance, and lower the blue slider, and maybe aqua as well. Raise blue saturation slightly if it looks flat.
Is the color mixer the same as vibrance?
No. Vibrance boosts muted colors globally, while the color mixer targets specific color ranges, so it is far more precise.
Why do my skin tones look wrong after using the mixer?
Skin shares channels with other warm colors, so strong moves affect it. Use small changes or a mask on the skin only.
Related Lessons
- Lightroom Color Grading to add mood after fixing colors.
- Lightroom Masks for local color changes.
- Lightroom Black And White to use the mixer as color filters.
- Camera Calibration Panel for the foundation of color.
- Lightroom Basic Panel to set tone before color.
Gear That Helps With This
Hand-picked kit that makes this lesson easier to put into practice.
Some links are affiliate links: if you buy through them we may earn a small commission at no extra cost to you. How this works.