
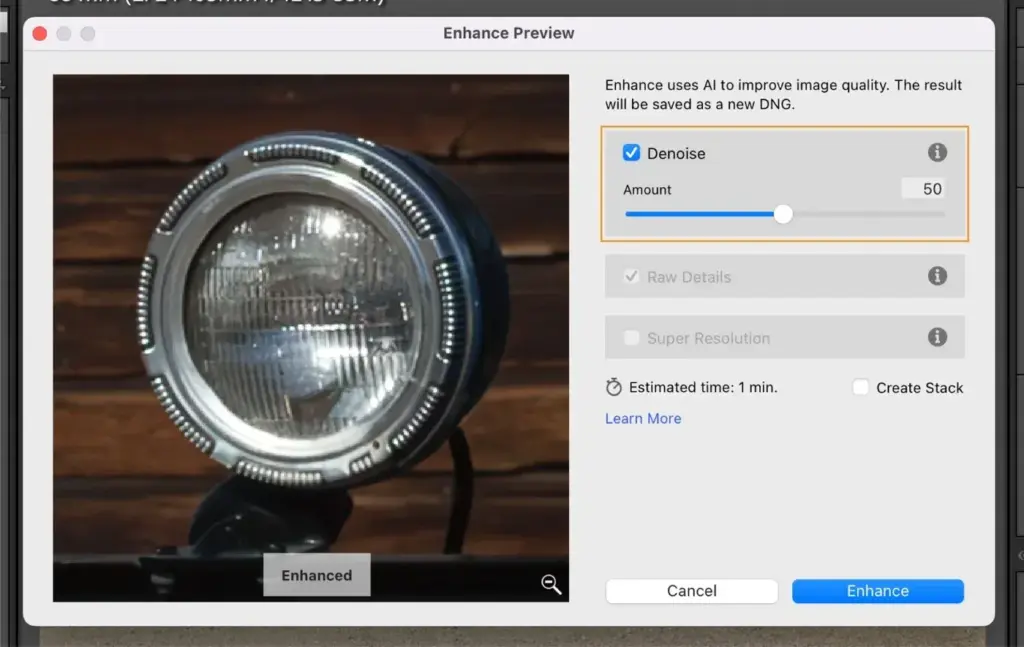
Lightroom denoise is an AI-based tool that removes noise from raw files while trying to keep detail, and it runs as a separate step that creates a new cleaned raw file. Use it on high ISO or underexposed images, choose a moderate amount and zoom to check for a plastic look.
Why It Matters
High ISO, dark shadows and small sensors all create noise. In the past, noise reduction forced a choice between grain and smoothness, and heavy settings erased texture. AI tools learn what real detail looks like, so they remove noise with less loss.
This can save photos shot in dim light, at events or with fast action, where a clean low ISO shot was not possible. It does not replace good exposure, but it gives you a second chance.
Beginner Using Lightroom Denoise
Where It Is
In Lightroom Classic or Lightroom, open the Develop module and find Denoise in the Detail panel or the Enhance command in the right click menu. It works on raw files and a few other formats, and you must have a supported version of the software.
Step By Step
1. Open the photo in Develop and zoom to 100 percent on a noisy area.
2. Choose Denoise, which opens a preview window.
3. Set the Amount. A value around 30 to 50 is a good start, and the maximum is 100.
4. Check the preview, then click Enhance.
5. Wait while the program creates a new DNG file next to the original.
What Is Created
Denoise produces a new raw file in DNG format, and the original stays untouched. The new file is larger, often two to three times the original, and takes time to process. Use it on selected images, not on whole folders unless needed.
When To Use It
– High ISO photos from concerts, events, wildlife or night scenes.
– Underexposed images you brightened in editing.
– Photos from small sensors, such as phones and compact cameras.
– Images with color noise that standard sliders cannot clean.
Common Mistakes
– Using a high amount on every image.
– Skipping the zoom check, then finding smeared fur or skin.
– Running Denoise before choosing the final crop and edit, wasting processing time.
– Forgetting the file size increase and running out of space.
Handy for this: Pen Tablet — precise retouching. (affiliate link)
Advanced Getting The Best Results From Lightroom Denoise
Order Of Operations
Do the culling first, and run Denoise only on the images you will deliver. It is common to run it before other detail work, since later sharpening works better on a clean file. Make exposure and white balance adjustments before or after as you prefer, but know that the processed DNG saves current raw settings for the cleaned result. Check detail work in adjustment brush edits afterward.
Amount And Detail
Low amounts give a subtle clean up and keep grain-like texture. High amounts remove nearly everything and may smooth fine patterns, such as hair, fabric, feathers and stars. Try several amounts on a test image and compare at 100 percent. For many photos, 25 to 50 is enough. Use a higher value for extreme ISO, and then add a little grain to restore a natural feel.
Compared With Manual Sliders
The manual Noise Reduction sliders in the Detail panel still have a role. Luminance and color sliders work on every file without making a new one, and they are fast. Use them for mild noise and Denoise for severe noise. Combining both works well: apply AI first and then a small manual adjustment if needed. See Photoshop noise reduction for another approach and DxO PureRAW workflow for a competing tool.
Understanding The Noise
Noise comes from light itself and from electronics, as explained in photon shot noise and read noise and banding. AI handles random speckle well, but it can struggle with strong banding or pattern noise. Better exposure gives cleaner input, and ISO explained helps you choose settings that reduce noise at capture.
Raw Versus JPEG
Denoise works best on raw files, which hold the original noise pattern. JPEGs already have processing and compression, so results are less impressive. Shooting raw gives you the option, as discussed in raw versus JPEG.
Storage And Performance
Denoise needs a good graphics processor, and processing can take from a few seconds to a few minutes per image. Plan batches overnight if you have many. Allow disk space, since the new DNG files are large. You may keep only the processed version for final deliveries and archive the originals.
Checking For Artifacts
After processing, look for smeared textures, waxy skin, odd patterns on stars and changes in fine lines. If you see them, lower the amount and run it again on the original, since you cannot undo a processed file apart from deleting it.
Super Resolution
Lightroom also offers an enhance feature that increases resolution, covered in super resolution. It can be combined with Denoise in one step in some versions, but doing them together may produce very large files. Decide whether you need both.
Portraits And Skin
For portraits, keep a touch of natural texture. Over-smoothing skin looks artificial. Combine a moderate amount with local adjustments such as reduced clarity in the skin only.
Wildlife And Astro
Fur and feathers contain fine detail, so use a lower amount and check eyes and edges. For stars, check that small stars are not removed. Stacking images for astro, as in astro image stacking, also reduces noise.
Summary
Use Denoise selectively, check at full size, keep originals and combine with good exposure habits. The result is cleaner images without losing detail that makes photographs feel real.
A Simple Decision Process
Ask three questions before running Denoise. First, will this image be delivered or printed at a size where noise shows? Second, is the noise visible at 100 percent in the areas that matter, such as faces or sky? Third, can the manual sliders solve it in a few seconds? If the answer to the first two is yes and the third is no, run Denoise. Otherwise save the time and storage. This approach keeps your catalog lean and your editing fast.
Batch Considerations
You can process several images at once, but each file takes time and space, so queue a modest number and check the first results before running the rest. Keep the processed DNG files grouped with their originals by using a stack, so you can find the pair later. When delivering to a client, export from the processed version and keep both in your archive.
Color Noise And Shadows
Heavy shadow lifting often creates blotchy color noise, which AI cleans well. After processing, look at deep shadows and dark skies for leftover color patches or banding, and fix them with a gentle manual color noise slider. If the result looks flat, add a small amount of grain in the Effects panel, which gives the image a natural, film-like finish at viewing size.
Try It
- Find a photo taken at ISO 6400 or higher and zoom to 100 percent.
- Run Denoise at amounts of 20, 50 and 80 on copies of the photo.
- Compare skin, fur or textured areas at 100 percent in each version.
- Choose the lowest amount that looks clean and note it for similar shots.
Common Questions
What does Lightroom denoise do?
It uses AI to remove noise from raw files and creates a new cleaned DNG file, keeping more detail than traditional noise reduction sliders.
What amount of denoise should I use?
A moderate amount, such as 30 to 50, is a good start. Raise it only for extreme noise and always check detail at 100 percent.
Does denoise replace the original file?
No. It creates a new DNG next to the original, so you can go back if needed, but remember the extra disk space.
Does AI denoise work on JPEG files?
It is designed for raw files and gives the best results there. JPEGs are already processed, so the improvement is smaller.
Related Lessons
- Photon Shot Noise to understand light-based noise.
- Read Noise And Banding for electronic noise causes.
- Photoshop Noise Reduction for another approach.
- Super Resolution to enlarge detail after cleaning.
- ISO Explained to reduce noise at capture.
Gear That Helps With This
Hand-picked kit that makes this lesson easier to put into practice.
Some links are affiliate links: if you buy through them we may earn a small commission at no extra cost to you. How this works.