
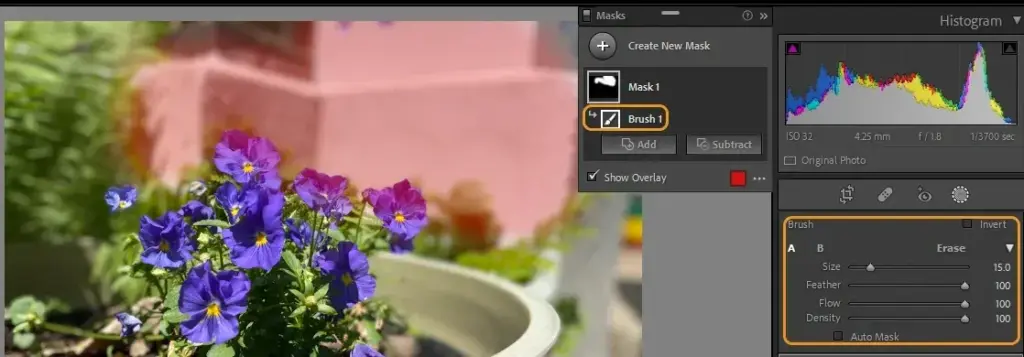
The adjustment brush in Lightroom is a local editing tool that lets you paint exposure, color, contrast or detail changes onto specific parts of a photo. Clean results depend on the right size, feather, flow and Auto Mask settings, and on keeping each adjustment small and purposeful.
Why It Matters
Global sliders change the entire frame, but photographs rarely need the same correction everywhere. A face may be a little dark while the sky is perfect, or a bright window may need to drop without touching the room. The brush solves those problems one area at a time.
Used poorly, however, it leaves halos, visible brush edges and unnatural patches. A few settings and habits make the difference between edits that look invisible and edits that look painted on.
Beginner How To Use The Adjustment Brush
Where To Find It
In current Lightroom Classic and Lightroom, open the Masking tool and choose Brush. Older versions have a separate adjustment brush in the toolbar, but the controls are similar. Click once to start a mask and paint over the area you want to change.
Key Brush Settings
– Size sets the diameter of the brush. Use the bracket keys to change it quickly.
– Feather softens the edge. A higher value blends the effect into surroundings.
– Flow controls how much each stroke applies. Low flow lets you build up gradually.
– Density sets the maximum strength of the brush, so even repeated strokes stay under a limit.
– Auto Mask limits the paint to areas that match the color and tone under the center of the brush.
A Simple Routine
1. Choose Brush and set size, feather 70 to 100, flow 50 and density 100.
2. Paint over the area, such as a dark face.
3. Press O to show the mask overlay and check coverage.
4. Move the sliders, such as Exposure, Shadows or Texture, until the area looks natural.
5. Zoom out and check the effect against the whole picture.
Useful Adjustments
| Goal | Slider To Try |
| Brighten a face | Exposure +0.3 to +0.7, Shadows up |
| Darken a bright window | Exposure down, Highlights down |
| Add sparkle to eyes | Exposure slightly up, Clarity up |
| Soften skin | Texture down a little, Clarity down |
| Warm a part of the scene | Temp toward yellow |
Common Mistakes
– Painting at full strength with a hard edge.
– Using one huge adjustment where several small ones would look better.
– Forgetting to check the mask overlay for gaps.
– Leaving heavy effects that look obvious when you zoom out.
Handy for this: Pen Tablet — precise retouching. (affiliate link)
Advanced Precision And Workflow With The Adjustment Brush
Layering Small Changes
Several light masks look more natural than a single strong one. Make a separate mask for each purpose, such as one for face exposure, one for eye detail and one for background darkening, and name them. This lets you adjust or delete one without touching the rest. When building up a strong effect, use low flow and paint over the same area several times. Compare this with the more automatic approach of Lightroom masks for subjects and skies.
Auto Mask And Edges
Auto Mask follows edges based on the color and brightness at the center of the brush, so keep the center on the area you want, not at the edge. It works well on sharp transitions, such as a bright sky against dark trees, and poorly on soft edges or similar tones. When it fails, turn it off and use a smaller brush with feather. For a refined edge, combine the brush with a range mask, as described in luminance range masks.
Subtracting And Erasing
After painting, you can erase with the Erase option or hold Alt or Option to switch temporarily. A better approach for complex shapes is to create the mask with a gradient or a subject selection, and then subtract using the brush. For gradients, see gradient filters. This keeps edges neat and the process quick.
Dodging And Burning
The brush is a flexible dodge and burn tool. Use small exposure changes of 0.1 to 0.3 stops over many strokes to shape light in a portrait or landscape, brightening highlights and darkening shadows to add dimension. Zoom out often, since this kind of work is subtle and appears messy when viewed close up. See dodge and burn for the principle, and Lightroom portrait editing for faces.
Halos And How To Avoid Them
A halo appears when a strong adjustment extends past an edge, such as a bright halo around a dark tree after lifting the sky. Reduce the strength, lower the feather, use Auto Mask or add a range mask to protect the edge. Check at 100 percent zoom on every high contrast boundary. The Tone Curve and clarity settings in the mask can also cause halos if pushed too far, so favor exposure and highlights for large changes. Related detail control is in tone curve.
Noise, Sharpness And Detail In Masks
Brushes can also add local noise reduction and sharpening. If you lift shadows heavily on a dark face, raise Noise Reduction in the mask to keep it smooth. Use a negative texture or clarity for gentle skin smoothing, and a positive value for eyes, hair and fabric. Keep these in separate masks so you can balance them.
Speed And Shortcuts
Press the bracket keys for size, Shift plus brackets for feather, and the O key for the overlay. Use the Y key for before and after views and the backslash key to toggle the entire mask effect. For more speed, check Lightroom shortcuts and use spot removal separately for blemishes.
Try It
- Open a portrait where the face is slightly darker than the background.
- Paint a mask over the face with low flow and a large feather, and lift Exposure by about half a stop.
- Create a second mask for the eyes with a small brush and add a little Clarity and Exposure.
- Toggle the masks off and on to compare, then reduce any adjustment that looks obvious.
Common Questions
What is the difference between the adjustment brush and a radial filter?
The brush lets you paint any shape freehand. A radial filter applies an adjustment in an oval shape with a feathered edge, which is quicker for round areas but less flexible.
Why does my brush edit look obvious?
The effect is probably too strong or has a hard edge. Increase feather, reduce the slider amount, use lower flow and check the overlay for missed spots.
What does Auto Mask do?
It restricts the brush to areas similar in color and brightness to the point under the brush center, which helps keep strokes inside object edges.
Can I use the brush on a portrait without making skin look fake?
Yes. Keep adjustments small, avoid removing texture entirely, and compare against the original often. Subtle exposure changes look better than heavy smoothing.
Related Lessons
- Lightroom Masks for subject, sky and automatic selections.
- Luminance Range Mask to refine a mask by brightness.
- Gradient Filters In Lightroom for sky and edge-based adjustments.
- Dodge And Burn to shape light with small brush strokes.
- Lightroom Portrait Editing for faces, eyes and skin.
Gear That Helps With This
Hand-picked kit that makes this lesson easier to put into practice.
Some links are affiliate links: if you buy through them we may earn a small commission at no extra cost to you. How this works.