
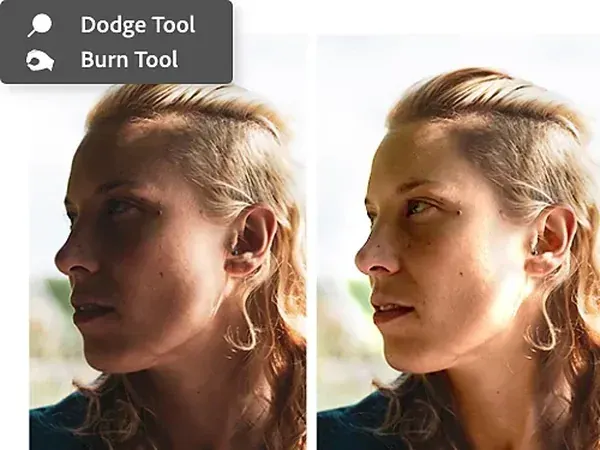
Dodge and burn is a retouching technique that lightens (dodges) and darkens (burns) specific areas of a photo to shape light, add depth and guide the eye. In Photoshop, the best method uses two curves or gray layers on a mask so every change is non-destructive and easy to adjust.
Why It Matters
Photographers have used dodging and burning in the darkroom for a century to control where the viewer looks. The same idea in Photoshop can add dimension to faces, make landscapes glow and clean up uneven lighting.
Learning the technique also teaches you to see light. You begin to notice how highlights and shadows build shape, which improves your photography and your editing.
Beginner Dodge And Burn Methods In Photoshop
The classic Dodge and Burn tools paint directly on the pixels, which is destructive and hard to fix. A better way is to create two adjustment layers, usually Curves, one brightened to dodge and one darkened to burn. Fill each layer mask with black to hide the effect, then paint with a soft white brush at low opacity and low flow to reveal the effect gradually where needed. Because the adjustments are separate layers, you can reduce their opacity or edit the mask at any time.
Ways To Dodge And Burn
- Two Curves layers, one lighter and one darker, with black masks and painted white.
- A 50 percent gray layer set to Soft Light or Overlay, painted with black and white.
- The Dodge and Burn tools on a duplicated layer, for quick work with a safety copy.
- Frequency separation combined with dodge and burn, for skin work.
- Selections and masks for broad, shape-based lighting changes.
Choosing A Method
| Method | Strength | Weakness |
|---|---|---|
| Curves layers with masks | Clean, flexible and fully editable | Needs two layers to set up |
| Gray layer in Soft Light | Intuitive, good for texture | Can shift color saturation |
| Dodge and Burn tools | Fast | Destructive and less control |
| Brush with Overlay layer | Simple | Less predictable than curves |
| Adjustment masks in Camera Raw | Convenient for RAW files | Less precise than Photoshop layers |
Curves Method Step By Step
- Add a Curves adjustment layer, pull the curve up to lighten, then fill its mask with black (Ctrl+I) and name it Dodge.
- Add a second Curves layer, pull the curve down to darken, invert its mask and name it Burn.
- Choose the Brush tool with a soft edge, white color, opacity about 5 to 10 percent and flow low.
- Paint on the Dodge layer over highlights you want to brighten, and on the Burn layer over areas to darken.
- Reduce layer opacity or clear the masks if the effect becomes too strong.
Common Mistakes
- Using too much opacity, so the brush creates blotchy patches.
- Dodging and burning everything evenly, which flattens contrast instead of adding it.
- Brightening skin until it looks gray or dirty because the color changes.
- Zooming in too far and losing the overall balance of the image.
A Worked Example
On a portrait, the face looks flat. Create a dodge layer and paint on the cheekbones, bridge of the nose and the catchlights in the eyes. On the burn layer, paint under the cheekbones, along the jaw and the edges of the frame. Zooming out reveals a subtle sculpted shape, and the image now has depth without any visible effects.
Working At The Right Scale
Large soft brushes create broad lighting changes, such as a gradual vignette or a gentle glow. Small brushes refine details such as eyes, hair or texture. Work from large to small, and keep checking the whole image at a reduced size, where uneven patches are most visible.
Use A Viewing Aid
Add a black and white adjustment layer or a temporary Hue and Saturation layer with saturation set to minus 100 on top. This shows only the tones, which makes blotches in the dodge and burn layers easier to see. Hide or delete the layer when you finish.
Practice With A Simple Image
Start with a portrait of a face or a simple object like a sphere or an egg, where light and shape are obvious. Observe where light would naturally fall, then paint to strengthen it. Repeating this exercise teaches you to see form and prepares you for more complex scenes such as landscapes and groups.
Dodging And Burning Landscapes
Landscapes benefit from subtle burns at the corners and dodges on the main subject, such as a lit rock face or a path through trees. Follow the direction of the real light, and avoid inventing light that was not there. Gentle gradients feel natural, while heavy local patches look like obvious edits. Keep opacity low and build in layers.
Common Workflow Tips
Save a version before heavy retouching, and name layers clearly. Use a graphics tablet if you have one, since pressure sensitivity makes soft strokes easier. Take breaks and look at the picture afresh, because eyes adjust and hide mistakes after long editing. Compare against the original often by toggling the layers on and off.
Handy for this: Pen Tablet — precise retouching. (affiliate link)
Advanced Precision, Color And Combination With Other Tools
Controlling Color Shifts
Dodging and burning with Curves can change saturation. Set the blend mode of the curves layers to Luminosity so only brightness is affected and color stays stable. This is a significant step for skin, where color shifts look unnatural. See blend modes for how modes change layer interaction, and adjustment layers for the setup.
Masks And Precision
Good masks make dodge and burn accurate. Refine the brush edges, use selections to limit the effect to a shape and clean up with a harder brush where needed. The method relies on layer masks, which you can adjust or blur after painting. For complex areas, combine with curves to set the contrast of the base image.
Skin Retouching Workflow
On portraits, dodge and burn is often used with frequency separation and the skin retouching workflow to even out tone without removing texture. Paint on the low-frequency layer for tonal shaping, and keep texture intact on the high-frequency layer. The sequence of healing, evening and sculpting produces natural results.
Landscape And Product Work
In landscapes, burn the edges and dodge highlights on trees or rocks to draw the eye, and use broad gradients rather than local blobs. In product photography, dodge and burn can clean up reflections and shape highlights on surfaces. Layered with high pass sharpening at the end, the details look crisp and balanced.
Try It
- Open a portrait or landscape and create two Curves layers named Dodge and Burn with black masks.
- Paint at 5 percent opacity on highlights and shadows to enhance shape.
- Add a temporary black and white layer to check for blotches.
- Reduce the opacity of each layer until the effect looks subtle and natural.
Common Questions
What does dodge and burn mean?
Dodge means to lighten an area, and burn means to darken it. The terms come from darkroom printing.
Is the Dodge tool destructive?
Yes, it changes pixels directly. Use curves or gray layers with masks to keep the edit non-destructive.
What brush settings are best?
A soft round brush with opacity or flow of about 5 to 10 percent, built up in several strokes.
Can I dodge and burn in Lightroom?
Yes, with brushes and radial or linear gradient masks, though Photoshop gives more precise control.
Related Lessons
- Curves In Photoshop for the adjustment behind dodge and burn.
- Layer Masks In Photoshop to control where effects appear.
- Frequency Separation for skin work combined with dodging.
- Skin Retouching for complete portrait workflows.
- Blend Modes to avoid color shifts.
Gear That Helps With This
Hand-picked kit that makes this lesson easier to put into practice.
Some links are affiliate links: if you buy through them we may earn a small commission at no extra cost to you. How this works.