
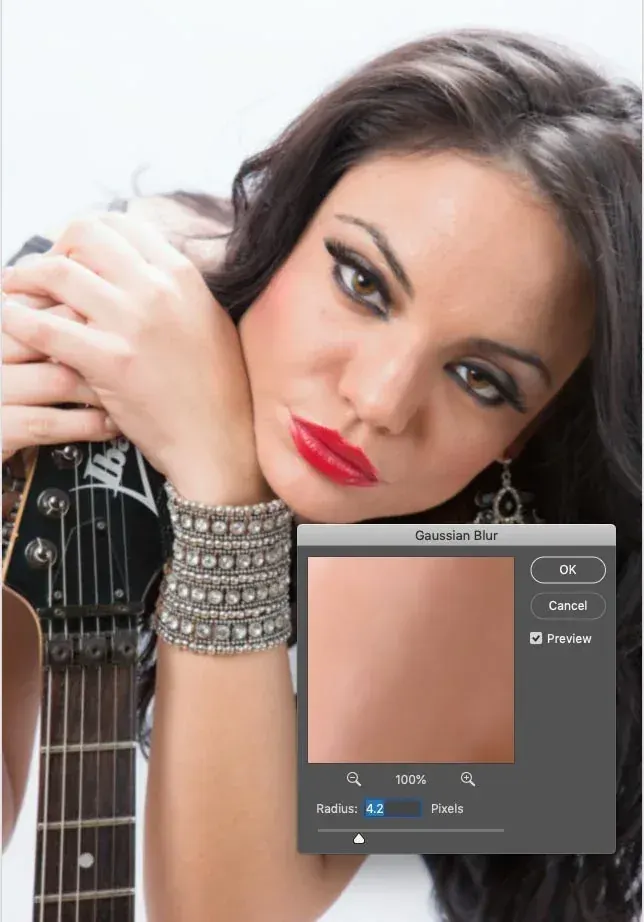
Frequency separation is a Photoshop retouching technique that splits an image into two layers: a low frequency layer holding color and tone, and a high frequency layer holding fine texture such as pores and hair. You can then smooth blotchy color or repair texture independently, without blurring or flattening the skin.
Why It Matters
Skin retouching often goes wrong because fixing color blotches also blurs texture, which gives plastic-looking results. Frequency separation avoids that by letting you work on color and texture in different layers.
It is also a precise tool for other tasks, such as evening out stained fabric, smoothing wall paint or repairing a surface with uneven color. Understanding it also helps you recognize overdone retouching when you see it.
Beginner Frequency Separation Basics In Photoshop
A photo contains information at different scales. Broad changes such as skin tone, shadow and redness are low frequencies, while fine detail such as pores, stubble and eyelashes are high frequencies. Frequency separation duplicates the image twice, blurs one copy to keep only the low frequencies, and uses the other copy, with the blur subtracted, to hold the fine detail. Stacked together, the two layers recreate the original photo exactly.
What You End Up With
- A low frequency layer, a blurred version that carries color and tone.
- A high frequency layer, set to Linear Light blend mode, that carries texture.
- The original image appearance until you start painting on either layer.
- Two independent places to work: smooth color on the low layer and repair blemish texture on the high layer.
Which Layer Fixes Which Problem
| Problem | Layer To Use | Typical Tool |
|---|---|---|
| Redness or uneven skin tone | Low frequency | Mixer brush or blur on a soft selection |
| Dark under-eye color | Low frequency | Soft brush sampling nearby color |
| Pimples and scars with texture | High frequency | Clone stamp or healing brush |
| Stray hairs and flaky skin | High frequency | Clone stamp at low opacity |
| Harsh shadow edges | Neither, use dodge and burn | See the dodge and burn lesson |
Basic Setup Steps
- Duplicate the background layer twice and name the lower copy Low and the upper copy High.
- Hide High, select Low, and apply a Gaussian Blur just large enough to hide skin texture, often 4 to 8 pixels on a typical portrait.
- Select High, open Image, Apply Image, choose the Low layer as source, set Blending to Subtract, Scale 2 and Offset 128 for 8-bit images, or Add with Scale 2 and Offset 0 for 16-bit images.
- Set the High layer blend mode to Linear Light, and the image should look like the original.
- Work on Low with soft brushes for color and on High with the clone tool for texture.
Common Mistakes
- Using too large a blur radius, which leaves obvious blotchy halos when you smooth the low layer.
- Blurring the high frequency layer, which removes the texture and creates a plastic look.
- Retouching every pore and every blemish until the person no longer looks like a person.
- Working on an 8-bit file with a harsh gradient and creating banding on smooth skin.
A Worked Example
Suppose a portrait has red blotches on the cheeks and a few small scars. On the Low layer, use a soft lasso selection on the cheek, feather it by 20 pixels and apply a small Gaussian blur, which evens the redness without touching pores. On the High layer, sample clear skin with the clone stamp at 60 percent opacity and paint over the scars. The result keeps the face looking real.
Choosing The Blur Radius
The radius should be about the size at which skin texture disappears but facial form remains. Higher resolution images need larger radii. As a rule of thumb, look at the blurred layer: if pores are still visible, increase the radius, and if the face is a smeared mask, decrease it. Test the setup by hiding the high layer and checking that only broad color remains.
Save Actions For Repeat Work
Once you understand the steps, record them as a Photoshop action so each new portrait starts with the two layers ready. Name the action clearly and leave the blur radius to be adjusted manually. A reliable starting point saves several minutes per image and reduces mistakes in the Apply Image dialog.
Handy for this: Pen Tablet — precise retouching. (affiliate link)
Advanced Limits, Alternatives And Quality Control
Why It Can Go Wrong
Frequency separation is a blunt instrument. Because the split is made by blur radius, large features such as a nose shadow can leak into the high layer, and fine features such as lip texture can leak into the low layer. Heavy work on either layer can therefore create edges or an artificial surface. Many professionals now use it only for small, specific repairs. The related skin retouching lesson places it in a broader workflow.
Dodge And Burn As An Alternative
Much of what retouchers do with frequency separation can be achieved by building up or toning down light on separate gray layers. This approach keeps natural texture because it never smooths pixels. It works well for uneven shadows and highlights, as explained in dodge and burn. Many workflows combine both: texture repair on the high layer and tone sculpting on gray layers.
Healing Tools And Masks
Modern healing tools and content-aware fills can repair small problems quickly, often on a separate empty layer set to sample from below. See healing and clone tools for these options. Always place retouching on separate layers with layer masks so you can reduce the effect on areas where it is too strong. Keep opacity moderate; subtle edits look more professional than perfect skin.
Bit Depth And Non-Destructive Habits
Work in 16-bit when possible, since 8-bit files can band when strong curves or smoothing are applied. Convert the base image to a smart object if you will apply filters, so blur settings stay editable. Group the two frequency layers into a folder and add a mask on the group, then reduce the group opacity to blend the retouching with the original. Check the final result at 100 percent and at a smaller size, since problems can appear at either scale.
Try It
- Open a portrait and duplicate the background twice, naming the layers Low and High.
- Apply a Gaussian Blur to Low until only color remains, and set up High with Apply Image and Linear Light.
- Smooth one cheek on Low with a soft brush and remove a blemish on High with the clone stamp.
- Hide and show the group to compare, then lower its opacity until the retouching looks natural.
Common Questions
Is frequency separation still used by professionals?
Yes, but mostly for targeted repairs. Many retouchers prefer dodge and burn for tone, and use frequency separation only where color or texture must be fixed separately.
Why does my image look different after setting it up?
The Apply Image settings or the blend mode are probably wrong. Check bit depth, the Subtract or Add choice, the scale and offset values, and that the high layer uses Linear Light.
Does it work for things other than skin?
Yes. Fabric, walls, water surfaces and product photos all benefit from separating color from texture when repairing blotches.
What blur radius should I use?
Choose a radius that hides texture but keeps facial shape. Larger files need larger values, and testing on the low layer alone tells you when it is right.
Related Lessons
- Skin Retouching for the full workflow around this technique.
- Dodge And Burn for a texture-friendly way to even out tone.
- Healing And Clone Tools for fast blemish repairs.
- Layer Masks In Photoshop to limit retouching to where it is needed.
- Smart Objects to keep blur settings editable.
Gear That Helps With This
Hand-picked kit that makes this lesson easier to put into practice.
Some links are affiliate links: if you buy through them we may earn a small commission at no extra cost to you. How this works.