
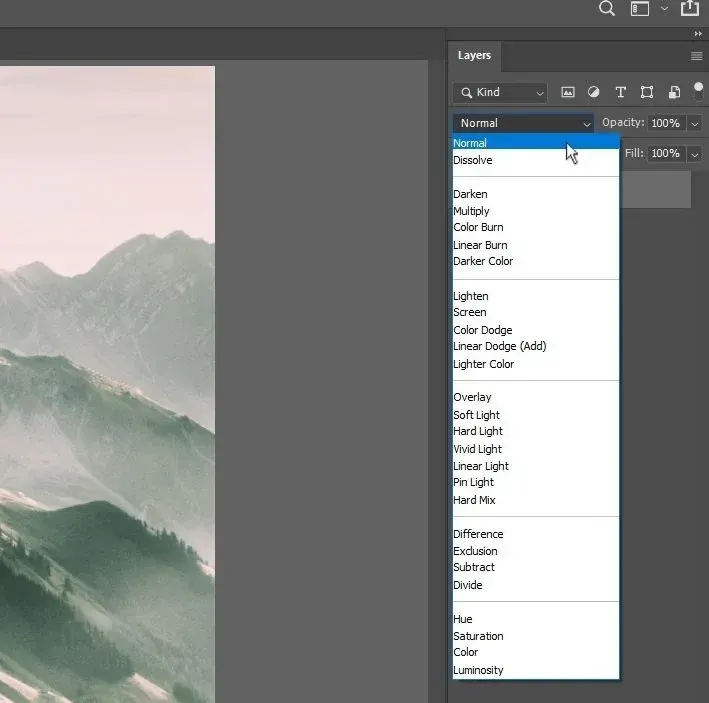
Blend modes are settings that control how a layer combines with the layers below it, using math on the color values instead of simply covering them. Multiply darkens, Screen lightens, Overlay adds contrast, Color tints and Luminosity changes brightness only, and learning these five covers most real editing work.
Why It Matters
Without blend modes, a layer either sits on top or is made partly transparent. Blend modes open up non-destructive ways to darken, brighten, add contrast, colorize and combine textures. They are the engine behind dodging and burning, sharpening, glows, shadows and creative effects.
They are also a shared language. Tutorials, presets and actions often say set the layer to Soft Light, and knowing what that does lets you adjust results instead of copying numbers blindly.
Beginner Blend Modes For Beginners
Blend modes live in a drop-down menu at the top of the Layers panel, next to Opacity. They apply to the active layer and affect how it interacts with everything underneath. Photoshop groups them by effect, and you can learn the group first.
The Groups
| Group | Modes | Effect |
|---|---|---|
| Darken | Darken, Multiply, Color Burn, Linear Burn | Make the result darker |
| Lighten | Lighten, Screen, Color Dodge, Linear Dodge (Add) | Make the result lighter |
| Contrast | Overlay, Soft Light, Hard Light, Vivid Light | Increase contrast |
| Inversion | Difference, Exclusion, Subtract, Divide | Compare or invert |
| Component | Hue, Saturation, Color, Luminosity | Change one color property |
The Five To Learn First
- Multiply: white disappears and darks stay, great for shadows and for darkening a sky with a gradient.
- Screen: black disappears and lights stay, great for glows, light leaks and fog.
- Overlay: darkens darks and lightens lights, boosting contrast and color.
- Soft Light: a gentler version of Overlay, good for dodging, burning and subtle contrast.
- Color: applies the hue and saturation of the layer while keeping the brightness below, ideal for tinting.
Neutral Colors
Some modes ignore a specific color. White is neutral in Multiply, and black is neutral in Screen. Fifty percent gray is neutral in Overlay and Soft Light. This is why you can paint on a gray layer set to Soft Light and the gray itself does not change the picture.
Common Mistakes
- Setting the mode, but leaving opacity at 100 percent, resulting in harsh effects.
- Using Overlay when Soft Light is a better fit, creating crunchy contrast.
- Applying blend modes to the Background layer, which cannot be changed until converted.
- Forgetting that the effect depends on what is beneath the layer.
Try A Quick Effect
Create a new layer, paint with a soft brush in a dark blue along the top of a sky, and set the mode to Multiply. Lower opacity to taste. You have created a darker sky using only a brush and a blend mode, with a mask for control.
Handy for this: Fast Prime Lens — creamy backgrounds, low light. (affiliate link)
Advanced How Modes Work, Practical Techniques And Control
The Math In Brief
Photoshop treats pixel values as numbers between 0 and 1. Multiply multiplies the top and bottom values, so anything times white equals itself and anything times black becomes black. Screen inverts both layers, multiplies, then inverts the result, which is why black does nothing and white stays white. Overlay applies Multiply to the dark half of the base and Screen to the light half, depending on the underlying value. Knowing this helps predict outcomes. Related concepts of tone appear in Curves in Photoshop.
Dodging And Burning With Soft Light
Create a layer filled with 50 percent gray set to Soft Light, then paint with a soft white brush at low flow to lighten and black to darken. Because the gray is neutral, only your strokes change the image. This keeps adjustments editable and reversible. See dodge and burn for the full workflow and frequency separation for skin work.
Color And Luminosity For Safe Edits
Applying a Curves adjustment can shift color along with brightness. Setting that adjustment layer to Luminosity changes only the brightness, preventing color shifts. Setting a Hue or Color Balance layer to Color shifts only hue and saturation without affecting contrast. These are valuable for portraits and skin tones. See adjustment layers and layer masks.
Sharpening And Texture
High Pass sharpening is typically applied on a layer set to Overlay or Soft Light, so only the edges gain contrast. Texture overlays, such as paper or film grain, work well in Soft Light, Multiply or Screen depending on whether the texture is light or dark. Learn the method in high pass sharpening.
Fill Versus Opacity, And Blend If
Opacity reduces the effect of the whole layer, including layer styles. Fill reduces the pixels while keeping styles like strokes and shadows at full strength. Blend If, found in the Layer Style dialog, limits the effect by the brightness of the layer or the layer below, with a split slider that feathers the transition. Use it to apply a glow only in the shadows or a texture only in the highlights.
Difference For Alignment And Checks
Setting a layer to Difference shows black where it matches the layer below, and bright pixels where it does not. This is useful for aligning two exposures or checking that a retouched layer matches the original. Switching quickly through modes with Shift and the plus or minus keys lets you test options in seconds.
Try It
- Open a photo and add a new empty layer above it.
- Paint a soft dark blue band across the sky and set the layer to Multiply, then lower the opacity.
- Add a 50 percent gray layer set to Soft Light and paint white on the subject’s face to lighten it gently.
- Add a Curves adjustment layer, set it to Luminosity, and compare with Normal mode.
Common Questions
What is the difference between Overlay and Soft Light?
Both increase contrast, but Overlay is stronger and can produce harsh results, while Soft Light is gentler. For subtle edits, Soft Light is usually safer.
Why does my layer not change when I use a blend mode?
Blend modes need something to interact with. A neutral color for that mode, such as white in Multiply or black in Screen, has no effect. Also check that the layer is not the Background and that opacity is above zero.
Which blend mode is best for shadows?
Multiply is the standard choice. Paint a soft shadow in a dark color on a separate layer, set it to Multiply, and lower the opacity until it looks natural.
Do other programs have the same blend modes?
Most editing tools, including Affinity Photo, GIMP, After Effects and Premiere, have equivalent modes with the same math. Names may vary slightly, but Multiply and Screen behave the same everywhere. See After Effects masks and blending.
Related Lessons
- Adjustment Layers to change tone and color non-destructively.
- Layer Masks In Photoshop to control where an effect applies.
- Dodge And Burn for shaping light with Soft Light layers.
- High Pass Sharpening for edge contrast with Overlay.
- Photo Compositing to combine images with blend modes.
Gear That Helps With This
Hand-picked kit that makes this lesson easier to put into practice.
Some links are affiliate links: if you buy through them we may earn a small commission at no extra cost to you. How this works.