
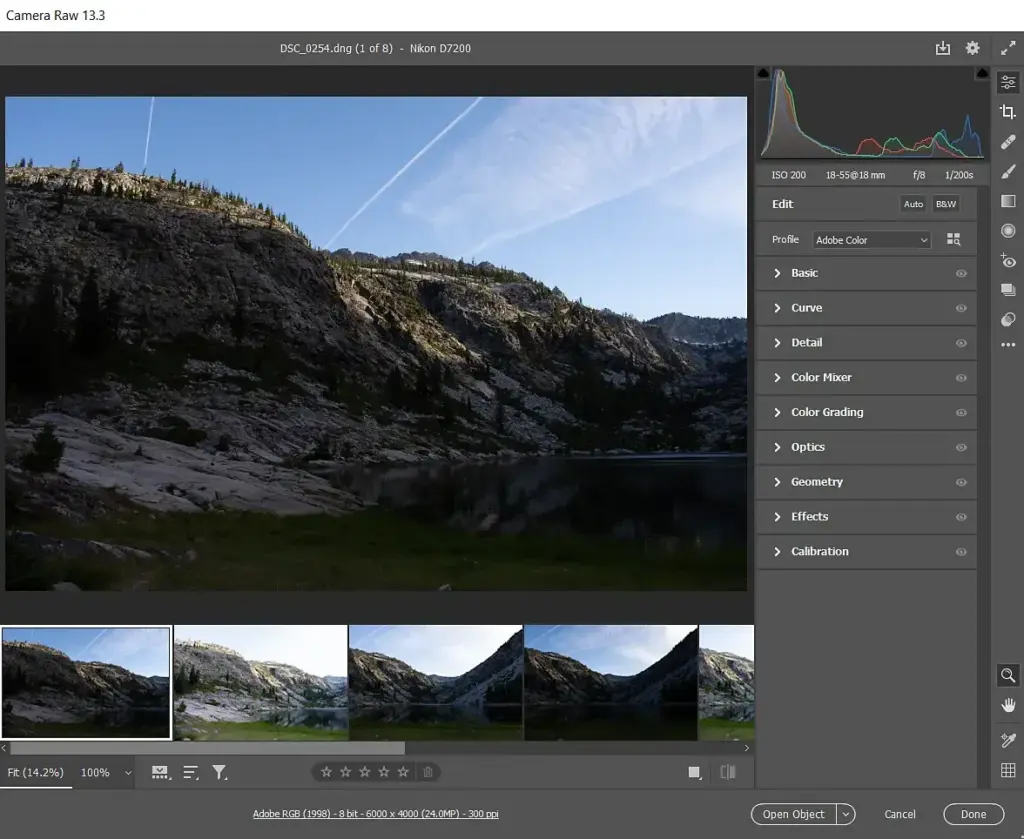
The Camera Raw filter is a Photoshop filter that gives any layer, including JPEGs, flattened files and merged copies, the same sliders and masking tools used to edit raw files. Applied to a Smart Object, it works as an editable Smart Filter, so you can change it later without losing quality.
Why It Matters
Many photographers do most of their editing in a raw converter, then open Photoshop for compositing or retouching. Sometimes you need those same tools inside Photoshop, such as to fix tone on a layer, add a quick color grade to a merged image or use masks on a finished composite.
The filter brings those tools to any layer, so you do not have to leave Photoshop or export and re-import files. It is quick, flexible and, with the right setup, non-destructive.
Beginner Using The Camera Raw Filter
Where To Find It
In Photoshop, choose Filter, then Camera Raw Filter. A window opens with a preview, a histogram and panels for basic tone, curves, detail, color mixer, color grading, optics and effects.
Raw Files Versus Normal Layers
When you open a raw file in Photoshop, it first opens in Camera Raw as usual. The filter is for files already inside Photoshop, such as JPEGs, TIFFs, flattened images and merged layers. It does not contain the raw data for those files, so some options, such as white balance temperature in Kelvin, work in a simpler way.
Basic Steps
1. Select the layer you want to edit.
2. Right click and convert it to a Smart Object so the filter stays editable.
3. Choose Filter, then Camera Raw Filter.
4. Adjust sliders such as Exposure, Contrast, Highlights and Shadows.
5. Click OK, and the filter appears under the layer as a Smart Filter.
Useful Panels
– Basic for exposure, contrast, texture, clarity and dehaze.
– Curve for tone control.
– Color Mixer for adjusting hues, saturation and luminance.
– Color Grading for adding tints to shadows, midtones and highlights.
– Detail for sharpening and noise reduction.
Common Mistakes
– Applying the filter to a normal layer, which changes pixels permanently.
– Trying to use it on very large documents without enough memory.
– Stacking several Camera Raw filters instead of editing one.
– Forgetting that it works on the visible layer only.
Handy for this: ND And Polarizing Filters — control light and glare. (affiliate link)
Advanced Making The Camera Raw Filter Work In Your Workflow
Smart Filters And Masks
When applied to a Smart Object, the filter creates a Smart Filter with its own mask. Click the white filter mask and paint black to hide the effect in some areas, or use a gradient. Double click the filter name to reopen it and change settings. See smart objects for how they behave and blend modes for changing how the filter blends, using the options at the filter’s right side.
Masking Tools Inside The Filter
The filter includes brush, gradient and radial masks, plus subject and sky selections in recent versions. These let you edit regions separately, such as brightening a face or darkening a sky. The tools mirror those in the adjustment brush and in the masks of Lightroom. Use them for quick local changes without making selections in Photoshop.
Merged Layers For Final Polish
Create a merged copy of all visible layers with the keyboard shortcut for stamp visible, convert it to a Smart Object and apply the filter. This lets you do final tone and color adjustments on the whole composite, such as adding contrast, grading or sharpening. Keep this layer on top and turn it off to compare.
Filter Versus Adjustment Layers
Adjustment layers, such as curves and hue and saturation, are lightweight and flexible, and see curves in Photoshop for one. The Camera Raw filter is more powerful for combined tone, color and detail changes in one place, and it includes tools such as texture, clarity, dehaze and grain. Use adjustment layers for simple edits and the filter for rich ones.
Color Work
The color mixer lets you shift individual hues, and color grading adds looks. Check skin tones carefully, and use gentle values. If you want to work in channels, see channels in Photoshop for more advanced approaches.
Sharpening And Noise
The Detail panel has sharpening and noise reduction. Noise reduction in a non-raw file is less powerful than in a raw file, so it is best to clean noise early with raw tools, then use the filter for final sharpening. Use masking in the sharpen controls so you sharpen edges only.
Performance And File Size
Smart Filters add to file size and slow large documents. If your computer struggles, flatten when you finish, and keep a layered copy. Use fewer filters and close unneeded documents.
Related Tools
Content-aware tools, covered in content-aware fill, help you fix areas before final tone changes.
Presets And Profiles
You can apply presets and profiles in the filter, which helps create a consistent look. Save your favorite settings as presets so you can reuse them. Remember that presets for raw files may behave differently on non-raw layers, so test them.
Keyboard Shortcuts
Open the filter with its shortcut, and use the preview toggle to compare before and after. Zoom to 100 percent to check sharpening and noise. Press the reset option to start over on a problem image.
Common Uses
People use the filter to add a quick glow, fix a color cast in a composite, lift shadows in a scan, add texture to a flat photo or apply grain to blend retouched areas. It is also helpful for matching the look of layers from different sources.
Summary
Use the Camera Raw filter on a Smart Object, edit in one pass, mask where needed and keep a layered file. This makes Photoshop edits flexible and consistent with your raw workflow.
Try It
- Open a JPEG in Photoshop and convert its layer to a Smart Object.
- Choose Filter, then Camera Raw Filter, and adjust Exposure, Contrast and Dehaze.
- Add a radial mask to brighten one area, then click OK.
- Paint on the Smart Filter mask to hide the effect on one region, then reopen the filter by double clicking it.
Common Questions
What is the Camera Raw filter in Photoshop?
It is a filter that applies the raw-style sliders and masks of Adobe Camera Raw to any layer in Photoshop, including JPEGs and merged copies of a composite.
Can I use Camera Raw filter non-destructively?
Yes. Convert the layer to a Smart Object first, and the filter becomes a Smart Filter that you can reopen, adjust or mask at any time.
Is the Camera Raw filter the same as editing a raw file?
The tools are the same, but on a non-raw layer you lack the original raw data, so some controls, like white balance, work differently and noise reduction is less powerful.
When should I use adjustment layers instead?
Use adjustment layers for simple, lightweight edits, and the Camera Raw filter when you want combined tone, color, texture and detail tools in one window.
Related Lessons
- Smart Objects for editable filters.
- Adjustment Brush for similar masking ideas.
- Curves In Photoshop for tone control with adjustment layers.
- Blend Modes to change how filters blend.
- Content-Aware Fill for fixes before final tone.
Gear That Helps With This
Hand-picked kit that makes this lesson easier to put into practice.
Some links are affiliate links: if you buy through them we may earn a small commission at no extra cost to you. How this works.