
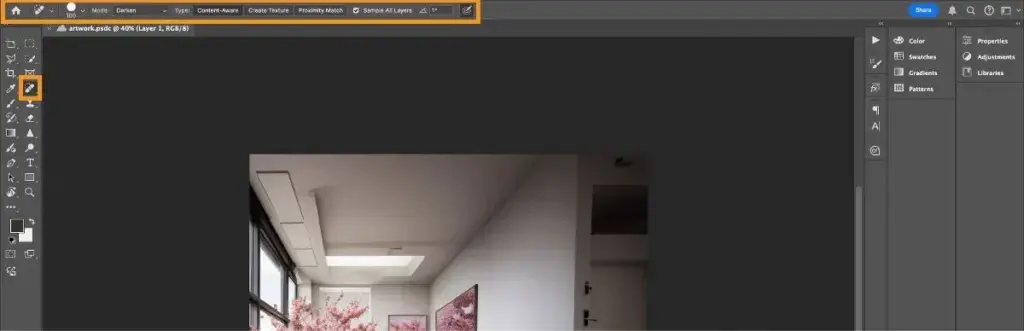
The healing brush copies texture from a sampled area and blends it with the color and brightness around the spot you paint. The clone stamp copies pixels exactly, and the spot healing brush samples automatically. Use healing for skin, sky and gradients, and cloning when you need an exact copy of detail.
Why It Matters
Dust spots, blemishes, wires and small distractions can ruin a good picture. Photoshop has several tools to remove them, and they behave differently.
Picking the right one saves time and prevents smudgy patches, repeating patterns and color mismatches that give away retouching.
Beginner The Healing Brush And Related Tools For Beginners
These tools live in the same group in the toolbar. Work on a new empty layer, set the tool to sample all layers, and keep the original untouched.
The Three Main Tools
| Tool | What It Does | Best For |
|---|---|---|
| Spot Healing Brush | Samples nearby pixels automatically and blends them | Small spots, dust and blemishes |
| Healing Brush | Samples from a source point you choose, blends texture with tone | Skin, textures and gradients |
| Clone Stamp | Copies pixels exactly from a source point | Patterns, edges and exact detail |
Using The Healing Brush
- Create a new empty layer above your photo.
- Choose the healing brush and set sample to current and below or all layers.
- Hold Alt on Windows or Option on a Mac and click a clean area as the source.
- Paint over the flaw, using short strokes and a soft brush slightly larger than the spot.
- Zoom out to check the result and repeat as needed.
Using The Spot Healing Brush
Click or paint over a small blemish and Photoshop picks the sample for you. It works well for dust spots in a sky and tiny skin marks. The content-aware option usually gives the best results, and the proximity option uses nearby pixels. If the result looks smudgy, undo and try the healing brush with a chosen source.
Using The Clone Stamp
The clone stamp is a direct copy. Use it along hard edges, patterns, and areas where you need exact detail, such as brick walls or fences. Set the opacity and flow lower and build up, and change the source often to avoid obvious repetition.
Common Mistakes
- Healing next to a strong edge, which smears color across the edge.
- Sampling from the same place again and again, creating visible repeats.
- Working directly on the background layer, which cannot be undone later.
- Using a hard brush, which leaves a visible outline.
A Five Minute Cleanup Routine
Zoom to 100 percent, scan the picture in a grid from top-left to bottom-right, and fix each flaw as you find it. Then zoom out and look at the picture as a whole. A set routine stops you from missing spots and from over-editing.
Handy for this: Fast Prime Lens — creamy backgrounds, low light. (affiliate link)
Advanced Blending Modes, Sources And Quality Control
How Healing Works
The healing brush copies the texture of the source, which is the fine pattern of detail, and then adjusts it to match the surrounding color and brightness at the target. This is why it blends better than a clone on skin or sky. It can fail near contrasting edges because it pulls in colors from the edge. A common remedy is to make a rough selection around the flaw first, so the blend stays inside it.
Sample Options And Layers
Working on an empty layer with sample all layers keeps the edit non-destructive and lets you lower the opacity or mask changes later. Make separate layers for different kinds of fixes, such as dust, skin and objects, so that you can turn each off. See layer masks for refining the result, and smart objects to keep the base image flexible.
Blend Mode Tricks
- Set the clone stamp to lighten to remove dark spots only, such as dust on a sky.
- Set it to darken to remove bright specks, such as stars in a night sky when needed.
- Use the healing brush in replace mode to keep grain and texture in noisy files.
- Use the normal mode with low opacity to soften a blemish without erasing it.
Content-Aware Tools And Generative Options
Content-aware fill can rebuild larger areas by sampling from the picture, as explained in content-aware fill. Generative tools offer another option, as in generative fill. Use these for large objects, and keep the healing brush and clone stamp for the final cleanup of texture and edges. Also see spot removal and sensor dust spot removal for batch cleanup.
Frequency And Skin
For portraits, avoid over-smoothing. A good approach is to remove only temporary blemishes and leave natural texture. For deeper control of tone and texture separately, use frequency separation and skin retouching. Check the result at 100 percent and at a small size, since over-retouching is obvious in both.
Detecting Problems
Show a high contrast view by adding a temporary curves layer, which exaggerates blotches and mismatched tone. Look for repeated patterns, soft smears or color shifts. Fix them with a smaller brush and a different source. Hide the temporary layer before export.
Efficient Habits
- Zoom to 100 percent for small flaws and 50 percent for larger ones.
- Use the bracket keys to change brush size quickly.
- Use a pen tablet for pressure control when you retouch a lot.
- Work in small strokes and check often with the layer on and off.
- Save common brush settings as a tool preset.
Keep the edits modest. The aim of retouching is to remove distractions, not to make the picture look artificial. When viewers notice the editing before the subject, it has gone too far.
Keeping Texture And Grain
When a photo has visible grain or fine texture, healing can create areas that look too smooth. Add a small amount of noise to the repaired layer, or use the clone stamp in a low-opacity setting to carry texture across. Compare repaired and untouched areas at 100 percent, and match their grain by eye.
Try It
- Open a photo with a few dust spots or small blemishes in Photoshop.
- Create a new empty layer and use the spot healing brush on one spot.
- Fix another with the healing brush using a chosen source, and a third with the clone stamp.
- Toggle the layer off and on and compare how each tool blended.
Common Questions
What is the difference between the healing brush and the clone stamp?
The clone stamp copies pixels exactly, while the healing brush copies texture and blends it with the tone and color around the target.
Why does my healing leave a smudge?
The brush may be near a strong edge, or the source may have a different texture. Use a smaller brush, change the source or select the area first.
Should I heal on a separate layer?
Yes. A separate layer with sample all layers lets you change opacity, mask or delete fixes without damaging the original.
Which tool is best for dust spots?
The spot healing brush is fast for small spots in smooth areas. For spots near details, use the healing brush or the clone stamp with a chosen source.
Related Lessons
- Spot Removal for quick fixes in Lightroom.
- Content-Aware Fill for larger objects.
- Skin Retouching to keep portraits natural.
- Frequency Separation for controlling tone and texture separately.
- Layer Masks In Photoshop to refine and hide edits.
Gear That Helps With This
Hand-picked kit that makes this lesson easier to put into practice.
Some links are affiliate links: if you buy through them we may earn a small commission at no extra cost to you. How this works.