
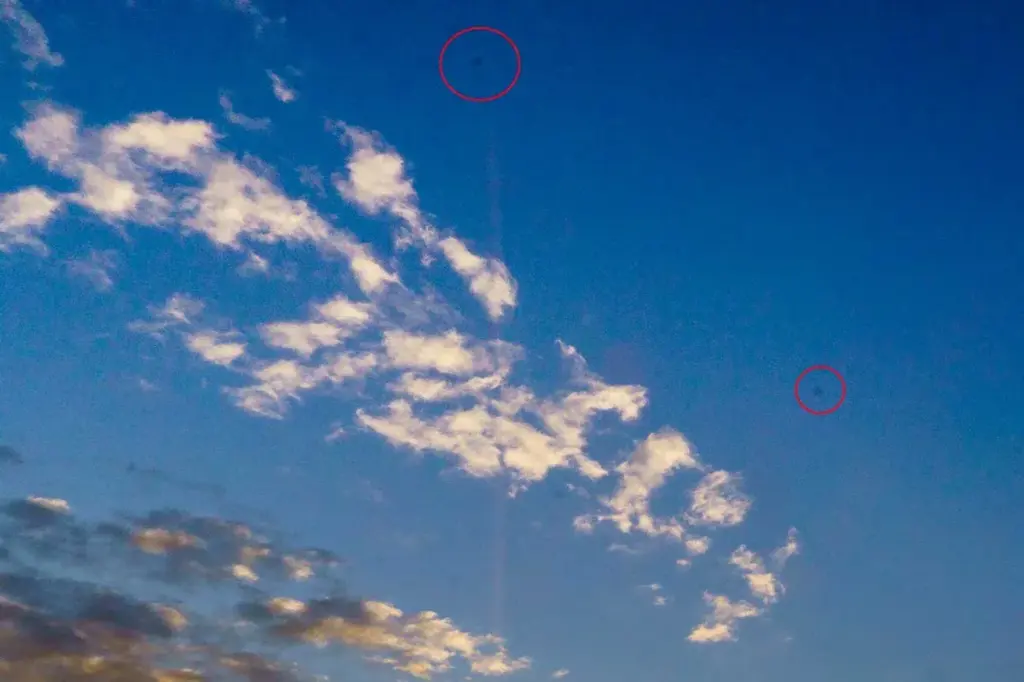
Sensor dust spots are specks of debris on the filter glass in front of your camera sensor that cast soft dark shadows, most visible at small apertures against plain backgrounds. Find them with a defocused f/16 to f/22 test shot, then remove them with a rocket blower first, a wet swab if needed, or spot healing in software.
Why It Matters
Dust is one of the most common and most irritating image quality problems. A single speck can sit in the same place on every frame, so one spot becomes hundreds of retouching jobs across a trip, a wedding or a long sky timelapse.
The good news is that most dust is loose and harmless, and a careful routine removes it at home for almost nothing. Knowing when to stop, and when a stubborn spot needs a professional, protects an expensive part of the camera.
Beginner How To Find And Clear Sensor Dust Spots
The sensor itself is covered by a thin stack of filter glass. Dust lands on that glass, not on the silicon, so each speck sits a fraction of a millimeter in front of the sensor. At wide apertures the light arrives from many angles and the speck blurs into nothing. As you stop down, light arrives from a narrower cone, and the shadow of the speck sharpens into a visible dark blotch.
Check For Dust First
- Set the camera to Aperture Priority, the lowest ISO and an aperture of f/16 to f/22.
- Point at a plain bright surface, such as a clear sky or a white wall or sheet of paper.
- Switch to manual focus and set the focus ring to its closest distance so that any texture is hopelessly blurred.
- Take a frame. Slow shutter speeds are fine, so do not worry about shake.
- Zoom to 100 percent and scan the whole frame. Dark smudges and ring shapes are dust, and they stay in the same place if you move the camera.
Cleaning Options From Gentlest To Firmest
| Method | Best For | Risk |
|---|---|---|
| Built-in sensor cleaning | Light loose dust | None, but often leaves some specks |
| Rocket blower | Loose dust and lint | Very low if used correctly |
| Sensor brush or gel stick | Static-bound specks | Low, if clean and unused on anything else |
| Wet swab with sensor fluid | Sticky spots and smears | Moderate, needs care and the right size |
| Spot healing in software | A few leftover specks | None to the camera |
Using A Rocket Blower
- Charge the battery fully, because a camera that loses power with the shutter open can damage the shutter curtain.
- Choose the clean sensor or lock-up option in the menu so the mirror or shutter opens and stays open.
- Hold the camera with the lens mount facing down so that dislodged dust falls out.
- Squeeze the blower a few times near the opening without touching the sensor. Do not insert the tip past the mount.
- Turn the camera off, then repeat your test shot to see what is left.
Mistakes To Avoid
- Using canned air, which can spray cold propellant that leaves permanent stains.
- Blowing with your mouth, which adds saliva droplets.
- Cleaning in a dusty or windy place, or with the lens mount facing up.
- Rubbing hard at a spot. Dust that does not move may be oil, which needs a wet method.
Prevention is cheaper than cleaning. Change lenses quickly in a sheltered spot, turn the camera off first, keep the mount facing down and cap open mounts with a body cap.
Handy for this: Sensor And Lens Cleaning Kit — keep glass spotless. (affiliate link)
Advanced Wet Swabs, Dust Maps And Software Fixes
Reading The Spot Position
The lens projects an inverted image, and the camera flips it so the photo looks upright. A speck near the top of a photo therefore sits near the bottom of the sensor when you look into the empty lens mount, and left and right are reversed as well. Knowing this helps you aim a gel stick or a swab at the right area, and tells you whether a spot lies in the center or at an edge.
The Wet Swab Method
Wet cleaning removes oily or sticky marks that a blower cannot shift. Use a swab sized to the sensor width, commonly about 16mm for APS-C and 24mm for full frame cameras. Put two or three drops of sensor-safe cleaning fluid on the edge of the swab, not on the sensor. Make one smooth pass across the sensor, flip the swab and make one pass back, then discard it. Never reuse a swab, and never press hard. Too much fluid leaves streaks that need another cleaning, while too little drags and can scratch.
Stop if a smear remains after two attempts. Stubborn marks on a coated filter may need a service center, and a sensor repair costs far more than a cleaning visit.
Sensor Dust Mapping
Some cameras can record a dust reference frame, such as a Nikon image dust off reference photo or a Canon dust delete data tag. You shoot a plain white target at a small aperture, the camera notes the coordinates of every spot, and compatible software then removes those spots from later files. This works best for specks that stay put, and it needs the same lens settings or a conservative aperture to be reliable.
Spot Removal In Software
Raw editors let you clone or heal a spot and then sync that edit to every image taken in the session. In Lightroom, the Spot Removal tool has a Visualize Spots checkbox that turns the picture into an edge map, which makes dust obvious against a smooth sky. Heal each dust speck, then copy the settings to the rest of the batch. See Lightroom masks for other local edits and the Lightroom Basic panel for the global tone settings you would normally apply alongside them.
Mirrorless Cameras And Shake Cleaning
Many bodies vibrate the sensor at startup or shutdown to shake dust loose. That works on loose particles, but it cannot remove oily films. Mirrorless sensors are exposed whenever a lens is off, so the lens-change routine matters more than on a DSLR. The overview in sensor cleaning shows how often to schedule full cleaning.
When To Pay Someone Else
Camera makers and local shops clean sensors for a modest fee, and it is a good option for a first cleaning, for a sensor with scratches or oil, or for any camera with in-body stabilization where the sensor floats on springs. Paying once also teaches you what a clean sensor looks like in a test shot.
Try It
- Take a defocused f/16 shot of a white wall and note how many spots you can see at 100 percent.
- Run the built-in sensor cleaning routine, then shoot the same test again and compare.
- Use a rocket blower with the camera facing down, then check the result with a third test shot.
- Heal any remaining specks in your editing software and sync the edit to a group of images.
Common Questions
How often should I clean my sensor?
Only when a test shot shows spots that affect your photos. Many photographers do a quick blower pass every month or two and a wet clean once or twice a year, if at all.
Can I use compressed air from a can?
It is best to avoid it. Cans can release liquid propellant that leaves marks on the filter glass. A rocket blower pushes only air and is safe for regular use.
Why are dust spots visible only at small apertures?
At wide apertures light reaches each speck from many angles, so its shadow blurs away. At f/16 and smaller, the light cone is narrow and the shadow becomes sharp.
Do mirrorless cameras get more dust?
They can, because the sensor is exposed whenever the lens is off. Powering down, changing lenses quickly and pointing the mount downward keeps it manageable.
Related Lessons
- Sensor Cleaning for a schedule and a full overview of care.
- Lightroom Masks for other local edits you can sync across a batch.
- Lightroom Basic Panel for the global edits that go with spot removal.
Gear That Helps With This
Hand-picked kit that makes this lesson easier to put into practice.
Some links are affiliate links: if you buy through them we may earn a small commission at no extra cost to you. How this works.