
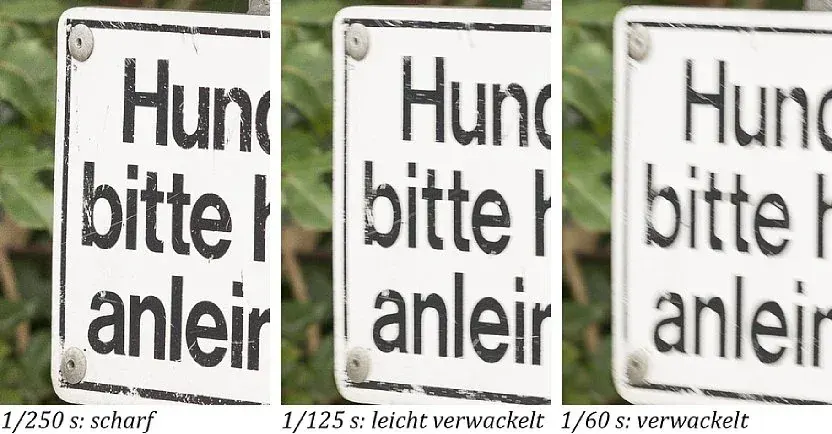
To fix blurry photos, first work out the cause, then correct it. Raise the shutter speed to freeze motion or shake, confirm the focus point sits on your subject, and steady your stance by tucking elbows and exhaling before each press. Most blur comes from a shutter speed that is too slow or focus that landed in the wrong place.
Why It Matters
Blur is the most common reason a photo gets deleted, and it has several different causes that look alike. Raising the shutter speed will not help if the focus landed on the background, and a new lens will not help if your hands are shaking.
A short routine for finding the cause turns a frustrating miss into a quick fix. Once you can read what kind of blur is in the frame, you can correct your technique on the next shot instead of guessing.
Beginner Quick Ways To Fix Blurry Photos
Start with the three easy checks, in this order: shutter speed, focus point and stance. Between them they explain most soft pictures taken by beginners, and each can be corrected in a few seconds.
Check The Shutter Speed
A common rule is to use a shutter speed at least equal to one over the focal length. With a 50mm lens, that means 1/50 second or faster, and with a 200mm lens, 1/200 second. Moving subjects need more. People walking need about 1/250 second, children running 1/500 second, and sports or birds 1/1000 second or faster. If the camera chooses a slow speed in dim light, raise the ISO, open the aperture or switch to Shutter Priority.
Check The Focus Point
Look at where the focus point or box sits in the viewfinder. If it landed on a branch, a wall or the background, your subject will be soft while something else is sharp. Use a single focus point, place it on the eye or the key detail, and press the shutter halfway to confirm focus before shooting. Wait for the confirmation beep or green box.
Steady Your Stance
- Plant your feet shoulder width apart and keep your knees soft.
- Tuck your elbows against your chest and support the lens from underneath with your left hand.
- Breathe out slowly and squeeze the shutter button gently instead of stabbing it.
- Lean on a wall, a post or a tree if one is nearby.
- Use the viewfinder rather than holding the camera out at arm length.
Which Kind Of Blur Do You Have
| What You See | Likely Cause | Quick Fix |
|---|---|---|
| Whole picture is soft, with ghosting in the same direction | Camera shake | Faster shutter, better stance or a support |
| Subject is smeared but the background is sharp | Subject motion | Faster shutter speed |
| Background is sharp and subject is soft | Missed focus | Move the focus point and recompose less |
| Everything is soft, even in daylight | Dirty lens, wrong mode or poor glass | Clean the lens and check the settings |
| Edges are soft but the center is sharp | Wide aperture or lens limits | Stop down one or two stops |
Common Mistakes
- Trusting the small rear screen, which hides blur until you zoom in.
- Leaving image stabilization off, or on when the camera is on a tripod.
- Shooting at the widest aperture so depth of field is razor thin.
- Pressing the shutter while the camera is still hunting for focus.
Zoom in on the rear screen after an important shot. A quick check at 100 percent shows blur immediately, and you can reshoot while the moment is still there. Take two or three frames in a row, because small shake often disappears between frames.
Handy for this: Carbon Fiber Tripod — sharp at slow shutter speeds. (affiliate link)
Advanced Diagnosing And Sharpening Blur
Motion Blur Versus Missed Focus Versus Shake
The direction and pattern of the blur identify the cause. Camera shake affects every part of the frame by the same amount and in the same direction, so a point of light becomes a short line. Subject motion blur affects only the moving part, so a sharp background with a smeared runner points to a shutter that is too slow for the subject. Missed focus leaves detail soft in a way that has no direction, with a sharp plane in front of or behind your subject. Look at fine detail such as eyelashes, text or leaf edges to see which part of the frame is in focus.
Beyond The Reciprocal Rule
The one over focal length rule dates from film and low resolution sensors. High megapixel cameras reveal tiny movement, so many people need about twice that speed, for example 1/100 second for a 50mm lens on a high resolution body. Image stabilization recovers some of that, often three to five stops. Read image stabilization for how it works and where it fails, such as when panning or on a tripod. If you shoot handheld in dim light, the shutter speed guide gives starting values for different subjects.
Focus Modes And Tracking
For still subjects, use single shot autofocus. For moving subjects, use continuous focus so the camera keeps updating as the distance changes, as explained in continuous autofocus. Back button focus separates focusing from shooting and avoids refocusing by accident, which is covered in back button focus. Recomposing after locking focus can also shift the plane of focus when you shoot wide open at close range, so move the focus point instead whenever you can. At night, autofocus can hunt, and the tricks in night focus with a flashlight help.
Lens And Aperture Effects
Many lenses are softest at the widest aperture and sharpest at two stops down. Very small apertures such as f/22 add diffraction softness, which is optical and cannot be fixed by steadier hands. For most lenses, f/5.6 to f/8 is the sweet spot. A lens that is soft at every setting may be dirty, so wipe it with the method in cleaning camera lenses, and check for a cheap filter, a smudged rear element or a loose mount.
Sharpening Afterward
Software can recover mild softness but not heavy motion blur. Apply capture sharpening to RAW files, then use a smart sharpen or a deconvolution tool for light shake. Keep the radius small, usually under 1.5 pixels, and the amount moderate, because strong sharpening adds halos and noise. Mask the sky and smooth areas so noise does not grow. For a more advanced option, see Smart Sharpen, which includes a motion blur removal setting for straight line shake. Treat these as rescue tools for a frame you cannot reshoot, not as a replacement for a sharp original.
Try It
- Shoot ten handheld frames at 1/30 second, then ten at 1/250 second, and compare them at 100 percent.
- Place the focus point on an eye and then on the background, and compare which part is sharp.
- Practice the steady stance with elbows tucked and a slow exhale.
- Photograph a moving person and find the slowest shutter speed that still freezes them.
- Open a slightly blurry file and try a mild sharpen to see what can be rescued.
Common Questions
Why are my photos blurry even in daylight?
Check that the focus point is on your subject, that the mode and shutter speed are sensible and that the lens is clean. Missed focus and a slow shutter in shade are the most common daytime causes.
What shutter speed stops blur?
For handheld shots use at least one over the focal length, and more for high resolution cameras. Add speed for moving subjects, around 1/250 for walking and 1/1000 for sports or birds.
Can I fix a blurry photo afterward?
Mild softness and light shake can be improved with sharpening or deconvolution, but strong motion blur or missed focus cannot be fully repaired. Reshoot when you can.
Is my lens the reason my photos look soft?
Sometimes. Check at f/5.6 to f/8 on a tripod with a sharp target. If it is still soft, clean the glass, test for front or back focus and consider service. Otherwise, technique is the more likely cause.
Related Lessons
- Shutter Speed Guide to pick a safe speed for any subject.
- Image Stabilization to see how much shake it can cancel.
- Continuous Autofocus for tracking moving subjects.
- Back Button Focus to separate focus from the shutter.
- Smart Sharpen to rescue a slightly soft file.
Gear That Helps With This
Hand-picked kit that makes this lesson easier to put into practice.
Some links are affiliate links: if you buy through them we may earn a small commission at no extra cost to you. How this works.