
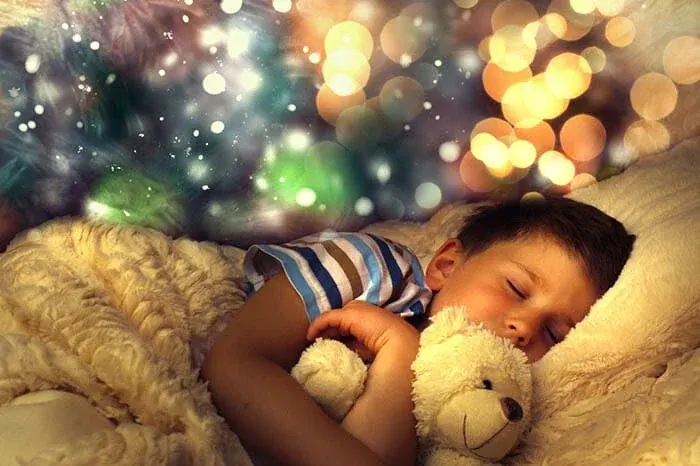
Fairy light bokeh is the glowing circles of color that string lights become when they are far out of focus behind a subject. To get it, place the lights well behind the person, use a wide aperture, focus on the eyes and stand close to your subject. The lights blur into soft, bright discs.
Why It Matters
Fairy lights are a favorite for holiday cards, cozy indoor portraits and wedding details. They are cheap, battery powered and small enough to hang anywhere. The result looks magical, but it only works when a few things line up: distance, aperture and exposure. Miss one of them and the lights stay as tiny sharp dots.
The effect is a good way to learn how blur works. You can see the discs grow as you move the lights farther away or open the aperture, which builds intuition for bokeh in any scene.
Beginner Setting Up Fairy Light Bokeh Step By Step
What You Need
- A string of warm white LED fairy lights, ideally battery powered with copper wire so they stay cool and thin.
- A lens with an aperture of f/2.8 or wider. A 50mm f/1.8 is a good choice, and an 85mm is even better.
- A way to light the face, such as a window, a lamp or a small flash.
- A background surface for hanging lights, such as a wall, curtain, tree or fence.
Step By Step
- Hang the lights in a loose cluster or in swags behind where the subject will stand. Fill an area about 3 to 5 feet wide.
- Place the subject 6 to 10 feet in front of the lights. Farther away is better, because the lights blur more.
- Stand 3 to 6 feet from the subject, and open the aperture to its widest setting.
- Focus on the nearest eye. If you use autofocus, choose a single point and place it on the eye.
- Check the brightness of the face. Add soft light from a window or lamp from the side if the face is dark.
- Take a test shot, then adjust the distance until the light discs look large and round.
Starting Settings
| Setting | Suggested Start | Why |
|---|---|---|
| Aperture | f/1.8 to f/2.8 | Wide opening makes large, soft discs |
| Shutter Speed | 1/125 second or faster | Freezes small movements of a person |
| ISO | 200 to 1600 | Raise it until the face is bright |
| Focus | Single point on the eye | Keeps the face sharp |
Common Mistakes
- Standing too far from the subject, which shrinks the blur.
- Placing the subject too close to the lights, so they are only slightly out of focus.
- Exposing for the bright lights, which makes the face dark.
- Using cold white fairy lights with warm indoor lamps, which clashes in color.
Easy Ideas
Wrap lights around a tree trunk and shoot at dusk. Hang them behind a bed or a sofa for a cozy portrait. Fill a glass jar with lights as a foreground detail, or tape a strand in a rectangle behind a child to frame them. Wide-spaced lights give larger, separate discs, and tight clusters give a glowing wash.
Handy for this: Fast Prime Lens — creamy backgrounds, low light. (affiliate link)
Advanced Distance Relationships, Focal Length And Mixed White Balance
Distances Control Blur
The size of a blur disc depends on the aperture, the focal length and the distances of the subject and the lights. Moving the lights farther from the subject makes the discs larger, with diminishing returns after about 15 feet. Moving the camera closer to the subject also makes the discs larger, because the focus distance shrinks. A good working ratio is to keep the lights at least three times as far from the subject as the camera is. See control depth of field for the underlying rules.
Focal Length Effects
A longer lens magnifies the background, so each fairy light looks bigger and fewer lights fit in the frame. At the same f-number, an 85mm lens at 6 feet gives much larger discs than a 35mm lens at the same spot, though you would frame the person differently. A 35mm shows more of the scene with smaller discs, and an 85mm gives a tighter, dreamier picture. Portrait lenses are covered in portrait focal length.
Disc Shape Across The Frame
Discs near the middle look round. Near the corners, the lens barrel clips them into a lemon or cat’s eye shape, and some lenses add a visible ring or onion texture. Wide apertures show this most, and stopping down by one stop cleans it up. If you want cleaner discs at the edges, keep lights in the center or choose a lens known for smooth bokeh. You can shape the discs yourself using custom bokeh shapes.
Exposure Balance
Fairy lights are bright small points against a dark background, and the camera meter can be fooled. Use spot or center-weighted metering on the face, or use manual exposure and adjust until the face looks correct. Blown highlights in the lights are fine, but huge white blobs mean the lights are too bright. Dim them, add a diffuser such as tissue, or step back a little. See exposure compensation for quick correction.
Mixed White Balance
Warm LED fairy lights sit around 2700K to 3000K. Window daylight is near 5500K. If you balance for the window, the lights turn orange, which usually looks pleasant. If you balance for the lights, the face turns blue. A good compromise is to set white balance to the face light and let the fairy lights stay warm. When the subject is lit by a lamp in the same warm tone, set white balance to match both and keep the look consistent. The guide to mixed lighting color explains more.
Adding Catchlights And Fill
Fairy lights are weak and cannot light a face well on their own. Add a soft light from the front and side to shape the face, and let the lights provide only the background glow. Even a window and a white card as a reflector are enough, and a small LED panel works too. See catchlights for bright eye details.
Try It
- Hang a string of lights on a wall and photograph a friend at 8 feet from the wall using f/1.8.
- Move the subject closer to the wall in 2 foot steps and compare how the discs shrink.
- Switch to a longer lens, or step back and zoom, and compare the size of the discs.
- Try two white balance settings, one for the face light and one for the fairy lights, and pick which looks better.
Common Questions
How far should the lights be behind the subject?
At least 6 feet, and 10 to 15 feet works better. The farther they are, the larger and softer the discs become. Keep the camera close to the subject to increase this effect.
Why are my fairy lights not blurry?
The aperture is probably too small, the lights are too close to the subject or you are too far from the subject. Open the lens to its widest, move the lights back and step closer.
Do I need a prime lens for fairy light bokeh?
It helps, since prime lenses reach f/1.8 or f/1.4 cheaply. A zoom lens at its longest setting and widest aperture can also work, especially at f/2.8 or f/4 on a telephoto.
What color of lights looks best?
Warm white LED lights look natural and flattering with skin tones. Colored lights can be fun, but they add color to the background only and look best with simple outfits.
Related Lessons
- Bokeh Explained for the optics behind the glowing discs.
- DIY Bokeh Shapes to turn the discs into hearts and stars.
- Portrait Focal Length to choose a lens for flattering portraits.
- Mixed Lighting Color to handle warm lights with daylight.
- Fast Lenses for lenses that give wide apertures.
Gear That Helps With This
Hand-picked kit that makes this lesson easier to put into practice.
Some links are affiliate links: if you buy through them we may earn a small commission at no extra cost to you. How this works.