
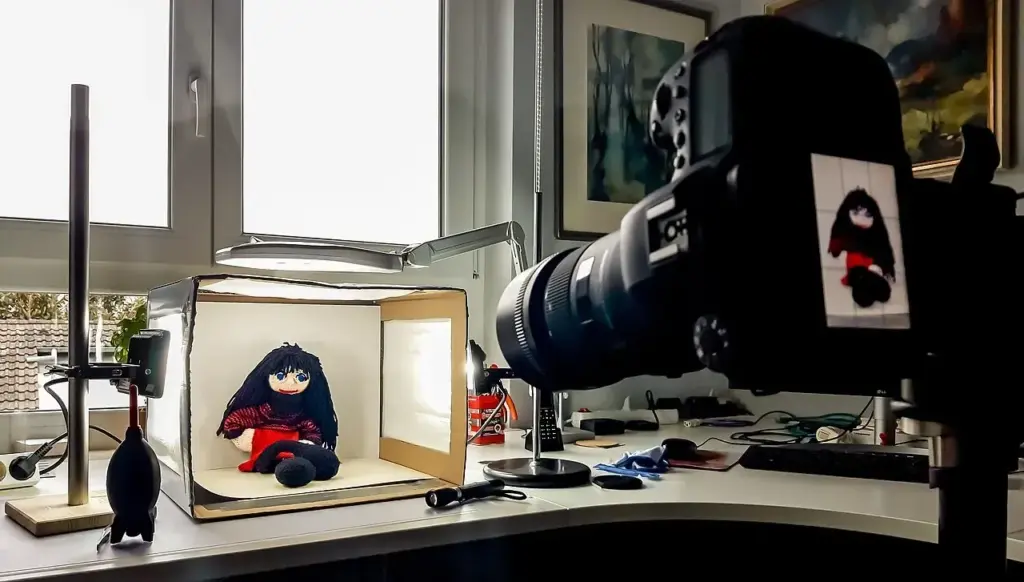
A DIY light tent is a small cube of white fabric or paper that diffuses lamps so a product is lit evenly from all sides. Cut windows in a cardboard box, cover them with white tissue or fabric, add a white sweep inside, and place two lamps at the sides for soft, even light.
Why It Matters
Product photos look clean when light wraps around the object, with soft shadows and no harsh reflections. A light tent creates that look by placing the item inside a translucent box, so the lamps shine on the tent and not on the product itself.
You can build one in under an hour from a cardboard box and a few sheets of paper or fabric. It is a practical first step for online shops, auctions, catalogs and hobby photography.
Beginner Building And Using A Simple Light Tent
A light tent works because it makes a small light source larger and softer. Light passes through the white walls and spreads, so shiny surfaces show gentle gradients instead of hot spots.
Materials
- A cardboard box about 16 to 24 inches on each side.
- White tissue paper, white ripstop nylon, a white shower curtain or a thin white sheet.
- A craft knife, ruler and tape.
- White poster board or paper for the background.
- Two lamps with daylight LED bulbs, rated around 5000 to 5600 K.
Build Steps
- Open the top of the box and cut a large square window in each side wall and the top, leaving a 2 inch frame of cardboard.
- Tape tissue paper or fabric over each window on the inside or outside, pulling it flat so it has no wrinkles.
- Place a sheet of white poster board inside so it curves up the back wall in a smooth sweep, without a sharp fold.
- Put the tent on a table and place one lamp on each side, about 1 foot from the walls and aimed at the center.
- Mount the camera on a tripod in front, with a lens that can frame the product without touching the tent.
Camera Settings To Start
| Setting | Starting Point | Reason |
|---|---|---|
| Mode | Manual or Aperture Priority | Keeps exposure steady between shots |
| Aperture | f/8 to f/11 | Gives depth of field across the product |
| ISO | 100 to 200 | Keeps noise low on a tripod |
| White balance | Custom or daylight | Keeps whites neutral |
| Exposure compensation | Plus 2/3 to plus 1 stop | Keeps the white background from turning gray |
Common Mistakes
- Using mixed bulbs, such as warm household lamps and daylight bulbs, which makes color shifts.
- Placing lamps too close to paper, which can create bright patches and heat.
- Leaving wrinkles or seams in the backdrop, which show as lines behind the product.
- Handling products with dusty or oily hands before photographing them.
Take a test picture, then adjust the lamp distance until the background looks bright and clean and the product has soft shading along its sides.
Handy for this: Carbon Fiber Tripod — sharp at slow shutter speeds. (affiliate link)
Advanced Light Placement, Reflective Backgrounds And Glare Control
Lamp Placement
Two lamps at the sides give even light and few shadows. For more shape, add a third lamp above the tent, shining through a top window, to light the upper surfaces of the product. If one side is brighter, move the lamp back or place a white card on the other side as a reflector. Moving a lamp farther away softens the shadows less than you might expect, but also reduces brightness, so raise the lamp power or lower the shutter speed. LED lamps run cool, which is safer near paper than hot tungsten or halogen bulbs. Read continuous lighting for more on lamp types and reflectors and diffusers for the card trick.
Color Accuracy
Use bulbs with the same color temperature and a high color rendering index, near 90 or higher, so colors look true. Set a custom white balance by photographing a gray card or white sheet inside the tent, as described in custom white balance. Turn off room lights and close curtains, since mixed light creates tints. If the background looks gray, raise exposure compensation instead of raising the lamp power until the product clips. The right side of the histogram should show a spike near white for the background, with product highlights just below it.
Reflective Backgrounds And Surfaces
Black acrylic, a mirror tile or a sheet of glossy white plastic under the product produces a reflection that adds depth. Because the tent is white, the reflection will be soft and bright. Wipe the surface with a microfiber cloth, since dust and fingerprints show strongly on glossy material. Place the product a little forward of the backdrop and tilt the camera down slightly so that the reflection is visible. If you want no reflection, use a matte white board or paper instead.
Controlling Glare On Shiny Products
Glass, chrome and glossy plastic reflect the lamps and the tent walls. A soft tent already reduces hard spots, but you may still see bright panels. Move the camera angle a few degrees until the reflection falls on a darker area. Add a strip of black card just outside the tent, or use a narrow slot cut in the front fabric for the lens, to create dark edges that define a glass bottle. A polarizing filter on the lens, turned while watching the screen, removes reflections from non-metal surfaces. Compare this with the box method in shoebox light modifier and the broader techniques in product photography.
Focus And Depth
Small products need extra depth of field. At f/11 diffraction softens fine detail a little, so use f/8 to f/11 and check at full size. For taller objects, take several shots at different focus distances and blend them in editing, a method called focus stacking. Use a remote release or a two second timer so that touching the camera does not blur the picture.
Try It
- Cut windows in a cardboard box, cover them with white tissue and line the inside with white poster board.
- Set two matching daylight lamps on each side and take a test picture of a small product.
- Adjust exposure compensation until the background is bright white without clipping the product.
- Photograph a shiny object, then change the camera angle and add a black card to see how glare changes.
Common Questions
What can I use to make a DIY light tent?
A cardboard box with windows cut in it, covered with white tissue, ripstop nylon or a thin white sheet, works well. Add white poster board inside as a smooth background.
How many lights do I need for a light tent?
Two lamps, one on each side, are enough for most products. A third lamp above the tent adds light to the top surfaces.
Why is my white background turning gray?
Camera meters aim for middle gray, so a bright background looks dull. Raise exposure compensation by about 2/3 to 1 stop and check the histogram.
How do I reduce glare on shiny products?
Change the camera angle, move the lamps, and add black card edges so reflections land on darker areas. A polarizing filter also helps with non-metal surfaces.
Related Lessons
- Product Photography for wider techniques on shooting items to sell.
- Shoebox Light Modifier for another cheap way to soften light.
- Reflectors And Diffusers for shaping and softening light with cards and fabric.
- Shower Curtain Diffuser for using a cheap fabric as a large diffuser.
- Custom White Balance for keeping whites clean and colors true.
Gear That Helps With This
Hand-picked kit that makes this lesson easier to put into practice.
Some links are affiliate links: if you buy through them we may earn a small commission at no extra cost to you. How this works.