
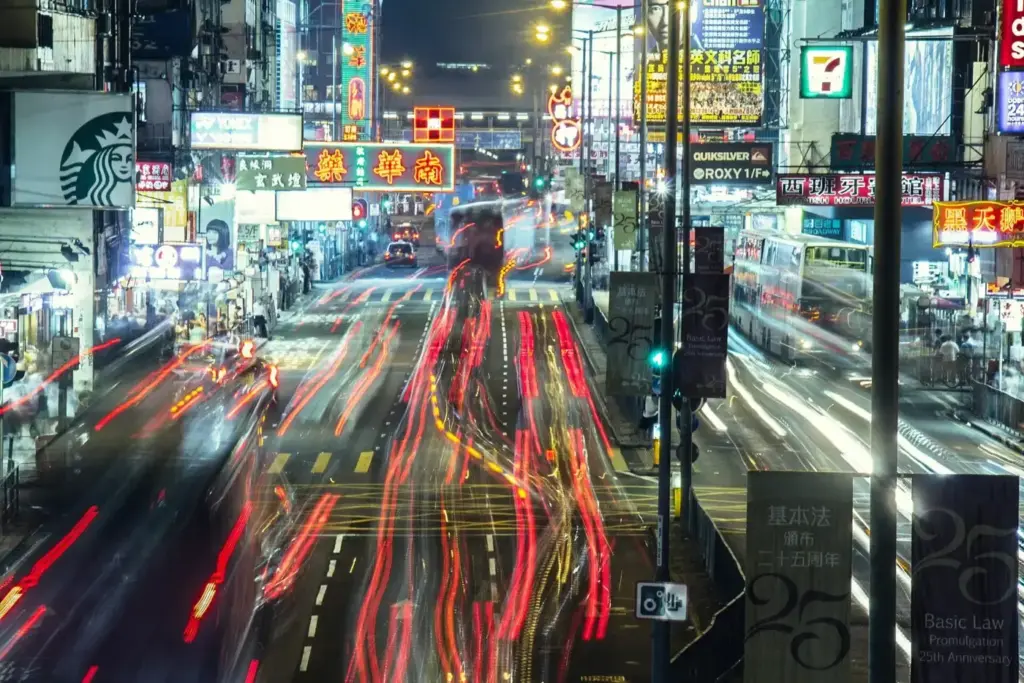
Car light trails are glowing lines of red and white made by photographing moving traffic with a long exposure. Put the camera on a tripod, use low ISO, an aperture near f/8 and a shutter time of 10 to 30 seconds, and focus manually, so the lights stretch into smooth streaks while buildings stay sharp.
Why It Matters
Light trails turn an ordinary road into a striking image. Moving headlights and taillights become smooth ribbons that lead the eye through a city, bridge or highway. The technique is easy to learn, needs only a tripod and basic settings, and works with almost any camera that has manual exposure.
Good results come from a handful of choices: a stable camera, the right time of day, a safe position, a plan for the composition and a patient approach to traffic. This lesson walks through each one.
Beginner Car Light Trails: The Basic Recipe
What You Need
- A sturdy tripod, since any shake turns lights into zigzags.
- A camera with manual mode, or at least Shutter Priority.
- A wide-angle lens, such as 16 to 35mm on full frame.
- A remote release, or the two second self-timer, so pressing the shutter does not shake the camera.
- A flashlight or headlamp for seeing your controls in the dark.
Starting Settings
| Setting | Starting Value | Reason |
|---|---|---|
| Mode | Manual | Keeps exposure steady as lights move |
| ISO | 100 or the lowest native value | Least noise during a long exposure |
| Aperture | f/8 to f/11 | Sharp scene with good depth of field |
| Shutter speed | 10 to 30 seconds | Long enough for trails to stretch across the frame |
| Focus | Manual, set on a distant light | Autofocus fails in low light |
| Image format | RAW | Gives room to fix white balance and shadows |
Step By Step
- Arrive during twilight, about 20 to 40 minutes after sunset, when the sky still has deep blue color.
- Place the tripod on stable ground, level the camera and frame the road with a strong line such as a curve, bridge or intersection.
- Switch the lens to manual focus and focus on a distant lit building or street lamp using live view zoom.
- Set the camera to manual mode with ISO 100, f/8 and 15 seconds.
- Use a two second timer, press the shutter and wait. Review the image and adjust time or aperture to taste.
Reading The Result
If the image is too bright, close the aperture to f/11 or shorten the time. If the trails are too short and the road looks empty, lengthen the time or wait for a heavier stream of cars. If lights look blown out, lower the exposure rather than raising ISO.
Safety Basics
- Stay well away from moving traffic. Shoot from a footbridge, overpass sidewalk, hillside or a legal pedestrian area.
- Do not stand on shoulders or in traffic lanes. Wear bright clothing in the dark.
- Keep your tripod legs out of walkways, and watch for wind on bridges, which can shake the camera.
- Check local rules about tripods and photography at public sites.
Common Mistakes
- Shooting in full dark, where the sky is black and flat. Twilight gives a better backdrop.
- Leaving autofocus on, so the camera cannot lock and refuses to shoot.
- Using a high ISO, which adds noise to the dark parts of the scene.
- Pressing the shutter by hand, which adds small shakes that blur the buildings.
Handy for this: Carbon Fiber Tripod — sharp at slow shutter speeds. (affiliate link)
Advanced Shutter Time, ND Filters, Composition And Traffic Patterns
Choosing The Shutter Time
Longer exposures create longer, smoother trails, but they also catch more traffic. A shutter time of 4 to 8 seconds gives short bursts of light, and 15 to 30 seconds draws long ribbons. On a busy road, long times may fill the frame with overlapping light and remove the gaps that make a pattern. On a quiet road, a longer time or a few cars can look better. Set the exposure first, then change the time and aperture together. Each doubling of time needs one stop less light, so f/8 at 10 seconds equals f/11 at 20 seconds.
Using ND Filters
During twilight, a 30 second exposure at f/8 may already be too bright. A neutral density filter reduces the light so you can use long times while the sky is still colorful. A 3 stop or 6 stop filter is useful. Put the filter on after focusing, since dark filters make live view difficult. Read the camera filters guide for how ND filters are rated.
Composition Ideas
- Use curves and S-shapes, such as a road bend, which draw the eye through the image.
- Look for leading lines like a bridge deck or a multi-lane highway running into the distance. See leading lines.
- Place the horizon or skyline on a third, leaving room for sky color. See rule of thirds composition.
- Include a fixed anchor such as a building, bridge or sign, so the trails have context.
- Choose a high viewpoint for a clearer layout of lanes, and a low angle for dramatic, large trails near the camera.
Traffic Patterns And Timing
Traffic lights group cars into waves. Time your exposures to start when a wave begins so the trails fill the frame in one piece. Headlights appear white and travel toward you, and taillights appear red and travel away, so a two-way road gives a classic red and white combination. A single lane with only taillights gives a cleaner, more minimal look. Take many frames, because the best one often depends on a lucky mix of buses, trucks and cars.
Combining Several Frames
Instead of one long exposure, you can shoot many shorter frames of 5 to 10 seconds and combine them in editing with a Lighten blend. This keeps the sky and buildings clean while you pick the best trails from each frame. Keep the camera and focus untouched during the series, and use the same exposure for every frame.
Image Quality At Night
Long exposure noise reduction doubles the time of each shot because the camera takes a second dark frame. It cleans hot pixels, but it also makes it hard to shoot quickly, so turn it off if you take many frames and fix noise in editing. White balance in RAW can be changed later, but set about 4000 to 4500 Kelvin in the camera for a rich blue twilight. Smaller apertures such as f/11 turn bright street lamps into small starbursts, a pleasing effect. For help with the dark, see night focus with a flashlight.
Try It
- Choose a safe pedestrian bridge or hillside near a road and arrive just after sunset with a tripod.
- Take three shots at f/8 and ISO 100 with 5, 15 and 30 seconds, and compare the trail lengths.
- Repeat the best setting with the frame composed on a curve and notice how the line leads the eye.
- Take ten 8 second frames in a row and combine them with a Lighten blend in your editor.
Common Questions
What shutter speed should I use for car light trails?
Start at 10 to 30 seconds with ISO 100 and f/8. Shorter times give short streaks, and longer times give smooth ribbons, so adjust to the traffic.
Do I need a tripod for light trails?
Yes. Any camera shake blurs the buildings and breaks the lines of light, so use a steady tripod and a timer or remote.
When is the best time to shoot car light trails?
Twilight, about 20 to 40 minutes after sunset, gives a deep blue sky and enough light to show buildings, with plenty of traffic for trails.
Can I shoot light trails with a phone?
Yes, many phones have a long exposure or light trail mode. Use a small tripod, hold still and keep the phone steady for the best result.
Related Lessons
- Long Exposure Photography for more on how time shapes motion in a picture.
- Blue Hour Photography to plan the best twilight window.
- Choosing A Tripod to pick a tripod stable enough for long frames.
- Night Focus With A Flashlight for sharp focus in the dark.
- Cityscape Photography for framing roads and skylines.
Gear That Helps With This
Hand-picked kit that makes this lesson easier to put into practice.
Some links are affiliate links: if you buy through them we may earn a small commission at no extra cost to you. How this works.