
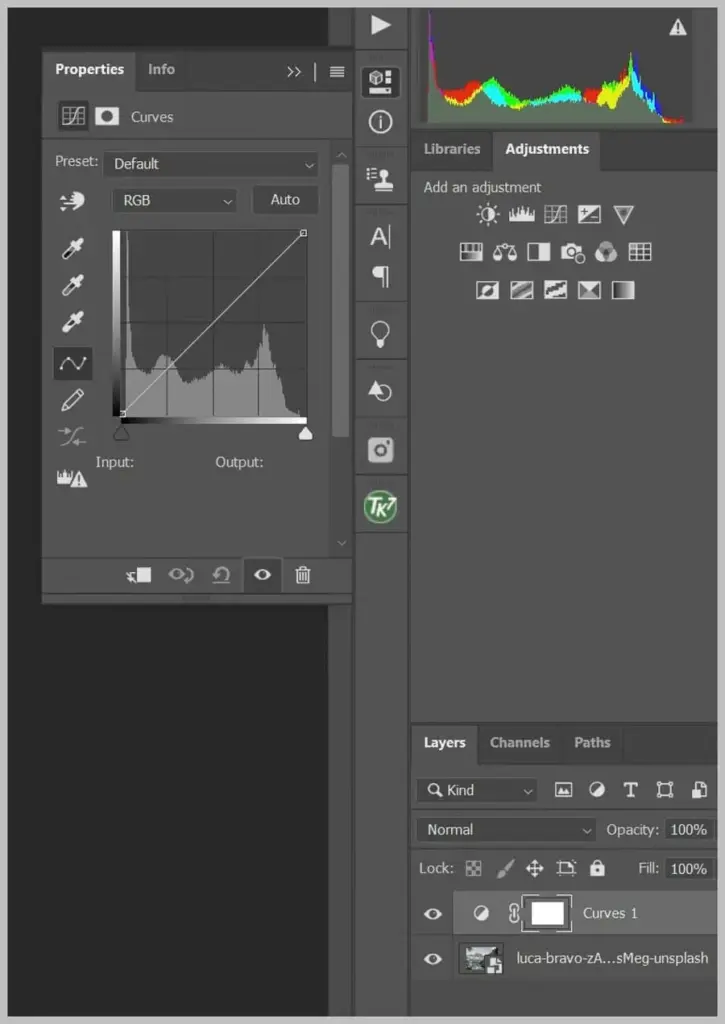
The curves adjustment in Photoshop is a graph that maps the original brightness of every pixel to a new value, letting you control contrast, brightness and color with precision. Dragging points on the line lightens or darkens specific tonal ranges, and working on individual color channels corrects casts and creates color effects.
Why It Matters
Sliders such as brightness and contrast are blunt tools that affect the whole image in a fixed way. Curves lets you decide exactly which tones to change and by how much, with smooth transitions. Many retouchers rely on curves for nearly all tone and color work because it is flexible and gives excellent quality.
Once you understand the graph, the same concept appears elsewhere, in Lightroom’s tone curve, in video editors and in Camera Raw, so the skill is very portable.
Beginner Using The Curves Adjustment Step By Step
Add curves as an adjustment layer, so the effect is non-destructive. Click the half black and half white circle at the bottom of the Layers panel and choose Curves.
Reading The Graph
The horizontal axis shows input values, the original tones from black on the left to white on the right. The vertical axis shows output values, the new tones. A straight diagonal line means no change. Raising a point on the line brightens that tonal range, and lowering it darkens it.
Basic Moves
| Action | Result |
|---|---|
| Drag the middle point up | Brighter midtones |
| Drag the middle point down | Darker midtones |
| Make an S shape | More contrast |
| Make a reverse S | Less contrast |
| Raise the bottom left point | Faded, matte blacks |
| Lower the top right point | Dimmer highlights |
A Simple S-Curve
- Add a Curves adjustment layer above your image.
- Click the middle of the line to add a point and leave it in place.
- Click about a quarter of the way up the line, then drag down slightly to darken the shadows.
- Click about three quarters up the line, then drag up slightly to brighten the highlights.
- Lower the layer opacity if the effect is too strong.
Using The Eyedroppers And Targeted Tool
Hold Ctrl or Command and click on the image to add a point at that tone. The hand tool with arrows lets you click and drag on the image itself, moving the curve for that tone. The three eyedroppers set the black point, gray point and white point, and the gray eyedropper can neutralize a color cast by clicking on a neutral object.
Common Mistakes
- Making extreme curves that cause posterization, with steep sections that stretch tones.
- Adding too many points, which creates wobbles and artifacts.
- Applying curves directly to the pixels instead of using an adjustment layer.
- Increasing contrast so much that highlights clip.
A Quick Practice
Open a flat photo, add a curves layer, and make a gentle S shape. Switch the layer visibility on and off to compare. Then change the layer blend mode to Luminosity to see how this avoids color shifts.
Handy for this: Monitor Calibrator — colors you can trust. (affiliate link)
Advanced Channels, Blend Modes, Masks And Precision
Working In Color Channels
Open the channel menu at the top of the curves panel and choose red, green or blue. Raising the red curve adds red and lowering it adds cyan. Raising green adds green, lowering it adds magenta. Raising blue adds blue, lowering it adds yellow. Use these controls to fix color casts, to add warm highlights and cool shadows, or to create stylized looks. See channels in Photoshop, color harmony and color temperature.
Luminosity Blend Mode
A strong S-curve in RGB mode can increase color saturation along with contrast, which sometimes shifts hues. Setting the adjustment layer’s blend mode to Luminosity limits the change to brightness. Setting it to Color does the opposite, applying only the color change. See blend modes for details.
Masking And Local Curves
The layer mask on the adjustment layer lets you apply the curve to a specific area. Fill the mask with black to hide the effect, then paint white where you want it. Use this to brighten a face, darken an edge or add contrast to a sky. For more control, combine with luminosity masks, which select tones by brightness. See layer masks, luminosity masks and dodge and burn.
Precision Tools
Display the histogram behind the curve to see how tones are distributed, and click the Show Clipping option to check for lost detail. Use the arrow keys to nudge a selected point by small amounts, and press Delete to remove a point. The numeric input and output boxes at the bottom let you type exact values. Check the result with the info panel while hovering over key tones. Learn the histogram in reading histograms.
Curves Versus Levels
Levels has three controls, black point, white point and midtone gamma, and is simpler. Curves has many control points and handles more complex adjustments. Levels is suitable for quick fixes, and curves is better for shaping. Read adjustment layers to see how both fit into a non-destructive workflow.
Curves In Other Software
The same idea appears in Lightroom’s tone curve, in Camera Raw and in video color tools. See Lightroom tone curve, gamma and tone curves and the Camera Raw filter. Printing is also influenced by curve shapes, as described in soft proofing for printing.
Curves Adjustment Practice For Portraits And Landscapes
For portraits, keep the curve gentle. A small lift in the midtones brightens skin, while a slight dip in the shadows adds depth around the eyes and jaw. Check skin tones in the info panel, because over-strong curves can turn skin orange or gray. For landscapes, a moderate S-curve adds punch to clouds and rock, and a small lift in the blue channel shadows can give a cool, clean look. Always compare with the original by toggling the layer, and step back from the screen to judge the result.
Building A Reusable Curves Workflow
Many editors save a few curves presets, such as a soft contrast curve, a faded matte curve and a warm highlights curve. Use the menu in the curves panel to save a preset, then load it on new images as a starting point. Adjust it for each photo rather than applying it blindly, since every image has a different tonal range. Keep adjustment layers named, such as “Contrast Curve” and “Skin Brightness”, so you can find and refine them later.
Troubleshooting Curves Problems
- If the image looks harsh, lower the layer opacity or flatten the steepest part of the curve.
- If you see banding in smooth skies, work in 16-bit mode and avoid extreme changes.
- If colors shift, set the blend mode to Luminosity or move color changes into a separate layer.
- If shadows look muddy, raise the bottom left point a little and check the blue channel for a cast.
Try It
- Open a photo and add a Curves adjustment layer.
- Create a gentle S-curve, then change the blend mode to Luminosity.
- Switch to the blue channel and lift the shadows slightly for a cool tint.
- Add a mask and paint out the effect on the subject’s face.
Common Questions
What does the curves adjustment do in Photoshop?
It maps input tones to output tones using a graph, allowing precise changes to brightness, contrast and color across the tonal range.
How do I make an S-curve?
Add a point in the middle, then pull the lower portion down and the upper portion up to form an S shape. This increases contrast, especially in the midtones.
Why do colors change when I use curves?
An RGB curve adjusts all channels together, which can change saturation and hue. Switch the layer blend mode to Luminosity to limit the change to brightness.
Is curves better than levels?
Curves is more flexible, but levels is quicker for simple black and white point adjustments. Many editors use both.
Related Lessons
- Adjustment Layers to keep edits non-destructive.
- Blend Modes for using Luminosity and Color with curves.
- Luminosity Masks to apply curves to specific tones.
- Lightroom Tone Curve for the same idea in Lightroom.
- Layer Masks In Photoshop to control where the curve applies.
Gear That Helps With This
Hand-picked kit that makes this lesson easier to put into practice.
Some links are affiliate links: if you buy through them we may earn a small commission at no extra cost to you. How this works.