
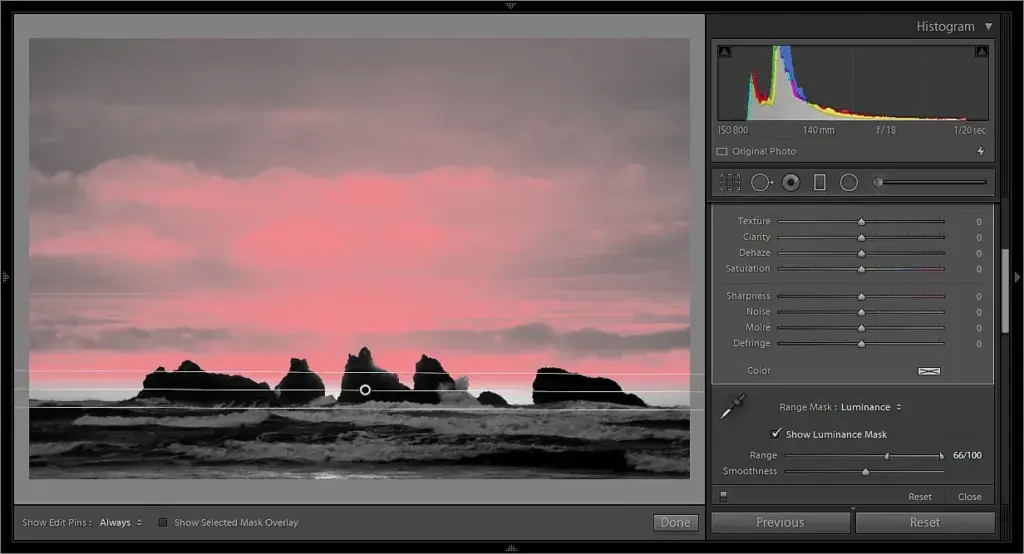
A luminance range mask is a Lightroom refinement that restricts an adjustment to a chosen band of brightness. You draw a mask, add a range condition, then drag the handles to select shadows, midtones or highlights. Only pixels inside that range receive the edit, which gives precise control without painting by hand.
Why It Matters
Brushes and gradients cover areas, but they do not know where the bright and dark parts of a picture are. A sky gradient also darkens the tops of mountains and trees unless you paint around them.
Range masks add that knowledge. They let a broad mask act only on the tones or colors you want, so edits look natural and need much less cleanup.
Beginner Luminance Range Masks For Beginners
Start with any mask, such as a linear gradient, radial gradient or brush. Open the mask panel and click the option to add a range condition. Choose luminance, color or depth if your photo has depth data. For brightness-based edits, choose luminance range.
The Controls
| Control | What It Does |
|---|---|
| Range handles | Set the darkest and brightest tones that are included |
| Smoothness | Softens the transition at the edge of the selected tones |
| Eyedropper | Click a part of the picture to set the range from that tone |
| Show overlay | Shows the selected area as a colored overlay or in black and white |
| Invert | Selects everything outside the chosen range |
A Simple First Edit
- Create a linear gradient over the sky.
- Add a luminance range condition and use the eyedropper on the sky.
- Drag the handles so the overlay covers the sky but not the dark landscape.
- Increase smoothness to hide the edge between the sky and the land.
- Lower exposure, add contrast or adjust color for the selected area only.
Color Range Masks
A color range mask works the same way, but it selects by hue instead of brightness. Click the eyedropper on a blue sky, a green leaf or a red jacket, and Lightroom selects similar colors inside the mask area. Adjust the amount slider to widen or narrow the match. It is useful for deepening a sky, changing a shirt color or cooling a distant hillside.
Where Range Masks Help
- Darkening only bright sky while keeping the foreground unchanged.
- Brightening only the shadows in a portrait.
- Changing the color of specific objects without painting around them.
- Adding contrast to highlights and shadows separately.
- Cleaning bright blown-out spots on skin, such as a shiny forehead.
Common Mistakes
- Setting smoothness too low, so the edge becomes visible and looks cut out.
- Making edits too strong and creating halos around objects.
- Forgetting to turn on the overlay to check what is selected.
- Applying a range mask to the wrong mask layer, since each mask has its own range settings.
A Reliable Habit
Always look at the overlay before you adjust sliders. A mask that appears correct in color view can include stray areas that only the overlay reveals. Turning on the overlay takes a second and prevents most mistakes.
Handy for this: Monitor Calibrator — colors you can trust. (affiliate link)
Advanced Refinement, Stacking And Quality Control
Combining Masks
Each mask in Lightroom can combine selections with add, subtract and intersect. A luminance range intersected with a gradient limits the effect to a given tonal band inside a given area. Subtracting a brush from the range removes unwanted places, such as a bright window frame you do not want to darken. Learn more about the overall mask workflow in Lightroom masks.
Working With Smoothness
The smoothness slider sets how gradual the boundary between included and excluded tones is. A high value creates a wide soft transition, which hides edges but may leak the edit into tones you did not target. A low value gives crisp control, but it can show posterization or jagged lines in fine detail. Start around the middle, then adjust while zooming to 100 percent on edges such as tree branches and hair.
Local Contrast And Tone
Range masks work best for tonal separation. Lifting only the deep shadows can open detail in dark areas without raising midtone noise. Reducing only the brightest highlights can recover clouds without dulling the whole sky. Pair them with the global tools in the basic panel and with shadow detail recovery so that every change has a clear job.
Quality Traps
- Halos appear when an edge between very different tones is selected with a soft range and a strong edit. Reduce the amount or narrow the range.
- Banding shows in smooth skies when strong tonal changes are applied to 8-bit exports. Check the sky at full size and consider a small amount of grain.
- Noise rises in lifted shadows. Use denoise from Lightroom denoise before or after, then recheck.
- Color fringes appear if the range includes edge pixels with chromatic aberration, covered in chromatic aberration.
Performance
Complex masks with many range conditions slow the editor, especially on large raw files. Keep the number of masks sensible, merge similar adjustments into one mask where possible and use smart previews, as discussed in Lightroom performance. Close other heavy applications while editing high-resolution images.
Verifying Results
Check the edit objectively by toggling the mask on and off, viewing the before and after, and zooming to inspect the edges. Use the histogram to confirm that no clipping occurred. Look at the image on a second display or a phone to see whether the effect still looks natural. If an edit is only visible when you look closely for it, it is probably the right strength.
Save a preset with your favorite range settings when you find a combination that works, such as a sky darkening mask or a shadow lift, so that it can be applied quickly to similar photographs. Review each preset on a few images before applying it to a whole batch.
Building A Tonal Workflow
Treat range masks as a way to split a picture into zones: deep shadows, shadows, midtones, highlights and bright highlights. Make small edits to each zone, then check the combined image. This approach follows the thinking in zone system basics and keeps edits small, which is what makes them look natural. Three gentle edits are almost always better than one aggressive edit.
Try It
- Open a landscape photo with a bright sky and create a linear gradient over the top.
- Add a luminance range condition and use the eyedropper on the sky.
- Adjust the range handles and smoothness until the dark land stays unselected.
- Lower exposure by about half a stop and compare the before and after.
Common Questions
What is the difference between luminance and color range masks?
A luminance range mask selects by brightness, while a color range mask selects by hue. Both limit a broad mask to matching pixels.
Why does my range mask leave a halo?
The transition is probably too sharp, or the edit is too strong. Raise smoothness, narrow the amount or reduce the adjustment.
Can I use range masks without a brush or gradient?
Yes. You can start from a blank mask with a range condition only, such as the sky selection, or use luminance range as the first selector.
Do range masks work on JPEG files?
Yes, but raw files give smoother results because they hold more tonal data, so there is less chance of banding.
Related Lessons
- Lightroom Masks for the full set of mask tools.
- Luminosity Masks for a similar technique in Photoshop.
- Shadow Detail Recovery to lift dark areas carefully.
- Gradient Filters In Lightroom for starting masks with gradients.
- Adjustment Brush to refine the mask by hand.
Gear That Helps With This
Hand-picked kit that makes this lesson easier to put into practice.
Some links are affiliate links: if you buy through them we may earn a small commission at no extra cost to you. How this works.