
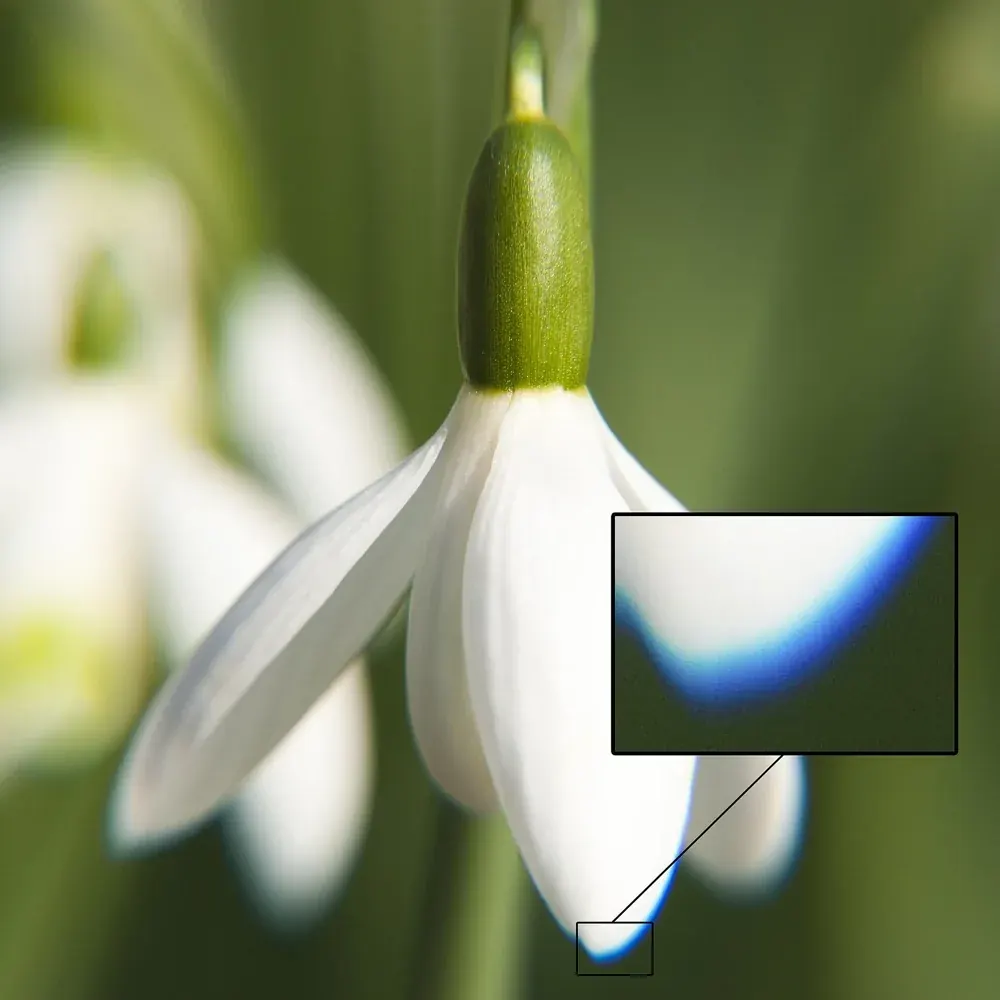
Chromatic aberration is a lens defect where different colors of light focus at slightly different points, creating purple, green or blue-red fringes along high-contrast edges. It is worst at wide apertures and toward the corners, and you can reduce it by stopping down, choosing better lenses and using profile corrections in software.
Why It Matters
Color fringing can ruin an otherwise sharp photo, especially around branches against a bright sky, or on backlit edges. It is easy to miss on a small screen and obvious in a large print.
Knowing the types and causes helps you decide when to fix it by changing settings, when software correction is enough and when a better lens is justified.
Beginner What Chromatic Aberration Looks Like
A glass lens bends light by different amounts for each wavelength, a property called dispersion. Blue light bends more than red, so the colors do not meet at the same point. The result is thin colored outlines on edges where bright and dark areas meet. In landscapes they often appear around tree branches against the sky, and in portraits around hair against a bright background.
The Two Types
- Lateral (transverse) aberration: colors shift sideways, giving red and blue or green and magenta edges that grow toward the corners.
- Longitudinal (axial) aberration: colors focus at different distances, producing green fringes behind the focus plane and purple in front, mostly at wide apertures.
- Purple fringing is often a mix of aberration and sensor effects.
- Lateral fringing is easy to correct in software, while axial is much harder.
- Both reduce when the lens is stopped down.
Fixes Compared
| Fix | Works On | Limit |
|---|---|---|
| Stop down by one to two stops | Longitudinal | Changes depth of field and light |
| Lens profile correction in software | Lateral | Needs a supported lens |
| Remove Chromatic Aberration checkbox | Lateral and some fringing | Less effective on strong fringes |
| Defringe tools | Remaining color edges | May desaturate real colors |
| Better lens with special glass | Both | Cost and weight |
How To Fix It In Software
- Open the RAW file and enable lens profile corrections, then tick Remove Chromatic Aberration.
- Zoom to 200 percent on an edge with strong fringing to check the result.
- If color remains, use the Defringe sliders or the fringe color selector to target purple or green edges.
- For stubborn areas, paint a brush adjustment that reduces saturation on the fringe color only.
- Check other edges to confirm that real colors were not changed.
Common Mistakes
- Zooming only at 100 percent, which hides small fringes that show in a print.
- Using strong defringe sliders globally, which turns real colored objects gray.
- Shooting extremely wide apertures in backlit scenes and expecting clean edges.
- Assuming expensive lenses have no aberration, when they simply reduce it.
A Worked Example
A photo of bare branches against a bright sky shows purple and green outlines. Enable the lens profile and Remove Chromatic Aberration, and most lateral fringes disappear. A small purple halo remains where branches were out of focus, so you use a brush with the defringe purple setting to remove it. The edges are now clean and the sky color remains natural.
Where It Shows Most
High contrast edges are the usual suspects: branches, power lines, window frames, metal and reflections. Backlit scenes with bright highlights next to dark objects are the worst cases, and wide angle lenses near the corners show lateral fringes the most. Knowing where to look saves time when reviewing images.
Prevention Before You Shoot
Choose lenses with extra low dispersion glass for demanding work, stop down by a stop or two in tricky light, and use a lens hood to avoid flare, which looks similar to fringing. Avoid placing a bright light source against dark detail at the edge of the frame if the lens is known to fringe.
Telling Fringing From Flare
Flare spreads color across a wide area and lowers contrast, while chromatic aberration forms thin lines on edges. If the color appears as a halo around a light source, look at the hood and filters first. If it follows edges, aberration is the likely cause, and the fixes above apply.
Checking Your Own Lenses
Photograph a high-contrast target such as a black and white striped card at several apertures and focal lengths, and inspect the corners at 200 percent. Note which settings show fringes, then decide whether you will avoid them, correct them in software or accept them. This simple test takes ten minutes and tells you more about a lens than most reviews, because it reflects your own copy and your own shooting style.
Printing And Viewing Size
Fringes that are invisible on a phone can be obvious in a large print, because enlargement magnifies the colored edges. If you print, correct fringing on every image, even when it seems minor on screen. For web use at small sizes, you can often skip detailed work and rely on automatic profile correction to save time during batch editing.
Batch Correction Workflow
When a shoot has many similar images, correct one photo carefully, then sync the lens profile and fringe removal settings to the rest. Spot check a few images with strong backlight, since those may need extra defringing. This keeps your workflow quick while still protecting the most important frames from visible color edges.
Handy for this: Monitor Calibrator — colors you can trust. (affiliate link)
Advanced Optics, Lens Design And Software
Why Glass Disperses Light
Each glass type has a dispersion value, and designers combine elements to cancel color errors. An achromat joins two types of glass so two wavelengths meet at the same focus, and an apochromat uses three or more. Special elements made from fluorite or extra low dispersion glass reduce residual color. This relates to broader topics in lens aberrations and aspherical lens elements.
Sensors And Digital Corrections
Many cameras apply corrections to JPEG files automatically, using stored lens profiles, and RAW converters read the same data. See Lightroom lens profiles for how to apply them. Corrections can slightly crop or stretch the image, so plan for a small margin, and review lens distortion for similar fixes.
Measuring Lenses
Charts and tests quantify aberration, as in MTF charts and lens testing. A lens that scores high in sharpness may still show fringes in difficult light, so look for sample photos with backlit edges. Corner performance matters in landscape and architecture.
Related Defects
Chromatic aberration is one of several optical issues. Field curvature, coma and spherical aberration all affect sharpness, as discussed in field curvature, and flare behavior in lens flare. Understanding the differences helps you choose the right fix for each problem.
Try It
- Photograph bare branches against a bright sky at the widest aperture and then at f/8.
- Open both files and zoom to 200 percent on the edges.
- Apply the lens profile and chromatic aberration removal and compare.
- Use defringe on any remaining color and check for side effects.
Common Questions
What causes chromatic aberration?
Different colors of light bend by different amounts in glass, so they do not focus at the same point, which creates colored edges.
Can chromatic aberration be fixed in editing?
Mostly lateral fringing can, using lens profiles and the remove chromatic aberration option. Longitudinal fringing is harder.
Does stopping down help?
Yes. Closing the aperture by one to two stops reduces axial fringing and usually improves sharpness too.
Is purple fringing the same thing?
Often it is related, but it can also come from sensor effects. The same fixes usually apply.
Related Lessons
- Lens Aberrations for the full family of optical defects.
- Lightroom Lens Profiles to apply automatic corrections.
- Lens Testing to check fringing yourself.
- MTF Charts for lens sharpness data.
- Lens Flare to tell it apart from fringing.
Gear That Helps With This
Hand-picked kit that makes this lesson easier to put into practice.
Some links are affiliate links: if you buy through them we may earn a small commission at no extra cost to you. How this works.