
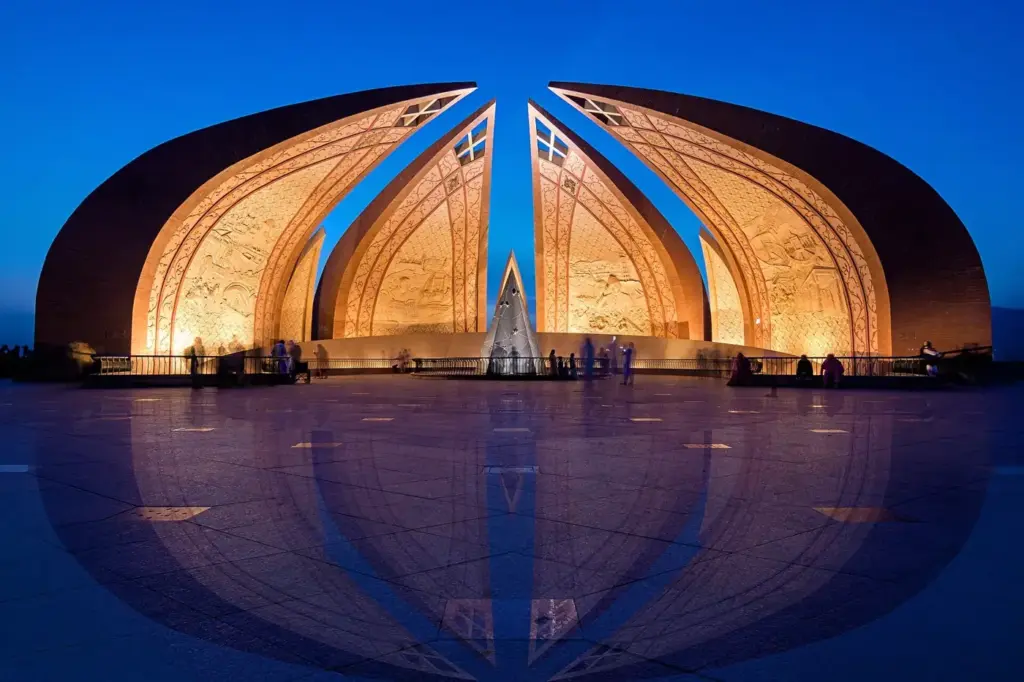
Blue hour is the stretch of twilight just before sunrise or after sunset when the sun is below the horizon and the sky turns deep blue. The light is dim, even and cool, and it lets you capture city lights and sky detail in the same frame. It usually lasts around 20 to 40 minutes.
Why It Matters
During blue hour the sky is bright enough to show clouds and skyline shapes, yet the streetlights, windows and cars are already glowing. That balance between ambient and artificial light is almost impossible to get at full night, when the sky goes black.
Because the window is brief, a little preparation helps. Know your settings and your composition before the sky reaches its best color, and you will make better use of the minutes you have.
Beginner Timing And Settings You Can Copy
Blue hour is not a fixed hour. It follows the sun’s angle below the horizon, and its length depends on latitude and the season. In the evening it begins as the sky fades after sunset, and in the morning it comes just before sunrise. Twilight in general has stages. Civil twilight runs from sunset until the sun is 6 degrees below the horizon, and the deepest blue usually appears somewhere in the middle of that period.
Setting Up
- Check twilight times in a sun app, and arrive about 30 minutes before the sky starts to turn blue.
- Mount the camera on a tripod, because shutter speeds will be slow.
- Use Aperture Priority or Manual with ISO 100 to 400 and aperture f/8 to f/11. This keeps the image clean and gives city lights a pleasing star shape.
- Turn on a 2 second self-timer or use a remote release to avoid shake.
- Take a test shot, check the histogram and adjust exposure compensation, because the camera meter often overexposes dark scenes.
White Balance
Auto white balance tends to remove the blue you came for. Set a daylight preset, around 5200 to 5600 kelvin, for a rich blue sky, or lower it to a tungsten value such as 3200 kelvin if you want a more neutral sky while the lights turn orange. Shoot raw, so you can change your mind later without losing quality.
What To Shoot
- City skylines with lit buildings against a deep blue sky.
- Bridges and water, where long exposures smooth waves and show reflections.
- Traffic trails, using 5 to 15 second exposures.
- Historic buildings with floodlights, where warm lamps contrast with cool sky.
Common Mistakes
- Waiting until it is fully dark, when the sky no longer holds color.
- Letting auto white balance turn the sky gray.
- Shooting handheld at slow speeds and getting soft pictures.
- Pointing the lens at bright lamps without cleaning it, which adds smears and ghosts.
Composition Tips
Include a strong anchor that stays visible as the sky darkens, such as a lit bridge, a lone tree or a row of street lamps. Leading lines such as roads and railings guide the eye toward the glowing center of the city. Leave room for the sky, because its smooth gradient from deep blue to a faint warm band near the horizon is a major part of the picture. Check the corners for stray reflections from nearby windows and wipe the front of the lens if lamps show smears.
Handy for this: Carbon Fiber Tripod — sharp at slow shutter speeds. (affiliate link)
Advanced Balancing Ambient And Artificial Light
Mixed Color Temperatures
The blue sky is a cool light source at roughly 10000 kelvin or higher, while sodium and LED streetlights range from about 2000 to 4000 kelvin. No single white balance can make both look neutral. Setting daylight makes the sky blue and the lamps orange, which most viewers find natural. Setting tungsten makes lamps neutral and the sky an intense blue. For a deeper look at this trade-off, read mixed lighting color.
Timing The Balance
The most pleasing frames usually come when the sky is only a few stops brighter than the artificial lights. Earlier in twilight the sky is too bright and the lights look weak. Later the sky is too dark and the lights become blown-out hotspots with no surrounding glow. Take a frame every minute or two and pick the best one. Many photographers bracket exposures and blend them to hold both the sky and the lit windows, as described in dynamic range explained.
Exposure, Noise And Long Exposures
At these light levels, exposures run from about 1 to 30 seconds at low ISO. Long exposures blur moving water, cloud and vehicles, but they also heat the sensor and increase noise. Long exposure noise reduction doubles the time of each shot, so use it only when needed. Lower ISO is nearly always better here, since the tripod removes the need for speed. For the noise sources, see photon shot noise.
Adding Artificial Light
You can add your own light for a subject in the foreground. A flash with a warm gel, or a small continuous light, lets you freeze a person against the sky. Use a slow shutter to expose the background, and a short flash burst to light the subject. This is the idea behind ambient and flash balancing. Keep flash power low so the person does not look pasted onto the scene.
Bracketing And Blending
When the brightness gap between sky and lights is too large for one frame, take three to five exposures spaced one or two stops apart on a tripod. Merge them in software that aligns the frames, or blend by hand using layer masks. Keep moving objects in mind: cars and people create ghosts if they change position between frames, so shoot a quick burst and remove the problem areas from the blend. Shooting raw with a low ISO keeps the shadows clean enough to lift without heavy noise.
Try It
- Check the twilight times for your location and set up on a tripod 30 minutes before the sky darkens.
- Shoot the same scene every two minutes at ISO 100, f/8, adjusting the shutter speed to keep exposure steady.
- Repeat one frame with daylight and one with tungsten white balance, and compare the sky and the lights.
- Choose the frame where sky brightness and lamp brightness feel balanced, and note the minutes after sunset it was taken.
Common Questions
How long is blue hour?
It usually lasts about 20 to 40 minutes, depending on your latitude and the season. Closer to the poles the twilight can last much longer, while near the equator it is shorter.
What is the best white balance for blue hour?
A daylight setting around 5200 to 5600 kelvin keeps the sky blue and shows lamps as warm orange. A lower setting makes lamps look neutral and the sky a stronger blue. Shoot raw to decide later.
Do I need a tripod for blue hour photography?
Almost always. Light levels are low and shutter speeds are often one to several seconds. A tripod or a solid support with a timer or remote release keeps pictures sharp.
Is blue hour the same as golden hour?
No. Golden hour happens while the sun is still above the horizon and gives warm light. Blue hour happens when the sun is below the horizon and the light comes from the sky, which is cool and even.
Related Lessons
- Golden Hour Photography for the warm light that comes before twilight.
- Mixed Lighting Color for handling cool sky and warm lamps together.
- White Balance Science to understand how color settings work.
- Ambient And Flash to add a lit subject to a twilight scene.
- Light Painting for creative use of long exposures after dark.
Gear That Helps With This
Hand-picked kit that makes this lesson easier to put into practice.
Some links are affiliate links: if you buy through them we may earn a small commission at no extra cost to you. How this works.