
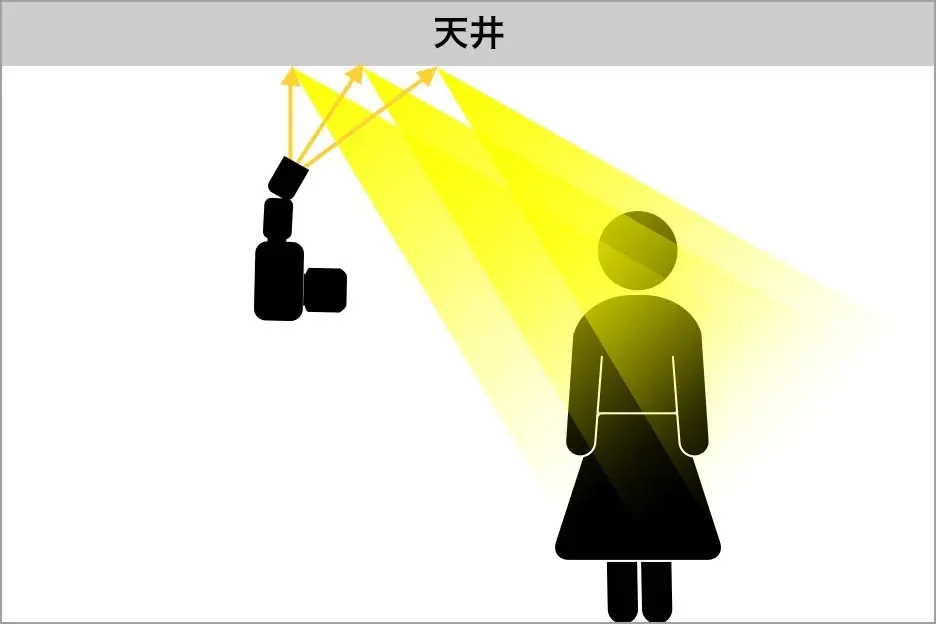
Bounce flash means pointing a speedlight at a ceiling, wall or reflector instead of directly at the subject, so the light reflects onto the subject from a larger surface. This makes shadows softer, reduces harsh highlights and gives a natural look. It works best with white or neutral surfaces within a few meters.
Why It Matters
Direct flash on the camera gives flat, harsh light, hot shiny skin and hard shadows behind the subject. Bounced light is larger and more directional, so it looks more like window light.
Learning to bounce is one of the quickest ways to improve photos of people at events, in homes and in small rooms, using equipment you already own.
Beginner Bounce Flash For Beginners
A flash head is small, so its light is hard when pointed straight at a person. When you bounce the flash, the surface it hits becomes the new light source, and it is much larger. A larger source relative to the subject gives softer transitions between light and shadow.
Basic Steps
- Mount the speedlight and make sure its head can tilt and swivel.
- Look for a white or light-colored ceiling or wall near the subject.
- Tilt the head up about 45 to 60 degrees for a ceiling bounce, or turn it sideways for a wall.
- Set the flash to automatic through-the-lens mode, and take a test shot.
- Adjust the flash compensation, angle or distance until the face is evenly lit.
Choosing A Surface
| Surface | Result |
|---|---|
| White ceiling, low height | Soft, neutral light from above |
| White wall to the side | Directional, window-like light |
| Colored wall or ceiling | Color cast on the subject |
| Very high or dark ceiling | Weak light, little reflection |
| Portable white card or reflector | Works anywhere, with controlled direction |
Watch The Shadows
If you aim straight up, the eyes can fall into shadow because light comes from above. To fill them, use a small white card attached to the flash head so a little light goes forward, or angle the head slightly toward the subject. See flash modifiers for simple accessories.
Common Mistakes
- Bouncing off a colored surface and getting a color cast.
- Using a high ceiling and losing most of the flash power.
- Aiming the head straight up, which leaves dark eye sockets.
- Keeping the camera in a vertical position without rotating the flash head, so the bounce goes the wrong way.
A Quick Rule
If the flash points at something white and near, and you raise exposure a little, you get soft light. If it points at something dark or far away, expect to boost power or switch to direct flash with a diffuser.
Handy for this: Speedlight Flash — add light anywhere. (affiliate link)
Advanced Light Geometry, Power And Control
How The Light Path Works
With a bounce, the light travels from the flash to the surface and then to the subject, so the distance is the sum of both parts. The light also loses power at the surface. Because of the longer path, you need more power, higher ISO or a wider aperture than with direct flash. A good starting point is an exposure two stops brighter, and then you can fine tune it. This is an application of the inverse square law.
Angles And Geometry
The angle of incidence equals the angle of reflection, so the light leaves the surface at the same angle at which it arrived. To light a subject standing a few meters away from a ceiling bounce, aim at a point about halfway between you and the subject. If the subject is close, aim higher, and if farther, lower. A bounce at too steep an angle makes the light come straight down, and one at too shallow an angle can make it hit the subject like a direct flash.
Settings
- Use automatic flash metering for speed, and adjust with flash exposure compensation.
- In manual mode, start at half power and adjust in single steps.
- Raise ISO to between 400 and 1600, since bounce loses light.
- Use an aperture of f/2.8 to f/5.6 for most indoor work.
- Choose a shutter speed at or below your flash sync speed, and slow enough to keep some ambient light.
Mixing With Ambient Light
A slower shutter speed brings in room light, which fills background areas and gives a natural look. The flash freezes the subject, while the ambient light adds mood. Compare this approach with dragging the shutter and fill flash. Set a custom white balance or a flash setting, and check that colors look natural.
Color Control
A white surface gives neutral light. If you must bounce off a colored wall, expect a tint, and correct it in editing by adjusting the temperature and tint of the raw file. Another option is to use a white card for the bounce, which gives you the same effect anywhere and avoids color casts, as in on camera flash.
Portable Bounce Tools
Small bounce cards and diffusers that attach to the flash head give direction and fill. A folded white card makes a good low cost tool for the job. A reflector or a person holding a white board can do the same thing in places with no useful ceiling. For outdoor use, a bounce against a large white umbrella gives soft light, but needs more power.
Practice in one room until you can predict the results. Walk around with the flash on a stand or in your hand, and notice how the light changes with the angle of the head and the position of the subject. A few minutes of experiments teach more than reading about ratios and angles.
Bounce Versus Diffusion
A diffuser on the flash head enlarges the source only a little, because it stays small compared with the subject distance. A bounce uses a surface as large as a wall or a ceiling and gives much softer results. When the bounce is not possible, a large umbrella or softbox on a stand gives the same benefit, and is worth the extra equipment if you do portraits regularly.
Try It
- Find a room with a white ceiling and place a person or an object about two meters away.
- Take one photo with direct flash and another with the flash tilted up toward the ceiling at 45 degrees.
- Compare the shadows and skin highlights.
- Try a wall bounce and a bounce with a small card on the flash, and note which you like best.
Common Questions
Can I bounce flash outdoors?
Only if there is a surface nearby, such as a white wall. Otherwise use a reflector, a diffuser or an off-camera flash.
Why are my photos too dark with bounce flash?
The light travels farther and loses power at the surface. Raise flash compensation, increase ISO, open the aperture or move the subject closer.
What if the ceiling is not white?
A colored surface adds a tint. Use a white card on the flash head, or switch to a wall or a portable reflector.
Does bounce flash work for video?
It works for stills, but video needs continuous light, so use a small LED panel bounced off a ceiling in the same way.
Related Lessons
- Fill Flash to balance flash with daylight.
- On Camera Flash for basic flash use.
- Flash Modifiers for soft boxes and diffusers.
- Inverse Square Law to understand light falloff.
- Dragging The Shutter for mixing flash and ambient light.
Gear That Helps With This
Hand-picked kit that makes this lesson easier to put into practice.
Some links are affiliate links: if you buy through them we may earn a small commission at no extra cost to you. How this works.