
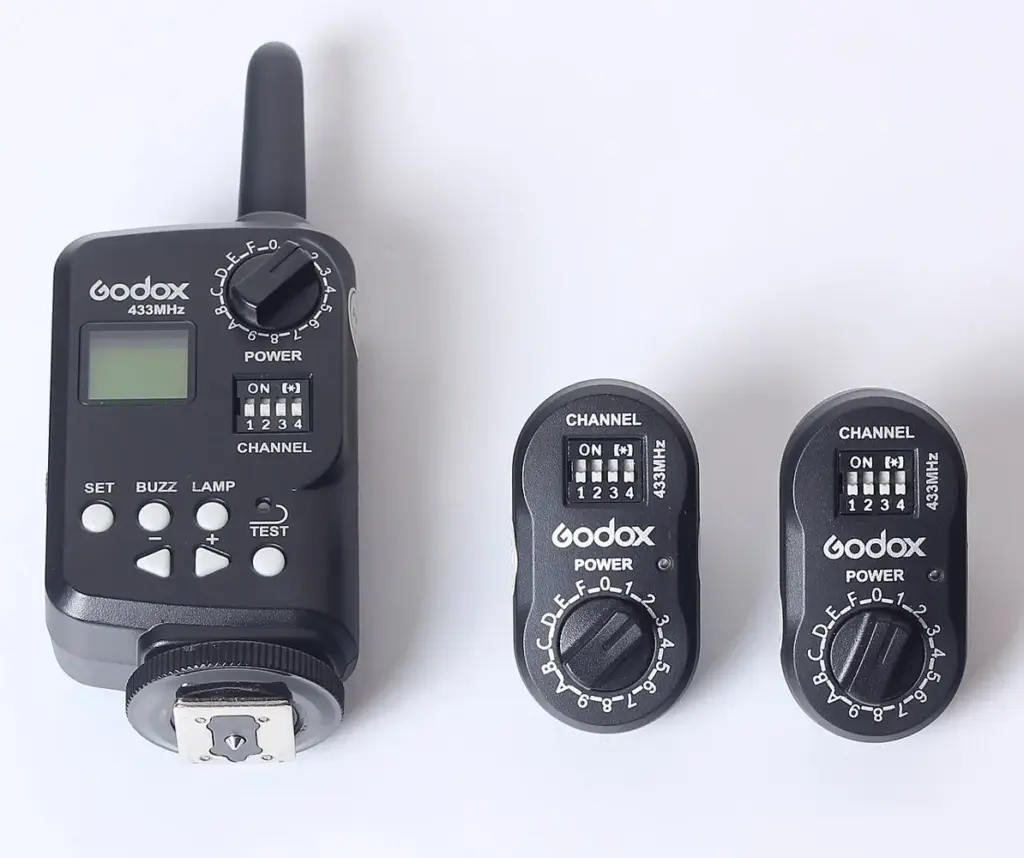
Flash triggers are devices that fire a flash wirelessly when the camera takes a picture, using optical light signals, infrared or radio waves. Radio systems are the most reliable because they work through obstacles and in bright light, and many add TTL metering, groups and high-speed sync.
Why It Matters
A flash on the camera gives flat, harsh light. Moving it to the side, above or behind the subject gives shape and depth, but then the flash needs a way to know when to fire. A cable works, but it limits movement and breaks easily.
Wireless triggers solve this. Choosing the right type affects reliability, range, speed and the number of lights you can control, so a little knowledge saves missed shots and wasted money.
Beginner Types Of Flash Triggers
Optical Triggers
Optical or slave triggers watch for a flash of light and fire when they see it. A built-in flash or another flash fires first, and the slave copies. They are cheap but need line of sight, and bright sun or other flashes can trigger them by mistake.
Infrared Triggers
Infrared systems send a coded beam of invisible light from the camera to the flash. Many cameras use this for built-in wireless control. They work indoors at short range but fail in bright sunlight or around corners.
Radio Triggers
Radio triggers send a signal over radio frequencies. A transmitter sits on the camera hot shoe, and a receiver attaches to each flash. They work through walls and at distances of many meters, and they are the usual choice for professional work.
| Type | Range | Weakness |
|---|---|---|
| Optical | Short | Needs line of sight, sun interference |
| Infrared | Short to medium | Fails in bright light |
| Radio | Medium to long | Needs batteries, compatibility |
Basic Setup
1. Put the transmitter on the camera and a receiver on the flash.
2. Match the channel on both.
3. Set the flash to manual mode.
4. Take a test shot and adjust power.
Common Mistakes
– Using an optical trigger outdoors in bright sun.
– Forgetting to match channels, so nothing fires.
– Running out of battery in the transmitter or receiver.
– Setting the camera shutter speed above the sync speed.
Handy for this: Speedlight Flash — add light anywhere. (affiliate link)
Advanced Choosing And Using Radio Flash Trigger Systems
Manual Versus TTL
Basic radio triggers only fire the flash, and you set power on each unit. TTL systems also pass metering data so the camera adjusts the flash output for each shot, which is handy for events and changing situations. Manual gives consistent results, which suits studio and portrait work. See off-camera flash for setups, and flash meters to measure output.
Groups And Remote Power Control
Better systems let you assign flashes to groups and change power from the transmitter. Instead of walking to each light, you adjust the key, fill and rim lights from the camera. This is a big time saver. Plan groups by role, such as key in group A and background in group B.
Compatibility
Triggers are often brand-specific for TTL, so match the system to your camera and flash. Some universal triggers work with many brands in manual mode. Check firmware updates, hot shoe design and whether the system supports your flash model. Mixing brands may limit features. See flash guide number to compare flash power across units.
High-Speed Sync
To use a shutter speed faster than the camera’s normal sync speed, the flash must pulse many times during the exposure. This is high-speed sync, and it needs trigger and flash support. It lets you use wide apertures in sunlight, but it reduces flash power. Learn how it interacts with timing in flash duration.
Range And Reliability
Radio range depends on obstacles, interference and antenna orientation. Test before a shoot, and keep the receiver antenna upright where possible. Use fresh batteries and carry spares. In crowded places with many wireless devices, change channels to avoid interference. Some systems offer encoding that reduces false triggering.
Using Built-In And Adapter Options
Some flashes have built-in radio receivers, so you only need a transmitter. Others need small receivers on a hot shoe adapter or a sync cable. Check the connectors on studio strobes, since they may need a sync port or a hot shoe to cable adapter.
Troubleshooting
If a flash does not fire, check the channel, the batteries, the contacts on the hot shoe and the connection. If it fires late, reduce the shutter speed. If it fires randomly, change channels. See flash troubleshooting.
Combining With Modifiers And Light
Triggers let you place flashes anywhere. Combine them with softboxes and umbrellas for soft light, and with gels from flash gels to match or change color. Use ambient and flash control to balance light with the background. Keep light stands stable and secure modifiers outdoors.
Budget And Growth
Start with a pair of reliable manual radio triggers and one flash. Add TTL or more receivers when your needs grow. Buying one system and staying with it avoids compatibility problems. Used equipment is fine if the model has firmware support.
Safety And Care
Keep contacts clean, and avoid forcing hot shoe connections. Remove batteries when storing equipment for long periods. Protect transmitters from rain, and label receivers by channel and group so setup is fast.
Practice Plan
Set up one flash on a stand at 45 degrees from a subject, trigger it by radio and photograph a friend. Then add a second flash behind as a rim light on its own group. Practicing at home makes real shoots smoother.
Choosing A System For Your Kind Of Work
Portrait and product photographers working in a studio usually value consistency, so a manual radio system with remote power control is enough, and it is often cheaper. Event and wedding photographers move fast between rooms and lighting, so TTL and a compact transmitter save time. Sports and outdoor photographers care about range and sunlight performance, so look for strong antennas and high-speed sync. Match the feature list to the pictures you take, not to the longest spec sheet.
Setting Up Several Flashes Quickly
Label each receiver with tape, and keep a note of which channel and group each light uses. Turn all receivers on, then fire a test shot with each group alone to confirm which flash is which. Change one thing at a time, such as power or position, and take a new test frame after every change. This habit saves minutes on location and prevents mixing up lights in the middle of a session.
Maintenance And Spares
Carry spare batteries of the same type, a spare sync cable and a spare receiver if the job matters. Clean the metal contacts with a dry cloth, and check that the locking ring on each foot grips firmly so a bump does not break the connection. Update firmware when the maker offers it, since updates often improve range and compatibility with new cameras.
Try It
- Mount a radio transmitter on your camera and a receiver on one flash, matching channels.
- Set the flash to manual at 1/8 power and fire a test shot.
- Move the flash to the side and adjust power until the exposure looks right.
- Add a second flash on another group and change its power from the camera.
Common Questions
What is the best type of flash trigger?
Radio triggers are the most reliable for most work because they do not need line of sight and work in bright light, with longer range than optical or infrared options.
Do I need TTL on my flash triggers?
Not necessarily. TTL helps in fast-changing situations, while manual triggers give consistent results in studio or planned shoots.
Why does my flash not fire with the trigger?
Check that channels match, batteries are fresh, contacts are clean and the flash is set to manual mode or the correct trigger mode.
Can I use triggers from different brands?
Manual mode often works across brands, but TTL and high-speed sync usually require matching systems.
Related Lessons
- Off-Camera Flash for setups that use triggers.
- Flash Meters to measure output from remote flashes.
- Flash Duration for timing and high-speed sync.
- Flash Troubleshooting to solve misfires.
- Ambient And Flash to balance flash with existing light.
Gear That Helps With This
Hand-picked kit that makes this lesson easier to put into practice.
Some links are affiliate links: if you buy through them we may earn a small commission at no extra cost to you. How this works.