
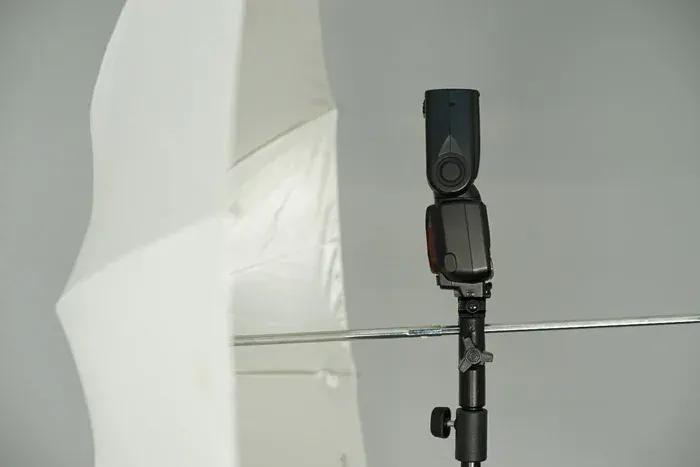
Off-camera flash means firing a flash unit away from the camera, usually on a stand and triggered wirelessly, so light comes from the side instead of straight on. It adds shape, depth and softness, and a simple first setup needs one speedlight, a trigger and an umbrella or softbox.
Why It Matters
A flash on top of the camera produces flat, harsh light with hard shadows right behind the subject. Moving the flash a few feet to one side changes the picture completely, creating modeled faces and a natural looking direction of light.
A single flash on a stand is the cheapest way to get studio-style results. It works indoors and outdoors, lets you overpower sunlight for dramatic skies and travels easily in a small bag.
Beginner Your First Off-Camera Flash Setup
Gear You Need
– A flash unit that can be set to manual power.
– A trigger set, either radio or optical, with a transmitter and receiver.
– A light stand with a flash bracket.
– A modifier such as a shoot-through umbrella or small softbox.
– Spare batteries.
Setup Steps
1. Mount the flash on the stand and attach the modifier.
2. Attach the transmitter to the camera hot shoe and set the receiver to the flash on the same channel.
3. Set the camera to Manual mode, ISO 100, a shutter speed at or below the sync speed (often 1/200 or 1/250 second) and an aperture of f/5.6 as a start.
4. Set the flash to manual at 1/16 power.
5. Place the flash about 3 to 4 feet from the subject, 45 degrees to one side and slightly above eye level, angled toward the face.
6. Take a test shot, then adjust.
Reading The Result
If the picture is too dark, increase flash power, move the flash closer or open the aperture. If it is too bright, lower the power, move back or close the aperture. The background brightness is controlled with the shutter speed, within the sync limit, and the flash exposure with power, distance and aperture.
Placement Ideas
| Position | Effect |
| 45 degrees and above | Classic, flattering portrait light |
| Directly to the side | Dramatic, more shadow on one side |
| Slightly behind the subject | Rim light along hair and shoulders |
| Close to the face | Soft light with quick fall-off |
Common Mistakes
– Using a shutter speed faster than sync speed, causing a black band.
– Placing the flash too far away, leaving harsh, weak light.
– Forgetting to change the trigger channel and firing another photographer’s flash.
– Leaving the flash in TTL when you want repeatable results.
Handy for this: Speedlight Flash — add light anywhere. (affiliate link)
Advanced Controlling Off-Camera Flash Like A Pro
Separating Ambient And Flash Exposure
Aperture, ISO and flash power affect flash exposure. Shutter speed has almost no effect on flash, since the burst lasts roughly 1/1000 second or less, but it changes the ambient light. That gives you two independent dials. Set ambient first by choosing a shutter speed, then add flash to light the subject. Underexposing the ambient by one to two stops creates a rich background with a lit subject. The idea is expanded in ambient and flash.
The Inverse Square Law
Light falls off with the square of distance. Doubling the flash distance cuts the light to a quarter, which is two stops. This explains why a subject close to the flash looks bright and the background falls dark, and it is why moving a light closer makes it look softer and lets you lower the power. See the inverse square law and flash guide numbers for calculations.
Manual Versus TTL
TTL flash measures the scene and adjusts power automatically, which is quick but can vary shot to shot when the framing changes. Manual power is consistent, which is vital for a series. Many photographers dial in manual once the setup is fixed. Compare approaches in TTL vs manual flash.
Sync Speed And High-Speed Sync
Focal plane shutters can only expose the whole sensor at once below the sync speed, commonly 1/200 or 1/250 second. High-speed sync pulses the flash to work at faster speeds and lets you use a wide aperture in bright sun, but it reduces effective power. See high-speed sync for the trade-off.
Modifiers And Light Quality
The size of the light source relative to the subject controls softness. A flash with a 32 inch umbrella placed 3 feet away makes soft light. A bare flash gives hard, crisp shadows. Shoot-through umbrellas spread light widely and are cheap, while softboxes give more control over spill. Read softbox vs umbrella and wireless flash triggers when choosing gear.
Building On One Light
Add a reflector or white wall opposite the flash to fill shadows. Gel the flash for warmth when mixing with tungsten light, or use a color effect on a background. When ready for a second light, put it behind the subject as a rim or on the background. A full walkthrough of the first setup is in one-light setup, and shaping choices appear in portrait lighting patterns.
Safety And Handling
Secure stands with sandbags, especially outdoors. Do not fire flash close to a person’s eyes at full power, and never aim it at drivers. Let a hot flash cool between long bursts to avoid overheating.
Working Outdoors
Flash is useful in daylight for lifting shadows and darkening a bright sky. Set the camera for the sky first, for instance one stop under, then add flash to bring the subject back up. A shoot-through umbrella handles light wind but needs a sandbag or an assistant to hold the stand. In full sun, a wide aperture often forces a fast shutter, and then high-speed sync or a neutral density filter becomes useful, or you can lower the ambient by moving the subject into open shade.
Checking Your Work With The Histogram
After the first test frame, check the subject’s skin in the preview and the histogram together. Skin tones should sit mid to bright without clipping on the cheekbones. If the highlights on the face flash red on the warnings, lower the power by a third or half a stop. If the face is too dark but the background is correct, increase flash power, not shutter speed, to keep the background unchanged.
Practice Projects
Photograph a still life such as a bottle or a plant, so you can learn without a person waiting. Move the flash around the object and watch how shadows and highlights change. Then try a friend or a family member, starting with a head and shoulders frame and one light. Keep notes on distance, power and angle, so you can repeat a setup that works and learn from the ones that do not.
Try It
- Set up one flash on a stand at 45 degrees to a friend or a household object.
- Take shots at 1/32, 1/16 and 1/8 power and compare brightness on the face.
- With flash power fixed, change shutter speed from 1/200 to 1/60 and notice what changes in the background.
- Move the flash from 3 feet to 6 feet and see how softness and brightness change.
Common Questions
What is off-camera flash?
It is a flash fired from a position away from the camera, usually on a stand and triggered wirelessly. It produces directional light with more shape than a flash mounted on the camera.
Do I need expensive gear to start?
No. A single speedlight with manual power, a basic radio trigger set, a stand and an umbrella are enough to produce excellent portraits.
Why do I get a black bar in my photo?
Your shutter speed is faster than the camera’s flash sync speed, so part of the sensor was covered when the flash fired. Use a speed at or below sync, or turn on high-speed sync.
What power should I start with?
Start at 1/16 power with ISO 100 and f/5.6 at about 3 to 4 feet, and adjust by stops after looking at the result.
Related Lessons
- Flash Triggers for choosing how to fire the flash wirelessly.
- Softbox Vs Umbrella for picking a modifier.
- TTL Vs Manual Flash to decide how to control power.
- The Inverse Square Law for how distance changes brightness.
- One-Light Setup for a complete portrait lighting plan.
Gear That Helps With This
Hand-picked kit that makes this lesson easier to put into practice.
Some links are affiliate links: if you buy through them we may earn a small commission at no extra cost to you. How this works.