
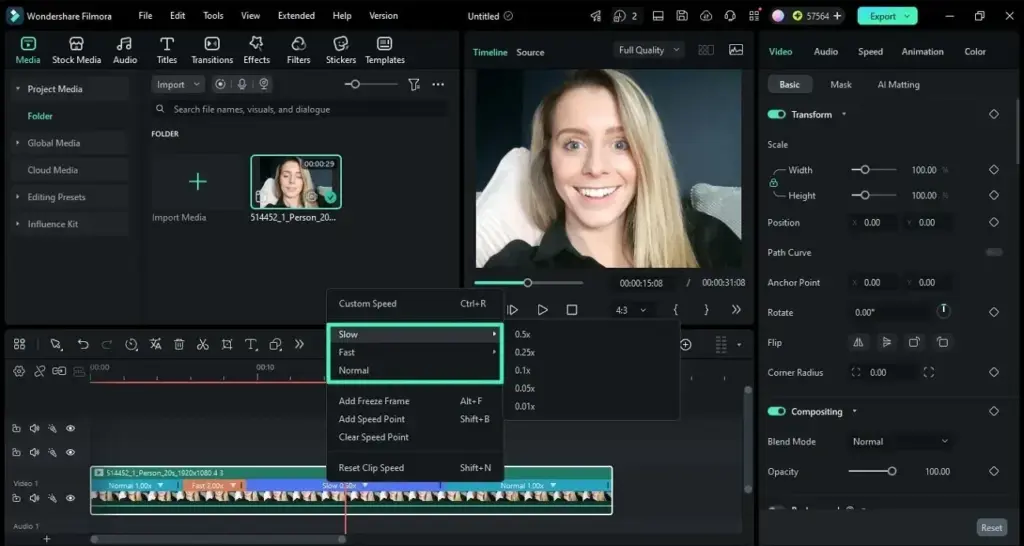
Filmora speed ramping changes the speed of a clip smoothly, for example going from normal speed to slow motion and back, instead of jumping between speeds. You use the Speed Ramping tool and its curve points to speed up or slow down specific parts of a clip, which adds energy to action, sport and travel videos.
Why It Matters
A constant speed can feel flat. Ramping lets you stress the best moment of a clip by slowing it down, and then speed through the boring parts, which keeps the viewer engaged.
It is popular in action, sports, travel and music videos. A smooth ramp feels professional, while a sudden jump looks like a mistake, so understanding the curve matters.
Beginner Speed Ramping In Filmora Basics
Select a clip in the timeline, open the Speed panel in the properties area and choose the Speed Ramping tab. You will see a graph with a line representing speed, with points you can drag up for faster playback and down for slower playback. Filmora also offers presets, such as Montage, Hero Moment, Bullet Time, Jump Cut, Flash In and Flash Out, that apply a ready-made curve. Select Customize to build your own by adding, moving and deleting points.
What You Can Adjust
- Speed points on the curve, from about 0.1 times to 10 times normal speed.
- Preset ramps for quick results.
- Smooth or sharp transitions, depending on the curve shape.
- Audio pitch and playback, which may change with speed.
- Optical flow or frame blending, which creates extra frames for smoother slow motion.
Speed Ramp Uses
| Effect | Speed Pattern | Good For |
|---|---|---|
| Hero moment | Normal, slow at the peak, normal | Jumps, tricks and goals |
| Montage | Fast, slow, fast | Travel and sport highlights |
| Flash in | Very fast start, ending in normal speed | Intro of a shot |
| Bullet time | Extreme slow at the center | Dramatic action |
| Jump cut | Sharp speed change | Music beats and edits |
Create A Custom Ramp
- Place the clip on the timeline and open Speed, then Speed Ramping and Customize.
- Add a point at the start of the action and another a moment before the peak.
- Drag the center points down to slow the key moment, and up to speed up the beginning and end.
- Play back and adjust the curve for a smooth, gradual change.
- Turn on optical flow for slow motion and check for visual artifacts.
Common Mistakes
- Slowing a clip recorded at 30 fps to a quarter speed, which looks choppy.
- Making the ramp abrupt, where a gradual curve would feel smoother.
- Leaving audio at the original track, which sounds odd at changed speed.
- Using speed ramps on every clip until the effect loses its impact.
A Worked Example
A skateboarder jumps over a stair set. Start at normal speed, add a point just before takeoff and lower it to 0.3 times for the jump, then raise it again after landing. The ramp should have a soft curve so the change feels natural. Add a whoosh sound effect at the ramp-in, and the jump becomes the highlight of the clip.
Shooting For Speed Ramps
Record at a high frame rate, such as 60 or 120 fps, to get smooth slow motion. Use a fast shutter speed and plenty of light, because high frame rates need them. A clip recorded at 24 fps will look stuttery when slowed, even with frame blending.
Pacing And Music
Match ramps to the beat of the music, so changes happen on accents. A ramp that fits the rhythm feels intentional, and one that ignores it feels random. Mark beats on the timeline before ramping, and keep the pattern consistent across the edit.
Exporting Ramped Clips
After ramping, check playback at full resolution, since previews may be reduced. Export with a frame rate that matches the project, and use a good bitrate so that fast motion does not turn blocky. If slow sections show stutter, try rendering with optical flow or choose a higher project frame rate. Always watch the exported file once before publishing.
Troubleshooting Common Issues
If the ramp looks jerky, smooth the curve points and widen the transition. If edges look warped in slow motion, turn off optical flow or reduce the slowdown. If audio drifts out of sync, detach it before changing speed. A short test render of the ramped section saves time on long projects.
Planning The Shoot For Ramps
Good ramps start on set. Ask the subject to repeat the action, record extra seconds before and after the peak so the curve has room to breathe, and keep the camera steady. Stable framing makes the speed change the only movement the viewer notices, and a clean start and end point makes the transitions between speeds look natural and deliberate.
Ideas To Practice
Try a sports clip with a slow-motion peak, a travel clip that speeds through a walk and slows at a landmark, and a product shot that speeds up its rotation. Each exercise teaches how the curve shape controls feeling. Compare your results with presets to learn what they do and how to adapt them.
Handy for this: Camera Gimbal — smooth handheld footage. (affiliate link)
Advanced Quality, Audio And Combining Techniques
Frame Rate And Interpolation
Slow motion needs more frames than the project frame rate. See video frame rates and slow motion video for how frame rate and shutter affect smoothness. Optical flow generates new frames but may create artifacts around moving edges, so check carefully at slow speeds.
Combining With Keyframes
Speed ramping often works with position and scale changes, as in Filmora keyframing. A subtle zoom during a slow ramp increases impact, and a quick shake at the speed-up adds energy. Keep the movement small so the speed is the main effect.
Audio Handling
Changing speed changes pitch unless pitch is preserved. For music and dialogue, detach the audio and keep it at normal speed, then add sound effects to support the ramp. See Filmora music and audio and audio ducking for balancing levels.
Cross-Program Ideas
Premiere offers a similar feature with time remapping, covered in speed ramping in Premiere, and After Effects has time remapping. The idea is the same: a curve controls how fast the clip plays. Learning it in one tool transfers to others.
Try It
- Import a clip with a clear action moment, ideally shot at 60 fps or higher.
- Open Speed Ramping and try three presets.
- Create a custom curve that slows the peak action smoothly.
- Add a sound effect that matches the speed change.
Common Questions
What is speed ramping?
It is a gradual change in clip speed, for example from normal to slow motion, instead of a sudden jump.
Why does my slow motion look choppy?
The source frame rate may be too low. Record at higher frame rates and use optical flow if available.
Does speed ramping affect audio?
Yes, pitch and timing change unless handled. Many editors keep audio separate or replace it with music and effects.
Which Filmora preset is best?
It depends on the clip. Hero Moment suits jumps and tricks, while Montage works for fast travel sequences.
Related Lessons
- Filmora Keyframing to add motion during a ramp.
- Slow Motion Video to shoot clean slow motion.
- Video Frame Rates to choose a source frame rate.
- Premiere Speed Ramping for a similar method in Premiere.
- Filmora Music Audio for audio decisions.
Gear That Helps With This
Hand-picked kit that makes this lesson easier to put into practice.
Some links are affiliate links: if you buy through them we may earn a small commission at no extra cost to you. How this works.