
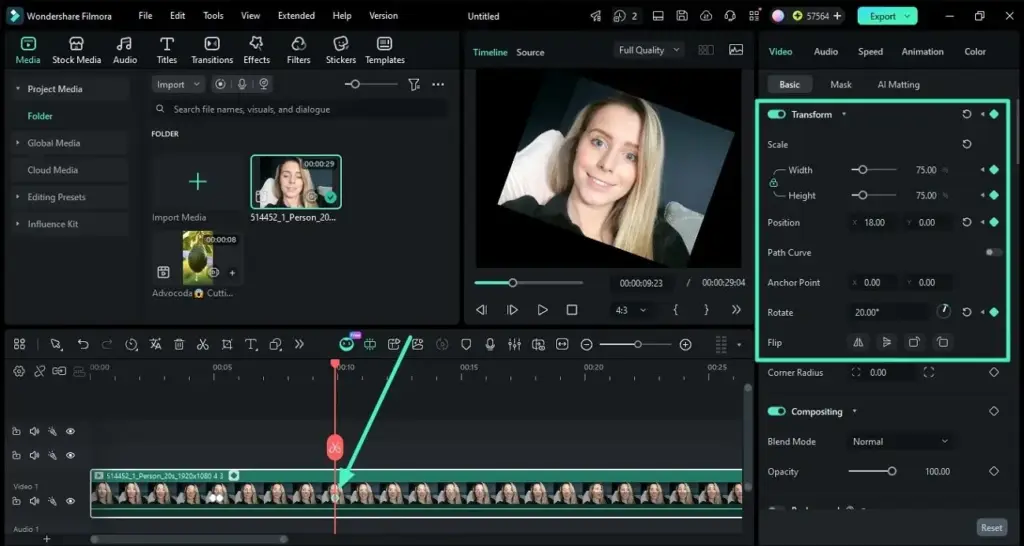
Filmora keyframing is the process of setting a property such as position, scale, rotation or opacity at specific points on the timeline, so Filmora fills in the movement between them. It lets you create custom zooms, pans, fades and motion graphics without presets, and it gives you control over timing and easing.
Why It Matters
Presets are fast, but they all look the same. Keyframes let you decide exactly how a clip moves, so you can build a slow zoom that follows a face, a logo that slides in at the right moment or a picture-in-picture that settles into a corner.
Keyframing is also the foundation of most video animation. The idea of two or more values connected by a curve is the same in every editor, so the skill transfers to other software.
Beginner Keyframing In Filmora For Beginners
A keyframe records a value at one moment. If you set scale to 100 percent at second 0 and 120 percent at second 5, Filmora creates a smooth zoom between those points. Open the clip properties by double-clicking the clip, find the Animation tab and choose Customize, or use the diamond button next to each property to add a keyframe at the playhead position. Changing a value at a new time adds a new keyframe automatically in many cases.
What You Can Animate
- Position, to move a clip across the frame.
- Scale, to zoom in or out.
- Rotation, to spin or tilt a clip.
- Opacity, to fade in and out.
- Effects, text and audio levels, depending on the clip type and version.
Common Animations And How To Build Them
| Animation | Properties Used | How It Works |
|---|---|---|
| Slow zoom in | Scale | 100 percent at start, 110 to 120 percent at end |
| Pan across a photo | Position X | Move from left to right across a zoomed image |
| Fade in or out | Opacity | 0 percent to 100 percent over half a second |
| Slide-in title | Position and opacity | Start off-screen and finish at the final spot |
| Picture-in-picture entrance | Scale and position | Small at a corner, grows to final size |
Create A Simple Zoom And Fade
- Place a photo or clip on the timeline and double-click it to open properties.
- Go to the Animation tab and choose Customize, or enable keyframes with the diamond button.
- At the start of the clip, set Scale to 100 percent and Opacity to 0 percent.
- Move the playhead one second forward, set Opacity to 100 percent and move to the end of the clip to set Scale to 115 percent.
- Play the result and move or delete keyframes to adjust timing.
Common Mistakes
- Setting only one keyframe and wondering why nothing moves; motion needs at least two values.
- Keyframing at the wrong playhead position, which shifts the timing.
- Using too large a movement, which makes the clip jump or appear to wobble.
- Leaving the animation linear so it feels mechanical.
A Worked Example
Imagine a travel photo of a mountain you want to bring to life. Set scale to 100 percent at the start and 112 percent at the end of a six second clip, and slide position X slightly so the zoom moves toward the peak. Add a half second fade in at the beginning. The still photo now feels like a slow camera move, which is a popular, simple effect for slideshows and intros.
Timing And Easing
Real objects accelerate and slow down. Right-click a keyframe and choose an ease option, such as ease in, ease out or both, when available, so movement begins and ends gently. A linear motion at constant speed looks robotic, while easing gives polish with no extra work. Experiment with short moves of one or two seconds to learn what looks natural.
Planning Before You Click
Decide start and end states before opening the panel. Write down the values: start scale, end scale, how long, which direction. A short plan prevents trial and error and keeps projects consistent. It also helps you reuse the same motion on multiple clips by copying keyframes from one clip and pasting them into another.
Keeping Motion Subtle
Viewers notice motion, so small moves are usually better than large ones. A 5 to 10 percent zoom over several seconds adds life without drawing attention to itself. Bigger moves belong to titles, transitions and effects where motion is the point. Judge the result at full screen and at the size where the video will be watched.
Handy for this: Camera Gimbal — smooth handheld footage. (affiliate link)
Advanced Precision, Reuse And Related Tools
Keyframes And Curves
Keyframes are points, and what happens between them depends on the interpolation. Linear interpolation moves at constant speed, while bezier and ease options curve the speed. In a graph editor, a steep line means fast change and a flat line means slow change. The same ideas drive the After Effects graph editor, and understanding them in one program carries to all.
Keyframes For Tracking And Masks
Keyframes can also be used to move a mask or effect by hand when automatic tracking fails. Compare with motion tracking in Filmora, which attaches text or graphics automatically, and masks in Filmora, which can be animated to reveal or hide an area. Use manual keyframes for fine corrections and tracking for follow motion.
Combining With Speed And Titles
Animation works best together with other tools. Smooth speed changes are covered in speed ramping, text effects are in Filmora titles, and entrances and exits can be handled with transitions. Keep a consistent style of motion across a project so the video feels unified, for example the same ease and duration for every title.
Efficiency And Reuse
Save time by copying and pasting attributes from one clip to another, or by saving a custom preset when the software allows it. Group clips into a compound clip before animating them as a unit, such as a picture frame with a photo inside. Keep the media library organized so animated assets are easy to find. When exporting, review the motion at full quality to verify that fast movement does not stutter, then follow export settings for the right format.
Try It
- Place a photo on the timeline and open its animation settings.
- Create a slow zoom with two scale keyframes over five seconds.
- Add an opacity fade in at the start and a fade out at the end.
- Apply easing to the zoom and compare it with the linear version.
Common Questions
How many keyframes do I need?
At least two to create motion, one for the start value and one for the end value. Complex moves use more keyframes at the points where direction or speed changes.
Can I copy keyframes between clips?
Yes. Copy the clip and paste its attributes onto another, or copy individual keyframes when the version allows it, then adjust for the new clip.
Why does my animation look jerky?
Large moves in short times, no easing or a low frame rate can all cause jerky motion. Slow the movement down, add easing and preview at full quality.
Is keyframing different from using presets?
Presets apply a fixed animation. Keyframing builds a custom one, so you control the exact values, timing and curve.
Related Lessons
- Filmora Speed Ramping for smooth changes in clip speed.
- Filmora Motion Tracking to attach elements automatically.
- Filmora Titles for animated text.
- Filmora Masks to animate reveals and cutouts.
- Filmora Export Settings to deliver animated projects cleanly.
Gear That Helps With This
Hand-picked kit that makes this lesson easier to put into practice.
Some links are affiliate links: if you buy through them we may earn a small commission at no extra cost to you. How this works.