
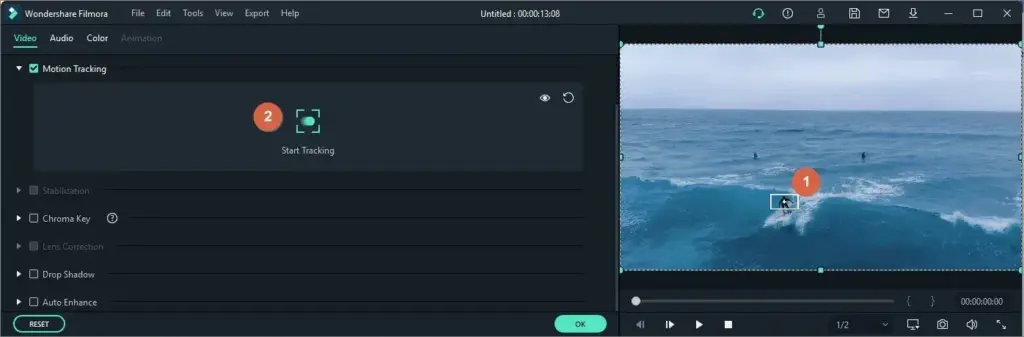
Filmora motion tracking analyzes a moving object in your clip and records its path so that a title, sticker, effect or blur can follow it automatically. You place a tracking box on a distinctive area, start tracking, and then attach an element that inherits the movement.
Why It Matters
Manually keyframing a label onto a moving person or car is slow and rarely looks smooth. Motion tracking does the frame-by-frame work for you, which saves hours on projects that need pointers, callouts or privacy blurs.
It also raises production value. A name tag that sticks to a speaker, or a blurred license plate that stays hidden through a whole pan, feels professional and keeps viewers focused on the content.
Beginner Using Filmora Motion Tracking
What You Can Track
– Faces for blurring or labeling.
– Cars, bikes and people for name tags and arrows.
– Products for callouts in a review.
– Corners and objects for attaching graphics.
The Basic Workflow
Menu names can vary slightly between Filmora versions, but the steps are the same.
1. Place the clip on the timeline and move the playhead to a frame where the object is clearly visible.
2. Double click the clip to open its properties, and find the Motion Tracking option in the video settings.
3. Turn it on. A tracking box appears in the preview.
4. Resize and move the box over a distinctive, high-contrast part of the object.
5. Click Start Tracking and let it analyze the clip. Watch the box follow the target.
6. When it finishes, choose an element to attach, such as a title, sticker, effect or mosaic blur.
7. Adjust position and size of the attached element, then play the section.
Picking A Good Target
Choose an area with strong detail and contrast, such as a logo, a patterned shirt or a sharp edge. Avoid plain surfaces such as a blank wall or a clear sky, which have nothing for the tracker to lock onto. The target should stay visible for the whole segment.
Simple Uses
Blur a face with a mosaic effect, add an arrow that stays on a moving subject, tag a speaker, or attach a small label to an item the host holds up.
Common Mistakes
– Tracking a blurry or poorly lit frame.
– Using a box that is too small or too large for the object.
– Letting the object leave the frame, so the tracker loses it.
– Starting from a frame where the subject is partly hidden.
Handy for this: Camera Gimbal — smooth handheld footage. (affiliate link)
Advanced Getting Clean Results From Filmora Motion Tracking
Start Frame And Direction
Trackers work best from the frame where the target is largest, sharpest and unobstructed. If the subject turns away or passes behind something partway through, split the clip at that point and track each segment separately. Tracking in short sections is more reliable than one long pass, and it gives you checkpoints you can correct.
Handling Drift
Drift happens when the tracked point slowly slides off the object. It usually comes from low contrast, motion blur or rotation the tracker did not account for. Re-run the track with a box centered on a more distinct feature. If a small drift remains, add keyframes to the attached element and nudge its position at a few moments. Learn the technique in Filmora keyframing.
Combining With Masks
For a face blur that must stay inside the face and not spill over the background, attach an oval mask to the tracked element and feather its edge. This gives a natural look instead of a hard-edged box. See Filmora masks for shapes and feathering.
Stabilizing Before Tracking
Handheld footage with heavy shake gives the tracker more motion to solve, and tracked objects may jitter. Apply stabilization first, then track the stabilized clip. Be aware that stabilization crops the frame slightly and can warp edges, so decide which problem matters more. For details, read Filmora stabilization.
Titles And Text That Follow
A title attached to a tracked object should sit slightly offset, not exactly over the target, with enough margin to remain readable. Add a short fade in and fade out, and keep text brief on moving subjects since viewers need time to read. Style options are in Filmora titles.
When To Use A Different Tool
Filmora’s tracker is a good fit for simple point tracking. Complex jobs, such as replacing a screen on a moving phone with correct perspective, need planar or corner pin tracking, found in tools like After Effects. See After Effects motion tracking and Premiere masking and tracking for stronger options.
Export Check
After tracking, play the sequence at full quality and watch the attached element for jitter. Export a short test to check blur and graphics on a phone screen before finishing the full render.
Tracking For Privacy And Compliance
One of the most practical uses is hiding identifying details. Track a face, a number plate, a street sign or a screen and attach a mosaic or blur that stays in place for the whole shot. Check every frame at full size, because a tracker can slip for a few frames and expose the detail. Add extra margin around the blur, extend it a few frames before and after the subject enters, and then review the export in slow motion before publishing.
Making Graphics Feel Part Of The Scene
A tracked label looks most convincing when it responds to the scene. Add a small drop shadow, a slight delay at the start so it appears to lock on, and a subtle scale change if the subject moves toward or away from the camera. Avoid bright, saturated stickers that fight the footage. Simple lines, small circles and short text often feel more professional than flashy elements.
Speed, Preview And Performance
Tracking analyzes every frame in the segment, so long 4K clips take more time. Trim the clip to the section you need before you track. If preview playback stutters, generate proxies or render the preview, then export to see the real result. Save the project before tracking, since an analysis can use a lot of memory on a modest computer.
Troubleshooting Checklist
– If the box jumps, restart from a sharper frame with a better target.
– If the element lags behind, check for stacked effects that add delay.
– If the track stops partway, split the clip and track the next part.
– If the effect shows outside the object, tighten the mask and feather the edge.
Try It
- Film a 10 second clip of a person walking with a colorful logo or jacket.
- Place the tracking box on the logo, start tracking, and attach a text label.
- Add a mosaic effect to a second tracked area, such as a face, and compare how the blur follows.
- Add keyframes to correct any drift and export a short test.
Common Questions
How does Filmora motion tracking work?
It analyzes the pixels inside a tracking box from frame to frame and records the movement path. Any title, sticker or effect you attach then follows that path.
Why does my tracking box lose the object?
The target may be low contrast, blurry, hidden by another object or leaving the frame. Choose a sharper feature, track a shorter segment or move the starting frame.
Can I blur a face with motion tracking?
Yes. Track the face, attach a mosaic or blur effect, and use a mask with feathered edges so the effect stays inside the face.
Does motion tracking work on shaky footage?
It can, but results improve if you stabilize the clip first and choose a high-contrast target.
Related Lessons
- Filmora Keyframing to correct small drift by hand.
- Filmora Masks for shaped, feathered blurs and effects.
- Filmora Stabilization to steady footage before tracking.
- Filmora Titles for text that follows a subject.
- After Effects Motion Tracking for advanced perspective tracking.
Gear That Helps With This
Hand-picked kit that makes this lesson easier to put into practice.
Some links are affiliate links: if you buy through them we may earn a small commission at no extra cost to you. How this works.