
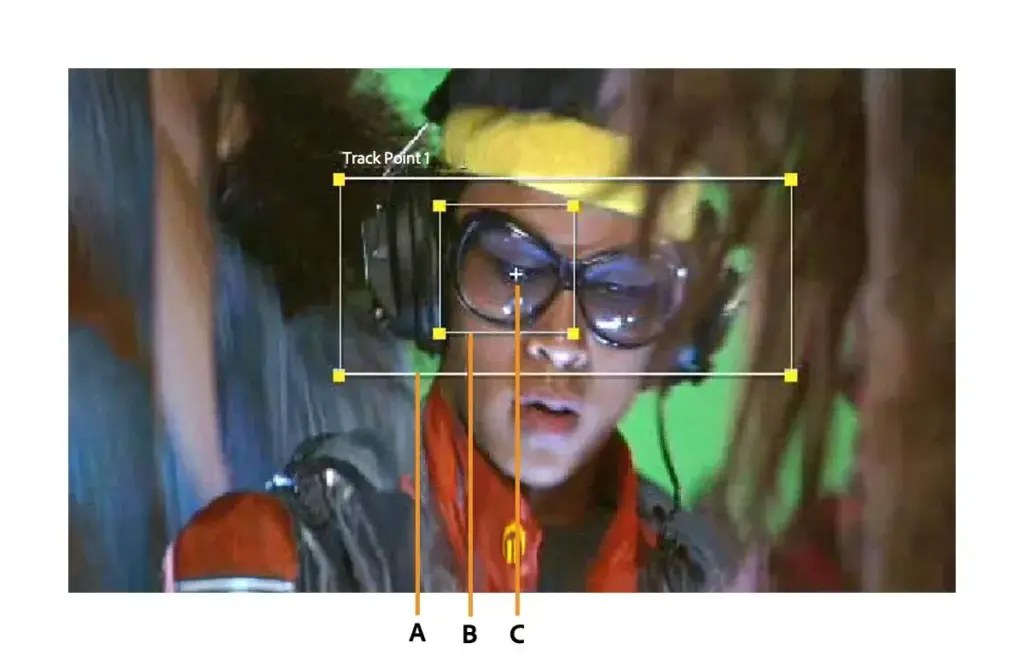
Motion tracking analyzes a moving subject in footage and records its position, scale and rotation so you can attach text, graphics or effects to it. In After Effects you place track points on a high-contrast feature, run the analysis forward, then apply the data to a null or layer so the element follows the subject naturally.
Why It Matters
Many shots need extra elements that must follow motion: a label above a moving person, a screen replacement on a phone or a logo on a moving vehicle. Without tracking, you would keyframe by hand and still risk visible slipping.
Tracking is also the foundation of other tasks such as stabilizing, object removal and compositing, so learning it well pays off across many projects.
Beginner Motion Tracking Basics
Open the Tracker panel with the footage layer selected and click Track Motion. A track point appears with two boxes: the inner feature region and the outer search region. Place the feature region on a high-contrast detail that stays visible, such as a corner or a mark. Click Analyze Forward and the tracker follows the pattern from frame to frame, recording the movement as keyframes.
Tracker Types
- Position: follows movement of one point, with no scale or rotation.
- Rotation and scale: uses two points to follow rotation and size changes.
- Perspective corner pin: uses four points to attach a flat surface such as a screen or sign.
- Camera tracker: solves 3D camera movement for objects placed in space.
- Warp Stabilizer: tracks to smooth shaky footage instead of attaching objects.
Choosing A Tracking Method
| Task | Method | Output |
|---|---|---|
| Label above a moving person | Position tracker | Null object with position |
| Replace a phone screen | Perspective corner pin | Corner pin effect |
| Follow a spinning object | Rotation and scale | Position, rotation, scale |
| Add 3D text to a scene | 3D camera tracker | Camera and track points |
| Remove a moving object | Tracker plus clone or fill | Position data for patches |
Tracking A Moving Subject
- Select the footage layer and open the Tracker panel, then click Track Motion.
- Place the feature region on a sharp, high-contrast detail and make the search region larger than the expected movement.
- Click Analyze Forward and watch the track follow the feature.
- Create a null object, click Edit Target and Apply the data to it.
- Parent your text or graphic to the null so it follows the subject.
Common Mistakes
- Choosing a feature that leaves the frame or gets hidden.
- Making the search region too small for fast motion.
- Applying tracking data directly to the wrong layer.
- Failing to correct drift that builds up over a long shot.
A Worked Example
A cyclist rides across the frame and you want a name label above the helmet. Place the track point on the helmet logo, set the search region wide enough for the speed and analyze forward. Apply the data to a null object and parent the label to it. A small offset keeps the label above the head, and the label follows the rider smoothly.
Choosing A Good Feature
The best features have high contrast, sharp edges and stay visible. Avoid reflections, shadows and objects that rotate out of view. If one point fails, choose another, track in sections and combine. A good feature is the single biggest factor in a successful track.
Search And Feature Regions
The feature region is the pattern the tracker looks for, and the search region is where it looks. Make the feature box tight on the detail and the search box big enough to cover how far the feature moves between frames. Faster motion needs a bigger search area, but larger boxes slow analysis.
Applying Data To A Null
Applying tracking data to a null object keeps things flexible. You can parent any number of layers to the null, change offsets and reuse the same movement. It also keeps the original footage untouched, which is helpful if you need to retrack.
Fixing Drift
Drift appears when the tracker slowly loses accuracy, so the element slides off the subject. Correct it by adjusting the track point at problem frames and re-analyzing from there, or by breaking the track into sections. For stubborn shots, add manual keyframes at the worst points.
Motion Blur And Matching
A tracked element should match the footage. Turn on motion blur for the layer so that fast movement blurs like the camera does, and match grain and color. Without these touches, an element looks pasted on, even when the tracking is perfect.
Planning Before You Shoot
If you know a shot will need tracking, shoot with that in mind. Add small markers on a surface, keep the lighting steady and avoid extreme motion blur by using a faster shutter speed. Good source footage makes tracking far easier, and a few minutes on set can save hours in post production.
Smoothing Jittery Data
Tracking data may be noisy, causing small jumps that make the attached element shake. Smooth the keyframes with the Smoother panel or an expression, and compare the result with the footage. A little smoothing improves the look, but too much makes the element lag behind the subject.
Organizing Projects
Name your tracking nulls clearly, such as Track Helmet or Track Screen, and keep them in a folder. Add a comment on how the track was made. When you return to a project weeks later, or hand it to a colleague, this small habit makes changes quick and prevents confusion about which null controls which element.
Handy for this: Camera Gimbal — smooth handheld footage. (affiliate link)
Advanced Edge Cases And Performance
Corner Pin Tracking
For flat surfaces, use the perspective corner pin option with four points. Place each point on a corner and analyze. The result is a corner pin effect that warps a replacement image to match the surface exactly. Add a mask for objects that pass in front, using masks and blend modes for clean edges.
Stabilizing Footage
The same tracking data can steady shaky shots, as described in stabilization in After Effects. Track a stable feature, then apply the inverse movement to hold it still. Choose between smoothing and locking, depending on whether you want to keep natural camera movement.
When Tracking Fails
Fast motion, motion blur, low contrast and occlusion can break a track. In those cases, use the roto brush from the roto brush lesson or manual keyframes. Expressions from expression basics can add smoothing to jittery tracks without rework.
Comparing Editors
Premiere Pro offers simpler tracking for masks, as shown in premiere masking and tracking, and is good for quick fixes. After Effects gives more control and supports 3D tracking and corner pins. Choose based on the complexity of the shot and the time available.
Try It
- Find a clip with a moving subject and a clear high-contrast feature.
- Track it with the Position tracker and apply the data to a null.
- Parent a text layer to the null and offset it above the subject.
- Turn on motion blur and check for drift.
Common Questions
What is motion tracking?
It records the movement of a feature in footage so you can attach other elements that follow it.
Which feature should I track?
Choose a sharp, high-contrast detail that stays visible throughout the shot.
Why does my track slide?
Drift builds up when the tracker loses accuracy. Correct it at problem frames and re-analyze.
Can I track a flat screen?
Yes. Use the perspective corner pin tracker with four points on the corners.
Related Lessons
- After Effects Stabilization to steady shaky shots.
- After Effects Masks And Blend Modes for clean composites.
- After Effects Roto Brush when tracking fails.
- Expression Basics to smooth movement.
- Premiere Masking And Tracking for simpler tracks.
Gear That Helps With This
Hand-picked kit that makes this lesson easier to put into practice.
Some links are affiliate links: if you buy through them we may earn a small commission at no extra cost to you. How this works.