
Shape layers in After Effects are vector layers built from paths, fills and strokes, so they stay sharp at any size and can be animated in many ways. You draw them with the shape tools or the pen tool, and every part, from the path to the stroke width, remains editable and keyframeable.
Why It Matters
Many motion graphics, such as lower thirds, icons, charts and animated backgrounds, are made from simple shapes. Because shape layers are vector based, you can scale them up for 4K or a large display without losing quality, and you do not need to import artwork from another program.
Learning shape layers gives you a flexible toolkit. A rectangle, a stroke and a few operators can create animations that would take much longer with imported files.
Beginner Working With Shape Layers
Creating A Shape
Choose a shape tool, such as the rectangle, ellipse, polygon or star, and drag in the composition. If a layer is selected, the shape may be added as a mask instead, so deselect layers first, or hold the shape tool and check the mode. Use the pen tool to draw custom paths.
Understanding The Structure
Expand a shape layer in the timeline and you will see Contents. Inside are groups, and each group has paths, a fill, a stroke and a transform. The order matters: items higher in the list are drawn on top.
| Part | What it controls |
|---|---|
| Path | The outline of the shape |
| Fill | The color inside |
| Stroke | The color, width and caps of the outline |
| Transform | Position, scale and rotation of the group |
| Operators | Effects such as Trim Paths and Repeater |
Shape Layers Step By Step
- Deselect all layers and choose the ellipse tool.
- Set a fill and stroke color in the toolbar, then drag to draw a circle.
- Expand the layer to see Contents, Ellipse 1, and its Fill and Stroke.
- Click the stopwatch on Size or Scale and create two keyframes to animate it.
- Press the U key to see all animated properties.
Fill And Stroke Options
Click the fill or stroke text in the toolbar to switch between solid color, gradients and none. Stroke has options for width, line cap and line join, and dashes. Rounded caps look friendly, while butt caps look technical. Use the corner radius setting on rectangles to create soft shapes.
Common Mistakes
- Drawing a shape with a layer selected, which creates a mask rather than a new shape.
- Animating the layer transform when the group transform is needed, which moves the anchor point unexpectedly.
- Leaving shapes named “Shape Layer 1”, “Shape Layer 2” and so on, making projects difficult to navigate.
- Forgetting that stroke and fill order affects how the shape looks.
A Quick Exercise
Draw a rectangle with a rounded corner, add a stroke, and animate its scale from zero to one hundred percent with an ease. Add a second shape and parent it to the first.
Handy for this: Camera Gimbal — smooth handheld footage. (affiliate link)
Advanced Operators, Expressions And Organization
Trim Paths
Trim Paths is one of the most useful operators. Add it from the Add menu in the layer, and animate Start and End from zero to one hundred percent to make a line draw itself. Offset moves the visible portion along the path, useful for loading spinners. Apply it to a stroke, not just a fill, and set the stroke to round caps for a polished look. See keyframes and the graph editor for easing.
Repeater
The Repeater duplicates a shape many times with offsets in position, scale, rotation and opacity. Use it to make patterns, radial designs, grids and animated bars. Change the copies number to control how many, and animate the transform values for movement. Place the repeater under the group you want to duplicate, and be careful that it can multiply both fill and stroke.
Other Operators
- Merge Paths combines shapes using add, subtract, intersect or exclude.
- Round Corners smooths sharp edges.
- Wiggle Paths adds a hand drawn wobble.
- Zig Zag creates wave and spike edges.
- Pucker and Bloat adjusts curves for organic shapes.
Expressions For Shapes
Expressions link properties and reduce keyframing. For example, wiggle(2, 20) on position adds natural movement, and linking the size of one shape to another keeps elements aligned. A slider control on a null layer can drive many properties at once, which is useful for adjustable templates. See After Effects expressions basics.
Parenting And Organization
Parent shape layers to a null object to move many elements together. Name layers and groups clearly, use label colors, and precompose related elements. Shape layers can be converted from Illustrator artwork by right-clicking a vector layer and choosing Create Shapes from Vector Layer, which makes imported logos editable. See parenting and null objects, precomposing and the After Effects interface.
Performance And Quality
Shape layers render quickly in most cases, but hundreds of repeated shapes with effects can slow previews. Reduce preview resolution, and cache the composition with RAM preview. Continuously rasterize is not needed for shape layers because they are already vector, but scale values above 100 percent remain sharp. Export through the render queue or Media Encoder, and consider alpha channel formats for overlays. See the render queue.
Design Ideas
Use simple geometry to build icons, animated infographics, bar charts, and background textures. Combine a subtle gradient with a few moving shapes for a modern background. Keep movement purposeful with eases and consistent timing, and limit colors to a palette. See color harmony and blend modes for styling.
Building A Simple Animated Icon
Start with a circle for the background, then add a smaller shape on top, such as a check mark drawn with the pen tool. Give the circle a scale animation from zero with an overshoot ease, then reveal the check mark with Trim Paths, starting a few frames later. Offset timing between elements gives motion a natural rhythm. Finish with a slight rotation or glow to add polish. This kind of small piece is useful for subscribe buttons, success messages and explainer videos.
Working With Gradients And Strokes
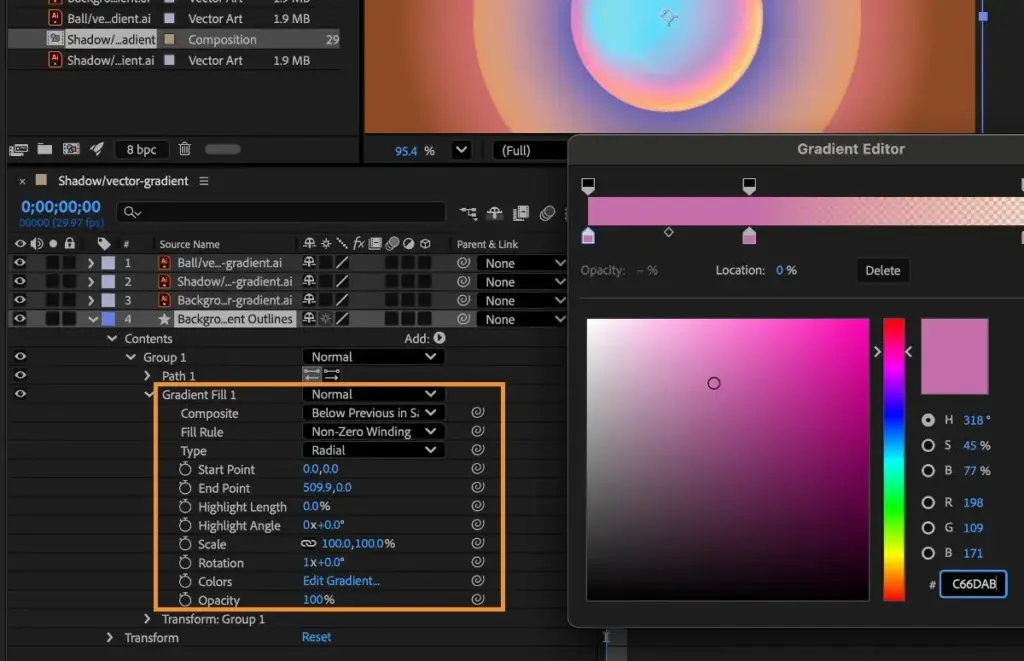
Gradient fills add depth to flat shapes. Set the gradient type to linear or radial, and drag the handles in the composition panel to place it. Gradient strokes work the same way. Animate the start and end points to create a moving shine across a button or logo. For dashed lines, set the dash and gap values in the stroke options, and animate the offset for a marching ants effect, which is useful for map routes and connection lines.
Tips For Cleaner Files
- Use the shape layer’s group names to mark parts, such as “Body” or “Shadow”.
- Delete unused groups, because hidden clutter slows editing.
- Keep one transform per group so animation stays predictable.
- Save a library of reusable shapes as animation presets.
Try It
- Draw a circle and add Trim Paths to its stroke, animating the End value.
- Add a Repeater with six copies and rotate each by 60 degrees.
- Parent the shape to a null and animate the null’s position.
- Rename every group in the layer to describe what it does.
Common Questions
What are shape layers in After Effects?
They are layers made from vector paths with fills and strokes, which stay sharp at any size and can be animated in detail.
Why did my shape become a mask?
You had a layer selected when drawing. Deselect all layers before using a shape tool to create a new shape layer.
How do I animate a line drawing itself?
Add Trim Paths to the shape and animate the End value from zero to one hundred percent.
Can I edit a logo from Illustrator as shapes?
Yes. Right-click the imported layer and choose Create Shapes from Vector Layer to convert it into editable shape layers.
Related Lessons
- After Effects Interface to find the panels you need.
- Keyframes And The Graph Editor for smooth easing.
- After Effects Expressions Basics for linking properties.
- Parenting And Null Objects for moving groups together.
- Blend Modes to style your graphics.
Gear That Helps With This
Hand-picked kit that makes this lesson easier to put into practice.
Some links are affiliate links: if you buy through them we may earn a small commission at no extra cost to you. How this works.