
AE motion blur is the smearing After Effects adds to fast-moving layers so animation looks like it was captured by a real camera. You turn it on per layer with the Motion Blur switch and for the whole composition with the master button, then tune shutter angle and samples in Composition Settings.
Why It Matters
A real camera exposes each frame for a short time, so anything moving during that time smears. Computer graphics have no exposure time by default, so each frame is perfectly sharp, which makes movement look jittery and artificial, especially on text, shapes and fast pans.
Adding motion blur is one of the quickest ways to make animation feel like part of live footage. It also hides small timing flaws, because the blur fills gaps between positions and makes movement read as continuous.
Beginner How To Turn On AE Motion Blur
The Two Switches
Motion blur needs two switches. First, in the timeline, each layer has a Motion Blur column, shown as a small icon of overlapping circles. Click it for every layer you want blurred. Second, the master Enable Motion Blur button at the top of the timeline must be on, or nothing will show.
What Gets Blurred
Motion blur responds to movement created by keyframes or expressions on Position, Scale, Rotation and similar properties, and to movement inherited from parent layers. It does not blur footage that already contains movement, since that blur was recorded in the camera, and it does not blur a layer that is not moving.
Basic Settings
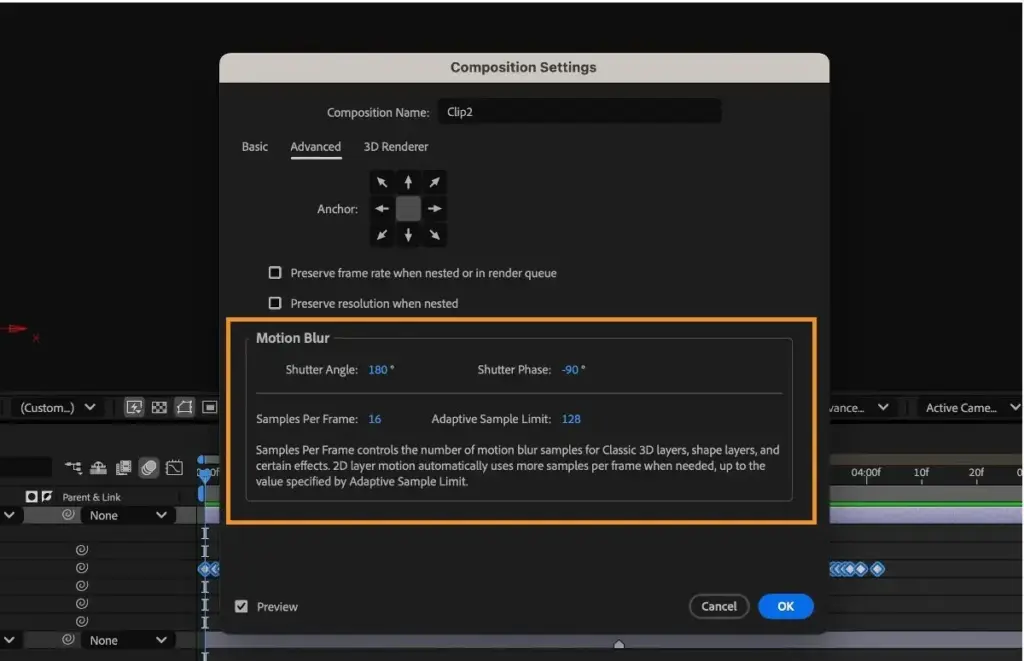
1. Open Composition, then Composition Settings, then the Advanced tab.
2. Set Shutter Angle to 180 for a film-like look. Higher values give more blur, lower values give less.
3. Set Shutter Phase to minus 90 so the exposure is centered on the frame.
4. Set Samples Per Frame to 16 for a smooth result.
5. Preview, and adjust if the blur looks too heavy or too light.
Matching Your Footage
If the live footage was shot at 24 frames per second with a 1/48 second shutter, that equals a 180 degree shutter, so a setting of 180 matches it. The relationship is explained in shutter angle and in the 180 degree shutter rule. Matching the two helps graphics sit naturally on real video.
Common Mistakes
– Turning on the layer switch but forgetting the master button.
– Using a very high shutter angle, which makes text unreadable.
– Expecting blur on a layer that is not animated.
– Judging the result at low preview quality instead of full resolution.
Handy for this: Camera Gimbal — smooth handheld footage. (affiliate link)
Advanced Tuning AE Motion Blur For Quality And Speed
Shutter Angle And Style
Shutter angle controls the length of the blur trail. A 180 degree angle is a natural default, 90 degrees gives a crisp, energetic look like action footage, and 360 degrees gives a dreamy, heavy blur. Choose by the style of the piece, and keep it consistent across all layers in a scene so the project feels like one camera shot it.
Samples And Render Quality
Samples Per Frame sets how many sub-frame positions are averaged. Low values create stepped, ghosted blur on fast movement, and high values are smoother but slower. Adaptive Sample Limit lets After Effects use more samples only where needed. Set the limit higher, such as 128, for final renders, and keep it low while previewing. See the render queue for output settings.
Motion Blur On Effects And Shapes
Motion blur works on shape layers, text and solids moved by transform properties. Effects that move content internally, such as a wiggle in an effect control, may not blur unless the layer has the switch on and the effect supports it. Some effects, such as particle systems, have their own motion blur settings, as covered in particles. Check each moving element rather than assuming.
Rotation And Scale Blur
Rotating a wheel or fan uses the same switch, and the blur follows a curved path. Fast scaling, such as a zoom in a title, blurs radially. When the blur appears uneven, increase samples and make sure the animation uses smooth curves, which you can adjust with the graph editor. Sudden changes in speed create short bursts of blur that look natural.
3D Layers And Cameras
In 3D scenes, camera moves and layer motion in depth both produce blur. A camera move blurs the whole scene, as in a real shot, and depth of field is a separate setting. For setup, read 3D layers and camera. Using a null object for camera control, as in parenting and null objects, keeps movement smooth.
Tracked Graphics And Footage
When you attach graphics to footage with motion tracking, the graphic inherits the camera’s motion but not its blur. Add motion blur to the graphic, and match the shutter angle to the footage. If the footage has a rolling shutter wobble, as discussed in rolling shutter, tracked graphics may feel slightly off, so test with a short preview.
Time Remapping And Slow Motion
Slowing footage with time remapping spreads out recorded motion blur, so slow motion can look soft. Graphics slowed the same way keep blur only if the switch is on. For a consistent look, apply the blur after the speed change, and see time remapping for the controls.
Troubleshooting
If blur does not appear, check the layer switch, the master button and that the layer has real movement. If the blur looks stepped, raise Samples Per Frame. If it looks too strong, lower the shutter angle. If it varies between layers, check that every layer uses the same composition settings, since precomposed layers use their own settings unless you collapse transformations.
Precomps And Nested Compositions
A precomposition has its own motion blur settings. Motion blur inside the precomp depends on its own shutter angle, while blur from moving the precomp layer depends on the parent composition. To keep things consistent, set the same values in both, or use Collapse Transformations carefully and test the output.
Performance Tips
Motion blur increases render time because each frame is sampled several times. Preview with the blur turned off for speed, then turn it on for checks and final output. Work at half resolution while animating, and save full quality for the final render. Closing other heavy programs and using a fast disk for cache also help long compositions.
A Final Check
Before delivery, pause on a frame in the middle of fast movement and look at the blur at 100 percent. It should resemble what a camera would record: smooth, directional and about the length of the movement during half a frame. If it looks like a digital filter, reduce it and try again.
Try It
- Create a shape layer and animate its position across the screen in half a second.
- Turn on the layer Motion Blur switch and the master button.
- Set Shutter Angle to 180 and Samples Per Frame to 16 in Composition Settings.
- Change the shutter angle to 360 and compare the look, then return to the value that matches your footage.
Common Questions
Why is there no motion blur in my After Effects animation?
Both the layer Motion Blur switch and the master Enable Motion Blur button must be on, and the layer must actually be moving through keyframes or expressions.
What shutter angle should I use for motion blur?
A 180 degree shutter angle suits most work and matches a 1/48 second shutter at 24 frames per second. Use less for crisp action and more for a dreamy look.
Does motion blur work on video footage?
It does not add blur to footage that is already moving, but it does blur the footage layer if you move or scale it with keyframes in After Effects.
How many samples should I use?
Sixteen is a good starting point for previews, and raise the adaptive sample limit for final renders if you see stepping on fast movement.
Related Lessons
- Shutter Angle to understand the setting behind the blur.
- The 180 Degree Shutter Rule for matching real footage.
- Keyframes And The Graph Editor to shape the speed of animation.
- 3D Layers And Camera for blur from camera and depth movement.
- The Render Queue for final output settings.
Gear That Helps With This
Hand-picked kit that makes this lesson easier to put into practice.
Some links are affiliate links: if you buy through them we may earn a small commission at no extra cost to you. How this works.