
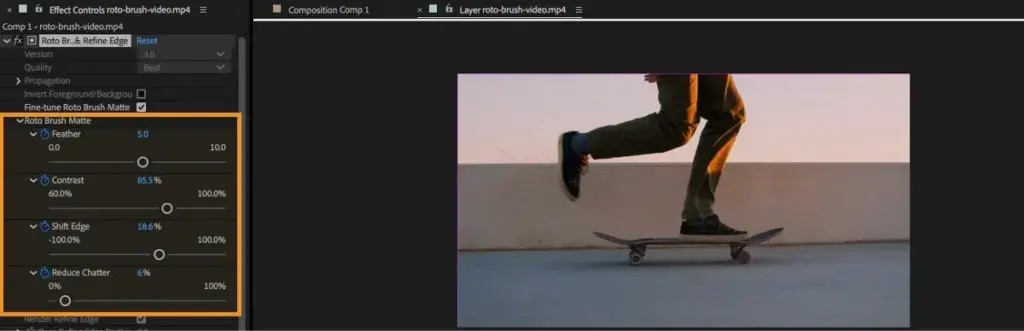
The roto brush in After Effects is a tool that cuts a moving subject out of a video by painting a rough selection on one frame and letting the software track it through the rest. It is used to replace backgrounds, apply effects to a person or object and isolate subjects without a green screen.
Why It Matters
Rotoscoping used to mean tracing a subject frame by frame. The roto brush automates most of the work, so a task that took hours can often be done in minutes, and the result can be used for background replacement, selective color and effects.
It is not perfect, and the quality depends on the footage. Knowing how to guide it and where it fails saves time and gives clean edges that hold up in the final composite.
Beginner Roto Brush Basics In After Effects
Double-click a layer to open it in the Layer panel, and choose the Roto Brush tool. Paint over the subject on a reference frame, and After Effects builds a selection. Add to it with the left mouse button, and subtract with Alt or Option held down. When the edge looks right, press the spacebar or use the forward controls to propagate the selection to following frames, which creates a matte layer that follows the subject.
Main Controls
- Paint strokes to add or remove areas from the selection.
- Propagation, which carries the matte forward and backward through the clip.
- Refine Edge brush for hair and soft edges.
- Freeze to lock the selection after you are satisfied.
- Output options such as the matte, the foreground only or the background only.
Typical Problems And Fixes
| Problem | Cause | Fix |
|---|---|---|
| Edge jitter | Matte changes frame to frame | Use Freeze and reduce edge softness, or add feathering |
| Selection grabs the background | Similar colors between subject and background | Paint subtraction strokes on the background |
| Hair edges disappear | Fine details | Use the Refine Edge brush on hair |
| Subject lost during fast motion | Tracking fails with quick change | Add correction strokes every few frames |
| Slow performance | High resolution | Reduce preview resolution and cache the result |
A Basic Roto Workflow
- Place the clip in a composition and double-click the layer to open the Layer panel.
- Choose the Roto Brush tool, go to a clear frame and paint across the subject.
- Subtract incorrect areas with Alt or Option and paint again to refine the shape.
- Let it propagate through the clip, scrubbing to check and correct problem frames.
- Use the Refine Edge tool, click Freeze and apply the matte to a background or effect.
Common Mistakes
- Starting with a frame where the subject is partly hidden.
- Painting too many strokes at once, which confuses the tracking.
- Ignoring edge problems until the end, when fixing them takes much longer.
- Not freezing the selection, so the software recalculates and changes the result.
A Worked Example
A person walks across a street in front of a busy background. Start on a frame where the whole body is visible, paint the figure with a few strokes and remove an area of street that was included. Propagate forward and check every ten frames. When the hair edge flickers, use the Refine Edge brush at that frame, then freeze. Place a new background underneath to complete the shot.
Choosing Good Footage
The easier the footage, the better the roto. Good contrast between subject and background, steady camera, low motion blur and a clean silhouette all help. Shoot with a fast shutter speed to reduce motion blur, and with a plain background when possible. A little planning on set avoids hours of cleanup.
Working Efficiently
Work on short sections and freeze each one. Lower the preview quality while painting, and cache the result in memory. Name your layers and keep different versions so that you can go back if an edit worsens the matte. Take regular breaks, because small errors become visible with fresh eyes.
Using Roto In A Larger Shot
Roto is often only a part of the job. After the matte is ready, you may add a shadow beneath the subject, blur the background slightly to match depth of field and adjust light wrap around the edges. Small touches like these make the subject seem to belong in the scene, and are as important as the cutout itself.
Time Planning
Estimate roto time before agreeing to a shot. A simple five second clip with a clear subject may take under an hour, while a long shot with hair and fast motion could take a day. Test a few seconds first, then multiply. Being honest about the time it requires helps you plan a project and decide whether another technique is better.
Checking The Matte
View the matte alone, over a solid color and over the final background. Problems that hide in one view appear in another, such as a dark fringe against a bright background. Scrub slowly and play at full speed too, since flicker is often easier to see in motion than on a still frame.
Handy for this: Fast Prime Lens — creamy backgrounds, low light. (affiliate link)
Advanced Refining, Compositing And Alternatives
Refining Edges
The matte edge decides whether a composite looks real. Use feathering, shrink and a slight blur to blend the edge, and check it over different backgrounds. Combine the roto matte with manual shapes from masks and blend modes for areas the brush cannot handle. A final color correction with color correction helps match subject and background light.
Tracking And Stabilizing First
If the camera shakes, stabilize before roto, as explained in stabilizing footage. For subjects that need effects attached to them, see motion tracking. Clean motion makes propagation more reliable and reduces the number of correction frames.
When To Use Green Screen Instead
If you control the shoot, a green screen gives a cleaner result with less work, as described in green screen keying. The roto brush is for footage that was not shot for keying. Hair, glass and smoke remain challenging, and may need several techniques together.
Precomposing And Rendering
After you finish a roto, precompose the layer to keep the project tidy and speed up playback. The method is covered in precomposing. Render the matte as a separate pass if you need to use it in other software, and keep an alpha channel in a lossless format.
Try It
- Import a clip of a person moving against a simple background.
- Use the roto brush to select the subject on a clear frame and propagate through the clip.
- Fix problem frames with additional strokes and apply the refine edge brush on hair.
- Place a new background beneath the subject and check the edges.
Common Questions
Does the roto brush need a green screen?
No. It is made for footage without a green screen, though cleaner footage gives better results.
Why does my matte jitter?
The tool recalculates each frame. Freeze the selection, add correction strokes and soften the edge to reduce jitter.
Can it handle hair?
Partly. The Refine Edge tool helps with hair, but very fine strands may still need extra work or a key.
Is it slow?
Propagation can take time on high-resolution clips. Lower preview quality and work in short sections.
Related Lessons
- AE Masks And Blend for manual shapes and compositing.
- AE Green Screen when you control the shoot.
- AE Motion Tracking to attach elements to moving subjects.
- AE Stabilize to steady footage first.
- AE Precompose to keep roto organized.
Gear That Helps With This
Hand-picked kit that makes this lesson easier to put into practice.
Some links are affiliate links: if you buy through them we may earn a small commission at no extra cost to you. How this works.