
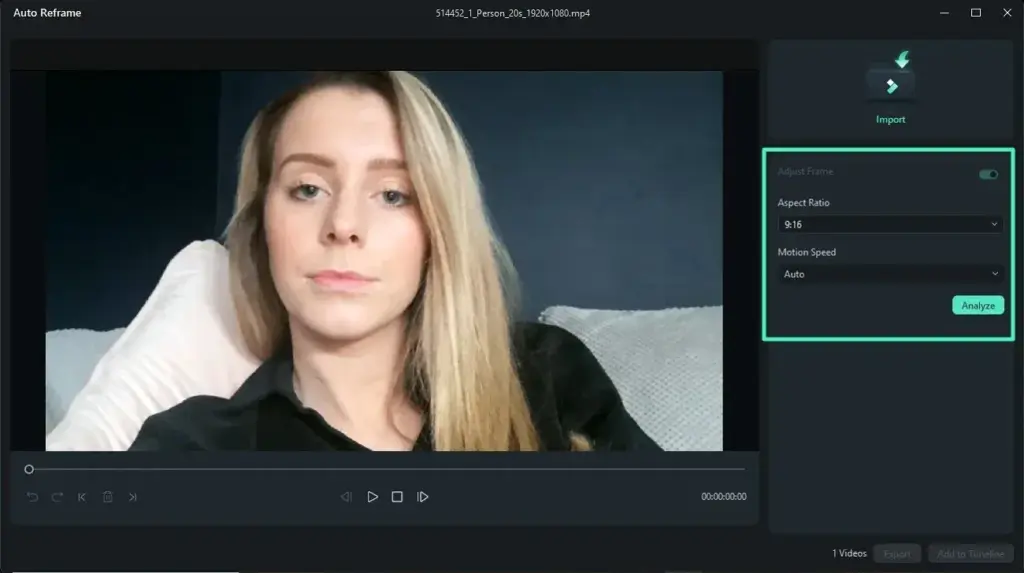
Filmora auto reframe is a feature that analyzes your video, finds the main subject and crops the frame to a new aspect ratio such as 9:16 vertical, 1:1 square or 4:5, keeping the subject in view. It saves time when you need to repurpose a widescreen video for short-form platforms without manually keyframing every shot.
Why It Matters
Most video is shot in 16:9 widescreen, but phones and social apps favor vertical or square formats. Cropping a widescreen clip to the center often cuts off faces or action. Reframing by hand means adding position keyframes on every clip, which takes a long time for longer edits.
Auto reframe handles the first pass automatically. You then review the result and correct the shots where the tracking misses, so a single master edit can feed several platforms.
Beginner Using Filmora Auto Reframe
Starting The Feature
Select a clip on the timeline, or the whole sequence, and choose Auto Reframe from the toolbar or the right-click menu. A dialog lets you pick the target aspect ratio and motion setting, then start the analysis. Filmora processes the clip and places the result back on the timeline with keyframes already added.
Choosing An Aspect Ratio
| Ratio | Best for |
|---|---|
| 9:16 | Vertical short video and stories |
| 1:1 | Square feed posts |
| 4:5 | Portrait feed posts |
| 16:9 | Standard widescreen, for reference |
| 21:9 | Cinematic widescreen |
Choose the ratio based on where the video will be posted, and check the platform’s safe areas, since captions and buttons may cover the top and bottom.
Steps For A Quick Reframe
- Finish the edit in widescreen, including cuts and music.
- Select the clips or the whole timeline.
- Open Auto Reframe and choose 9:16 or the ratio you need.
- Pick a motion speed, such as slow, default or fast.
- Click Analyze and wait for the process to finish.
- Play the result, and adjust any shot where the subject is cut off.
Motion Speed Settings
Slow motion tracking follows the subject smoothly, which suits interviews and calm shots, but it may lag behind quick movement. Fast tracking reacts quickly and suits sports and action, but it can look jumpy. Default sits in the middle. Try different settings on one clip before analyzing a long edit.
Common Mistakes
- Reframing before editing, which forces you to analyze again after each change.
- Leaving titles and graphics in a widescreen position, so they are cut off.
- Not checking every clip after analysis.
- Using a wide shot with small subjects, where the tracker has little to follow.
A Quick Exercise
Take a one-minute clip of a person talking and reframe it to 9:16 with each motion setting. Compare how smoothly the subject stays in the middle.
Handy for this: Camera Gimbal — smooth handheld footage. (affiliate link)
Advanced Getting Better Results And Fixing Problems
Shoot With Reframing In Mind
The best reframing starts at capture. Keep the subject in the center third of the widescreen frame, avoid important details at the edges and leave headroom. If you know you will publish vertical, shoot at 4K so that cropping to 9:16 still gives a sharp 1080 by 1920 picture. A 4K widescreen frame is 3840 by 2160, and a vertical crop of it measures about 1215 by 2160, so the output stays close to full HD. See vertical video framing and aspect ratios.
Manual Keyframe Corrections
After the analysis, open the clip’s position keyframes and adjust any that miss. Add a keyframe at the point where the subject begins to leave the frame, move the clip to recenter it, and add a second keyframe afterward. Use easing so the motion looks natural, and keep corrections small. See Filmora keyframing.
Dealing With Multiple Subjects
Auto reframe picks the most prominent subject, which may not be the one you want. In a two-person interview, the tracker may jump between faces. Split the clip at the speaker changes and reframe each part separately, or position the clips manually. For group shots, a wider crop or a split screen layout may work better. See Filmora split screen.
Titles, Captions And Graphics
Add captions after reframing so they sit in the safe area of the new frame. Filmora can generate captions automatically. Keep text large, high contrast and away from the edges. See Filmora auto captions and Filmora titles.
Project Settings And Export
Set the project aspect ratio to match the new format before editing further, or create a new project for each platform. When exporting, choose the correct resolution, frame rate and bitrate for the platform, such as 1080 by 1920 at 30 fps. See Filmora project settings, Filmora export settings and video frame rates.
Comparing With Other Tools
Premiere Pro offers an Auto Reframe effect with similar features, and CapCut includes automatic resizing for its templates. The approach is the same in each: analyze the clip, crop, and fix manually where needed. See Premiere Pro auto reframe and CapCut desktop workflow.
Performance Tips
Analysis can take a while on long or high-resolution clips, so close other programs and process in sections. Use proxy files for smooth playback if your computer struggles. Save the project before starting, in case it needs to be repeated. See Filmora proxy editing.
When To Reframe By Hand
For hero content, such as an ad or a polished short, hand-keyframed framing often looks better, because you decide exactly where the subject sits and how the camera appears to move. Use auto reframe to rough in the shots and then refine the important ones.
Reviewing The Result Shot By Shot
After the analysis finishes, play the timeline and pause on each cut. Check that faces are not cropped at the chin or forehead, that the subject is not hugging one edge, and that on-screen objects the viewer needs are still visible. Reframed footage often needs a little extra headroom, so nudge the clip down by a few percent if the face sits too high. For talking-head video, keep the eyes about a third of the way down from the top of the vertical frame.
A Repeatable Workflow For Several Platforms
Edit once in widescreen, then duplicate the project for each destination. In the first copy, run auto reframe to 9:16 for short-form platforms. In the second, use 1:1 or 4:5 for feed posts. Keep the original 16:9 version for longer platforms. Name each project clearly, and export all of them at the end, so the story, music and timing stay identical while only the framing changes.
Try It
- Export a widescreen clip with a clear subject, or pick one from your library.
- Run Auto Reframe to 9:16 with each motion speed.
- Fix one missed shot with manual keyframes.
- Add captions in the safe area and export a test clip.
Common Questions
What is Filmora auto reframe?
It is a feature that detects the main subject in a clip and crops the frame to a new aspect ratio, such as vertical, while following the subject.
Does auto reframe reduce quality?
Cropping reduces resolution, so shoot in 4K when you plan to publish vertical, and the result stays sharp.
Why is the subject cut off after reframing?
The tracker may follow the wrong subject or lag behind fast movement. Adjust the motion speed or fix the position keyframes manually.
Can I reframe a whole timeline at once?
Yes. Select all clips and run Auto Reframe, then review each shot.
Related Lessons
- Vertical Video Framing for composing in portrait format.
- Aspect Ratios to pick the right shape for each platform.
- Filmora Keyframing for manual corrections.
- Filmora Motion Tracking for following objects precisely.
- Filmora Export Settings for the right output.
Gear That Helps With This
Hand-picked kit that makes this lesson easier to put into practice.
Some links are affiliate links: if you buy through them we may earn a small commission at no extra cost to you. How this works.