
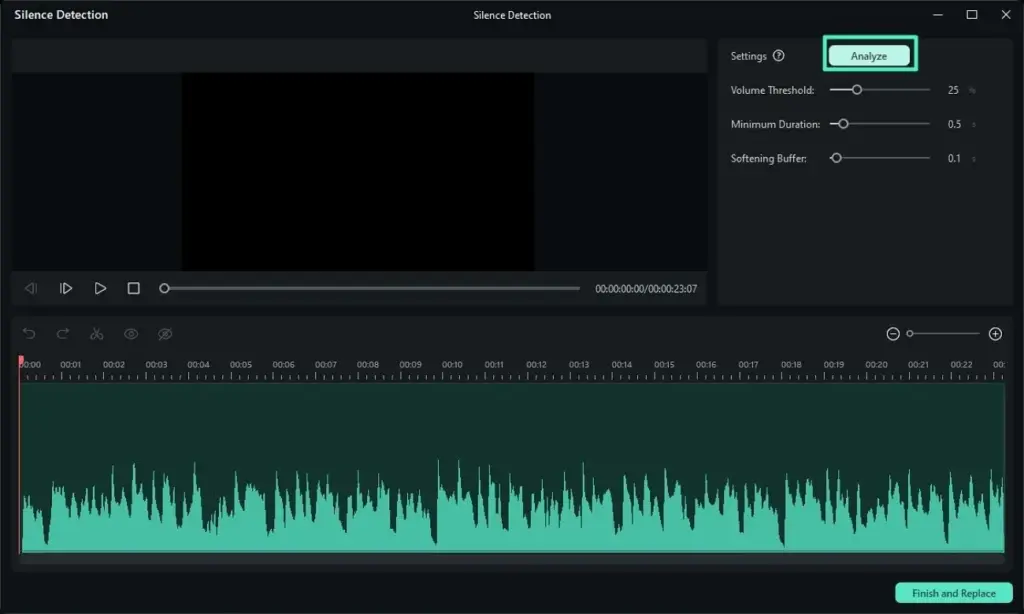
Silence detection in Filmora analyzes a clip, finds stretches of audio below a volume threshold, and cuts them out for you. You choose how quiet and how long a gap must be before it is removed, which turns a long talking recording into a tighter edit in a few clicks.
Why It Matters
Raw talking footage is full of pauses, false starts and gaps between sentences. Cutting each one by hand takes a long time and is tedious on long recordings such as interviews, tutorials and podcasts.
Silence detection removes the obvious dead air quickly so you can spend your effort on pacing and storytelling. It works best when you review the result instead of trusting it blindly.
Beginner Silence Detection In Filmora For Beginners
The feature listens to the audio track of a selected clip and looks for places where the sound stays below a chosen level. It then splits the clip at those points and deletes the quiet sections, leaving the speech.
How To Use It
- Place the clip on the timeline and select it.
- Open the audio tools and choose silence detection.
- Set the volume threshold. A higher value counts more sound as silence.
- Set the minimum duration. Gaps shorter than this stay in place.
- Run the analysis, check the preview, then apply the cut.
Names and layout of menus change between versions, so look for the silence option under the audio or clip tools if your menu differs.
Settings To Understand
| Setting | What It Does | Starting Point |
|---|---|---|
| Volume threshold | Sets how quiet counts as silence | Just above the room noise level |
| Minimum duration | Shortest gap that will be removed | About 0.5 seconds |
| Padding or buffer | Keeps a little space around speech | About 0.1 to 0.2 seconds |
Quick Tips
- Record a few seconds of room tone before you speak so you know how quiet the background is. See room tone for why this matters.
- Start with a gentle threshold and raise it until pauses disappear but breaths stay.
- Listen to the whole result once. Look for clipped word endings.
- Add a short audio fade or a small cut transition if the sound jumps.
Common Mistakes
- Setting the threshold too high, which chops the ends of words and soft consonants.
- Using a very short minimum duration, which removes natural breaths and makes the speaker sound rushed.
- Running detection on a clip with loud background noise, so little is ever treated as silence.
- Forgetting that video cuts will jump when the speaker stays in the same position.
A Short Checklist Before You Run It
- Make sure the clip has only one speaker or a consistent level.
- Trim the beginning and end by hand so the analysis starts on useful audio.
- Listen for loud clicks or taps, which count as sound and may interrupt gap detection.
- Save the project so you can return to the uncut version.
If the result is not right the first time, do not fight it by hand. Undo and adjust the threshold or duration, because the setting change usually fixes the whole clip at once.
Handy for this: Fast Wide-Angle Lens — gather more starlight. (affiliate link)
Advanced Pacing, Noise And Workflow
Noise Decides What Is Silent
The tool does not know what silence is, only what is quiet. A fan, traffic or air conditioning can keep the signal above the threshold. Clean the track first with noise reduction, or lower the background at the source. The editing lessons on wind noise and audio levels help you prepare a track that behaves well.
Pacing Is A Creative Choice
Not every pause is dead air. A beat of silence lets a point land, gives a joke time and makes an interview feel human. Aim to remove excess, not all gaps. Many editors keep a pause of about a quarter to half a second between sentences, and slightly longer between ideas.
Hide The Jump Cuts
Removing pauses causes the speaker to jump on screen. You can cover cuts with cutaway footage, as described in b-roll shooting, or alternate between a wide and a punched-in version of the same shot so the change looks deliberate. Keyframing a small zoom on every other clip is a quick method, and Filmora keyframing shows how.
Work On A Copy And Keep Control
- Duplicate the clip or project before large automated edits so you can return to the original.
- Apply silence removal to separated clips on different tracks if you need to keep sync with other media.
- After removal, ripple the timeline and check that music, titles and sound effects did not shift out of place.
- Use markers to flag any spot where the cut sounded wrong and refine it by hand.
Related Automation
Text-based tools in other editors, such as text-based editing, also remove pauses by working from a transcript. They give finer control over which words stay, while Filmora silence detection is faster for a first rough pass.
For long recordings, work in sections. Run detection on a ten or fifteen minute stretch, review it, then continue. Smaller chunks are easier to check and a single mistake does not affect the entire timeline.
Handling Interviews And Multiple Speakers
In a two-person conversation, one microphone often picks up the other person, so there is little true silence. Silence detection works best on separate microphone tracks, because the quiet track can be cut cleanly while the active one stays. If you only have a single mixed track, keep the removal gentle and fix problem areas manually.
Audio Cleanup After Cuts
Removing gaps also removes the room sound that sits under them, so the background may seem to pump on and off. Add a low level of room tone under the full clip, or use a gentle noise reduction pass over the whole track, so the ambience stays steady. A short crossfade of a few frames at each cut also smooths the joins. This is a standard technique in dialogue editing and makes automated cuts sound hand-made.
Try It
- Import a recording of yourself speaking for about two minutes with natural pauses.
- Run silence detection with the default settings and note how many seconds are removed.
- Undo and run it again with a higher threshold and a longer minimum duration.
- Play both versions and decide which one sounds natural.
Common Questions
Does Filmora silence detection remove breaths?
It can, if the breath is quieter than the threshold and the gap is long enough. Raise the minimum duration or lower the threshold if breaths are disappearing and the speech sounds rushed.
Why does silence detection find nothing in my clip?
Background noise may be louder than the threshold. Reduce noise, raise the threshold slightly, or record a quieter track next time.
Can I use it on music or video without speech?
It works on any audio, but it is designed for speech. On music it may cut quiet passages that you wanted to keep, so use it carefully.
Will the video stay in sync after cuts?
The video on the same clip is cut along with the audio, so they stay together. Separate tracks, such as background music, may need adjusting afterward.
Related Lessons
- Filmora Keyframing to hide jump cuts with small zooms.
- Room Tone for recording the quiet baseline you need.
- Audio Levels to prepare a clean track before editing.
- B-Roll Shooting for cutaways that cover removed pauses.
- Text-Based Editing for removing pauses by editing a transcript.
Gear That Helps With This
Hand-picked kit that makes this lesson easier to put into practice.
Some links are affiliate links: if you buy through them we may earn a small commission at no extra cost to you. How this works.