
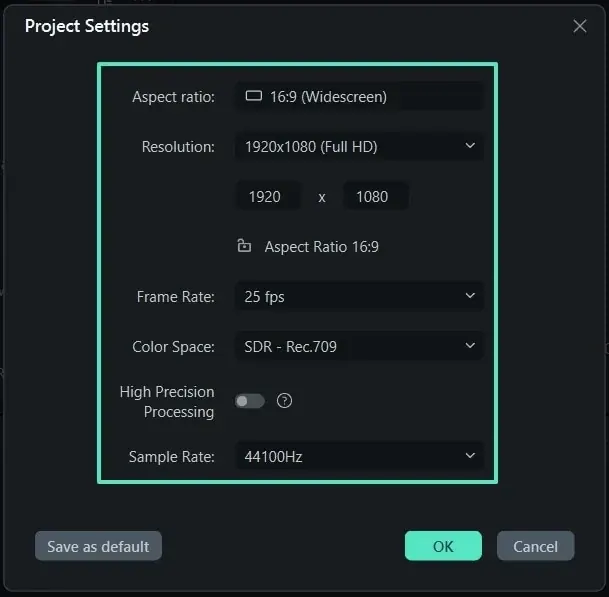
Filmora project settings define the canvas for your edit: the aspect ratio, resolution, frame rate and color space that every clip is placed into. Set them before importing footage, and you will avoid cropped frames, mismatched speeds and exports that look different from what you edited.
Why It Matters
Beginners often jump straight into editing and discover later that the project is the wrong shape. A video meant for a phone feed but built in a wide 16:9 frame needs reframing, and a 24 fps clip in a 30 fps project may stutter.
Setting the project once, based on where the video will be viewed, gives you a predictable result. It also makes the interface easier to understand, because the preview window and timeline reflect your final output.
Beginner Filmora Project Settings And Interface Basics
When you open Filmora, you can start a new project from the welcome screen and pick an aspect ratio. Common choices are 16:9 for YouTube and widescreen, 9:16 for vertical short videos, 1:1 for square posts, and 4:3 or 21:9 for special looks. You can open Project Settings later from the File menu to adjust resolution and frame rate.
The Main Areas Of The Interface
| Area | What it does |
|---|---|
| Media panel | Holds imported footage, audio and stock items |
| Effects and titles tabs | Provide transitions, effects, titles and stickers |
| Preview window | Shows the current frame at your chosen quality |
| Timeline | Stacks video, audio and title tracks along time |
| Toolbar | Contains split, delete, speed, crop and other tools |
Setting Up A New Project
- Choose the aspect ratio that matches where the video will be posted.
- Open Project Settings and set the resolution, such as 1920 by 1080 or 3840 by 2160.
- Set the frame rate to match your camera footage, commonly 24, 25, 30 or 60.
- Leave color space on standard SDR unless you are intentionally working with HDR footage.
- Save the project and then import your media.
Pick The Frame Rate
- 24 fps for a film look and most cinematic work.
- 25 fps if you are in a PAL region and use that standard.
- 30 fps for general online video and screen recordings in North America.
- 60 fps for fast action and smooth gameplay or sports clips.
Common Mistakes
- Importing footage first and letting the project adopt the wrong rate or size.
- Using 4K project settings on a slow computer without creating proxies.
- Mixing vertical and horizontal clips without deciding how each will fit.
- Changing project settings late and forgetting to check every clip’s position.
A First Edit
Create a 16:9 project at 1920 by 1080 and 30 fps, import three clips, drag them to the timeline, press Space to play, and use the split tool at the playhead to trim. You will have used the media panel, timeline, preview window and toolbar in about five minutes.
Handy for this: Camera Gimbal — smooth handheld footage. (affiliate link)
Advanced Resolution, Frame Rate, Color Space And Performance
Resolution And Preview Quality
The project resolution is the size of the final export. Preview quality in the player window is separate, and lowering it gives smoother playback on weaker machines without changing the export. If footage is 4K and the project is 1080p, Filmora scales it down, which gives room to crop in. If footage is smaller than the project, it will be scaled up and look soft. See Filmora proxy editing for using lighter files while you cut.
Frame Rate Matching
When a clip does not match the project rate, Filmora must repeat or drop frames. A 60 fps clip in a 30 fps project plays normally but with half the frames, and a 24 fps clip in a 30 fps project can show uneven motion. For slow motion, shoot at a higher rate and use speed controls, as explained in Filmora speed ramping and conforming frame rate.
Color Space And HDR
Standard projects use Rec.709 color, which suits almost every monitor and social platform. HDR options such as Rec.2020 with HLG or PQ are for footage shot in those formats and delivered on HDR displays. If you export HDR footage in an SDR project, colors can look flat or oversaturated. Match settings to the source. The wider ideas are in color spaces compared.
Autosave And Project Files
Filmora saves its edits in a project file that points to your media rather than copying it, so moving or renaming the source files can break links. Keep media in a stable folder, use the autosave option, and make backups of the project file. Follow a clear folder structure approach for video as well.
Aspect Ratio Changes Later
Changing aspect ratio after editing can crop clips or add black bars. Filmora offers an auto reframe tool to track the main subject for vertical versions. Use it for converting a finished wide video to a social format. See Filmora auto reframe.
Export Settings Follow Project Settings
The export dialog defaults to your project size and frame rate. You can change the format, bitrate and resolution, but exporting at a higher frame rate than the project will not add real frames. Set quality for the platform you use, referring to Filmora export settings.
Choosing Settings By Platform
Different destinations favor different shapes and sizes, and picking early saves reframing later. YouTube and websites usually use 16:9 at 1920 by 1080 or 3840 by 2160. Short vertical platforms use 9:16 at 1080 by 1920. A square 1:1 frame at 1080 by 1080 still works for some feeds. If you plan to publish the same story in several shapes, edit a main version first, then duplicate the project and change the aspect ratio for each variant. That keeps your main edit untouched while you adjust titles and framing for the others.
Hardware Acceleration And Cache
Filmora can use your graphics card to speed up playback and export, and the option is found in Preferences. If playback stutters or exports crash, try turning acceleration off, since driver problems are a common cause. The render cache, created when you use Render Preview on a section of the timeline, stores finished frames on disk so repeat playback is smooth. Clear the cache periodically, because it can grow to many gigabytes. Keep it on a fast drive with free space, and avoid placing it on the same slow external disk as your source footage.
Try It
- Create a new 16:9 project at 1920 by 1080 and 24 frames per second.
- Import one clip shot at 24 fps and one shot at 60 fps.
- Place both on the timeline and watch the motion at normal speed.
- Open Project Settings, change to 30 fps, and see whether the playback changes.
Common Questions
What are the best Filmora project settings for YouTube?
Use 16:9 at 1920 by 1080 or 3840 by 2160, with a frame rate that matches your footage, usually 24, 25 or 30. Keep color space on standard SDR unless you shot HDR.
Can I change project settings after I start editing?
Yes, but do it early. Changing resolution or aspect ratio can alter how clips fit the frame, so you may need to reposition them. Frame rate changes may alter motion, so check playback again.
Why does my footage look zoomed or letterboxed?
The clip and project have different aspect ratios. Filmora either fits the clip with bars or fills the frame by cropping. Change the fit mode on the clip, or adjust the project aspect ratio.
Why is Filmora playback laggy?
High resolution and high bitrate footage demand a lot of processing. Lower preview quality, enable proxies, close other applications and use render preview. These steps do not change the exported file.
Related Lessons
- Filmora Media Library for importing and organizing clips.
- Filmora Proxy Editing for smoother playback with large files.
- Filmora Export Settings to finish with the right format.
- Video Frame Rates for choosing between 24, 25, 30 and 60.
- Aspect Ratios for matching the frame to the platform.
Gear That Helps With This
Hand-picked kit that makes this lesson easier to put into practice.
Some links are affiliate links: if you buy through them we may earn a small commission at no extra cost to you. How this works.