
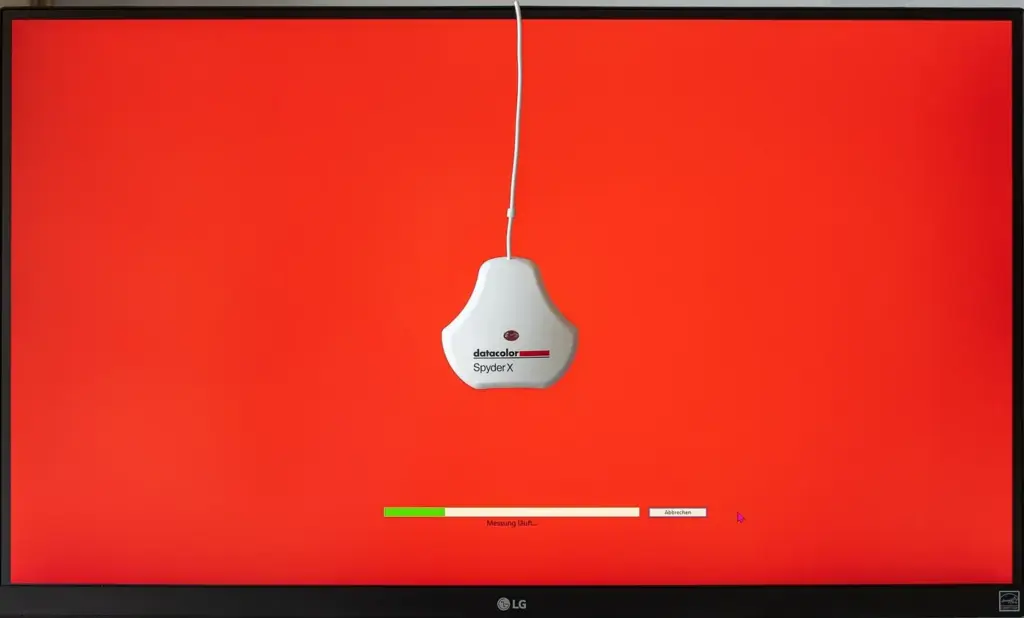
Monitor calibration is the process of measuring how your screen displays color and brightness with a colorimeter, then creating an ICC profile and setting targets so that colors are accurate and consistent. It means photos you edit look the same on other calibrated screens and match prints much more closely.
Why It Matters
A monitor that is too bright, too blue or too saturated leads you to make the wrong edits. You brighten photos that look dark only on your screen, remove a color cast that is not there, and then wonder why prints and phones show something different.
Calibration is the foundation of a color managed workflow. Without it, other tools such as soft proofing and print profiles cannot do their job.
Beginner Monitor Calibration Basics
Screens drift over time and vary from one to another, even within the same model. A colorimeter is a small sensor that sits against the screen while software displays a series of colors. The software compares what the sensor measures with what the color should be, builds a correction in the form of an ICC profile, and loads it into the operating system so applications can display colors accurately.
What You Need
- A colorimeter or spectrophotometer from a reputable maker.
- Calibration software that comes with the device or a compatible app.
- A monitor that has been on for at least 20 to 30 minutes to warm up.
- A room with stable, moderate lighting and no direct light on the screen.
- A screen with a reasonable color gamut, ideally covering most of sRGB or Adobe RGB.
Typical Calibration Targets
| Setting | Common Value | Reason |
|---|---|---|
| White point | 6500 K (D65) | Standard for most photo and video work |
| Gamma | 2.2 | Matches sRGB-like tone response |
| Luminance for editing | 80 to 120 cd/m2 | Close to a typical dim-room viewing level |
| Luminance for print matching | Around 80 to 100 cd/m2 | Brings screen brightness near the paper in the viewing booth |
| Black level | Native or lowest available | Preserves shadow detail without lifting blacks |
A Basic Calibration Session
- Warm up the monitor, reset it to default settings and turn off any dynamic contrast, eco mode or night mode.
- Install the software, choose your display type and set the targets for white point, gamma and luminance.
- Attach the colorimeter at the position shown, in a dim room, and let the software cycle through patches.
- Save the profile, confirm it is set as the system default, and check the before and after views.
- Write the date and settings on a note so you know when the next check is due.
Common Mistakes
- Calibrating with the screen set far brighter than the print viewing level, then finding prints look dark.
- Using blue light or night mode filters while editing, which alters colors on screen.
- Skipping the warm-up and measuring a screen whose brightness is still drifting.
- Assuming a laptop display can match a professional wide-gamut monitor after calibration.
A Worked Example
A photographer notices that prints come out darker and warmer than the screen shows. The monitor is set at maximum brightness with a cool white point. After calibration to 6500 K and 100 cd/m2, the screen looks dimmer and slightly warmer at first, but edits now match the prints. The change feels odd for a day and then becomes the new normal.
Hardware Versus Software Calibration
Software calibration changes the signal sent to the screen through the graphics card lookup table, and it works with any monitor. Hardware calibration, available on some high-end displays, writes the corrections inside the monitor, which preserves more tonal steps and avoids banding. If your monitor supports it, hardware calibration gives the cleanest result.
How Often To Recalibrate
Screens age and shift gradually. A reasonable routine is to recalibrate every month for professional work and every few months for casual editing. Some software reminds you automatically. Recalibrate also after changing the room lighting, replacing the graphics card or cable, or noticing that colors look different from yesterday.
Reading Your Room
Your room matters as much as the panel. A bright window behind you, a white wall that bounces light onto the screen or a colored wall close to the monitor all change how you perceive color on screen. Neutral gray surroundings, dim lighting and a shading hood create a stable reference. If you edit in a room whose light changes through the day, plan color-critical work for a consistent time, or close the blinds before judging a profile. Good habits in the room reinforce everything the colorimeter does.
Handy for this: Monitor Calibrator — colors you can trust. (affiliate link)
Advanced Gamut, Uniformity And Verification
Display Gamut And Color Spaces
Calibration can correct a screen, but it cannot create colors the panel cannot display. A monitor that covers only 70 percent of sRGB will clip saturated colors regardless of profile. A wide-gamut panel can show more of Adobe RGB or DCI-P3, but requires color managed software to avoid oversaturation. Learn the differences in color spaces compared, and set up software correctly with a color managed workflow.
Uniformity And Viewing Conditions
Cheap panels can be brighter in the center than at the edges, or tinted in one corner. Some professional monitors include uniformity compensation, and some calibration software can measure it. Keep ambient light neutral and consistent, avoid colored walls near the screen, and use a hood to reduce glare. Your eyes judge color in context, so a stable environment matters as much as the profile itself.
Verification And Delta E
After calibration, run a validation that measures a set of known colors and reports the difference as delta E. Values below 2 are generally considered visually accurate for photo work and values below 1 are excellent. Check the report for maximum errors in saturated colors and in neutral grays, because gray balance matters most for photos. Repeat the validation periodically as an inexpensive check.
Connecting Calibration To Print
The final test of a calibrated workflow is a print. Use soft proofing with the paper profile to preview the output, and choose paper carefully using photo paper types. If prints still differ from the screen after calibration, check the paper profile, the printer settings, the lighting used to view prints and the screen brightness before blaming the calibration.
Try It
- Check what your monitor brightness and color mode are set to right now.
- Reset the monitor to factory defaults and turn off night mode and dynamic contrast.
- Run the calibration software with 6500 K, gamma 2.2 and about 100 cd/m2.
- Open a familiar photo before and after calibration and compare shadows and skin tone.
Common Questions
Do I need a colorimeter?
If you edit photos for prints or for clients, yes. Without a measuring device, your screen is only guesswork, and the colors you see may be far from accurate.
How bright should my monitor be?
Many photographers use about 80 to 120 cd/m2 in a dim room. Adjust within that range so a print under good light matches the screen.
Does calibration fix a cheap monitor?
It improves accuracy, but it cannot add colors the panel cannot show. A better panel gives better results after calibration.
How often should I calibrate?
Monthly for professional work is a good habit. Recalibrate sooner if the room lighting changes or colors look different.
Related Lessons
- Color Managed Workflow to make every program use the profile correctly.
- Soft Proofing And Printing to preview prints on your calibrated screen.
- Photo Paper Types for choosing the print surface you will compare against.
- Color Spaces Compared for sRGB, Adobe RGB and wider gamuts.
- Color Temperature Kelvin to understand the white point number.
Gear That Helps With This
Hand-picked kit that makes this lesson easier to put into practice.
Some links are affiliate links: if you buy through them we may earn a small commission at no extra cost to you. How this works.