
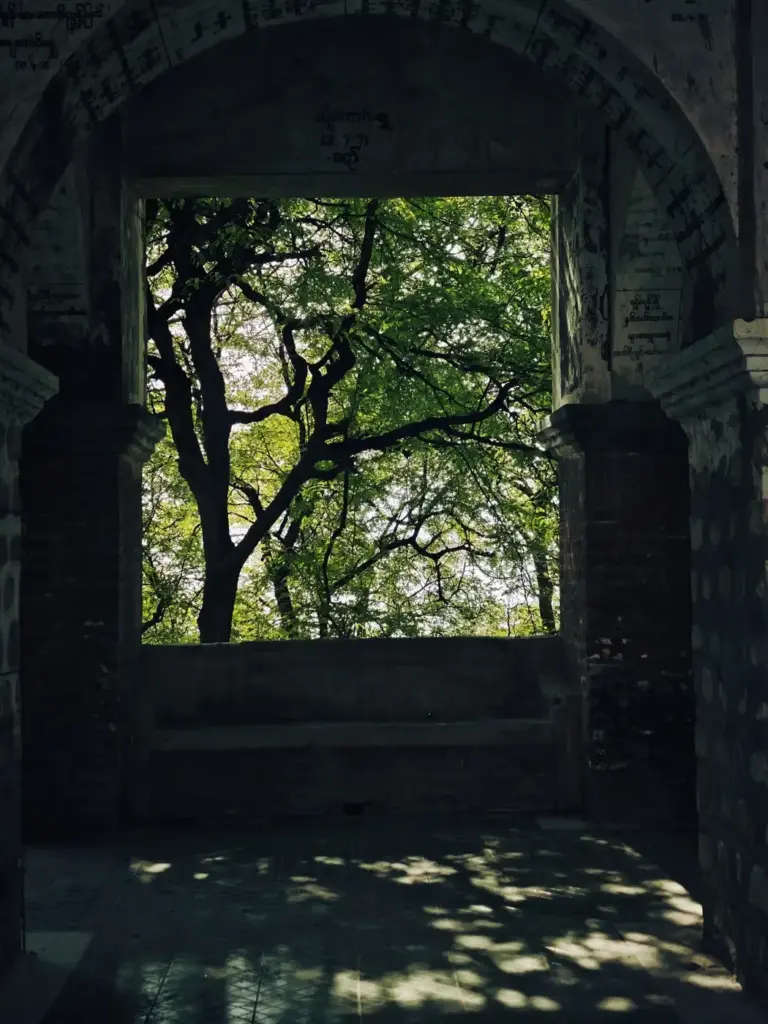
Natural framing is a composition technique that uses elements already in the scene, such as an arch, a doorway, tree branches or a window, to surround or partly enclose the subject. The frame draws attention inward, hides distracting areas, and adds a sense of depth because the viewer sees the frame in front of the subject.
Why It Matters
Without any structure around it, a subject can float in a busy scene, and the eye has no clear place to land. A frame inside the picture works like a picture frame on a wall: it says look here. It also separates the subject from its surroundings, which makes it feel more important.
Natural frames are also free. You do not need special gear, only a willingness to move around until something in the scene wraps the part you care about. Used well, they add layers, and layers are what make a flat photograph feel three-dimensional.
Beginner Finding And Using Natural Framing
Start by looking at the scene for anything with an opening or an edge that could surround your subject. The frame does not have to be complete. Even a branch across the top and a trunk on one side can be enough to suggest an enclosure.
Common Natural Frames
- Architecture: arches, doorways, windows, tunnels, columns and bridges.
- Trees and plants: overhanging branches, gaps between trunks and leaves or flowers close to the lens.
- Landscape: a cave mouth, a rock opening, or two cliffs with a view between.
- People and objects: an arm held in a loop, a car window, or a gap between two people.
- Light and shadow: a pool of light on a floor or a dark foreground that surrounds a bright area.
Simple Settings
- Choose aperture priority and start at f/8. That keeps both the frame and the subject reasonably sharp.
- If you want a soft frame that does not compete, open the aperture to f/2.8 or f/4 and focus on the subject so the foreground blurs.
- Set the focus point on the subject, not on the frame. The camera may otherwise lock onto the closer object.
- Use exposure compensation if the frame is much darker than the scene. Take a test shot and check the screen.
- Take several pictures, moving a few steps left, right, lower or higher to change how much of the frame shows.
| Goal | Aperture | Focus on | Result |
|---|---|---|---|
| Frame and subject both sharp | f/8 to f/11 | Subject | Clear layers, strong depth |
| Soft, dreamy frame | f/2.8 to f/4 | Subject | Blurred edges that lead inward |
| Frame as a dark silhouette | f/5.6 to f/8 | Subject | Bold shape, subject glows |
Common Mistakes
- Choosing a frame that is brighter or busier than the subject, so it steals attention.
- Letting the frame cover too much of the subject.
- Cutting the frame awkwardly at the edge of the picture, creating a tangent.
- Using the same frame in every photo until it becomes a habit rather than a decision.
Handy for this: Fast Prime Lens — creamy backgrounds, low light. (affiliate link)
Advanced Exposure Balance And Depth Cues In Natural Framing
Balancing Exposure Between Frame And Subject
A common problem is that the frame sits in shade while the subject beyond it is in bright light, such as a doorway that looks out on a sunny street. Cameras measure the whole scene, so the result is often a subject that is too bright or a frame that is too dark. Your options are to meter for the subject and let the frame fall into silhouette, to meter for the frame and allow the subject to glow, or to bracket several exposures and blend them. A histogram helps you see how much of the scene is clipped. If you shoot raw files, you can lift dark foreground areas later, as covered in the lesson on exposure compensation.
How Frames Create Depth
Depth cues are the signals the brain uses to judge how far away things are. A natural frame supplies several at once. It overlaps the subject, which tells the eye that the frame is closer. It may be larger or sharper than the subject, which adds relative size and focus cues. And it often has different brightness or color, which adds tonal separation. This is why a frame works best when it is in a different plane from the subject, as discussed in foreground interest.
Lens And Distance
A wider lens lets you stand close to the frame and include more of it, which makes the frame look bigger and the subject smaller. A longer lens compresses the distance between the two, so the subject looks larger inside a smaller opening. If you want a wide, immersive look, use a wide-angle lens and stand near the frame. If you want an intimate look at a distant subject, back away and zoom in. Either way, small moves change the result more than you expect. Take a step and recheck the edges.
Frame Shape And Subject Position
The frame does not need to center the subject. A subject placed on a third line within an arch can feel more natural than a perfectly centered one, as long as the frame still surrounds it. See the rule of thirds for how to do this. Symmetrical frames such as a tunnel, however, can work better with a subject in the middle, a topic covered in symmetrical composition.
Keeping The Frame Meaningful
The best frames add to the story. A window frame around a person suggests a view of private life, while leaves around a bird suggest a habitat. Choose frames that fit the subject instead of simply being available, and be ready to move on when none does.
Try It
- Walk through a place with arches, doorways or trees and find three natural frames.
- For each, shoot once focused on the frame and once focused on the subject, and compare the results.
- Take another version with the aperture at f/2.8 and one at f/11 to see how the frame’s sharpness changes the effect.
- Check the histogram and decide whether the frame should be a silhouette or show detail, then retake with the exposure you chose.
Common Questions
What is natural framing in photography?
It is using elements in the scene, such as arches, windows or branches, to enclose the subject. The frame guides attention inward, hides clutter and adds depth.
Should the frame be in focus?
Usually focus on the subject. A softly blurred frame guides the eye without competing, while a sharp frame works when you want a crisp layered look at a smaller aperture.
What if the frame is much darker than the subject?
Decide which matters more. Meter for the subject and let the frame become a silhouette, or bracket exposures and blend them. Check the histogram to avoid clipping highlights.
Does the frame have to surround the subject completely?
No. A partial frame, such as a branch at the top and a trunk at the side, is enough for the eye to read it as an enclosure.
Related Lessons
- Foreground Interest to build the layers that a frame depends on.
- Visual Weight and Balance to keep the frame from overpowering the subject.
- Controlling Depth of Field to blur or sharpen the frame as you want.
- Rule of Thirds to place a subject inside the frame.
- Tangents in Composition to avoid awkward joins at the frame edge.
Gear That Helps With This
Hand-picked kit that makes this lesson easier to put into practice.
Some links are affiliate links: if you buy through them we may earn a small commission at no extra cost to you. How this works.