
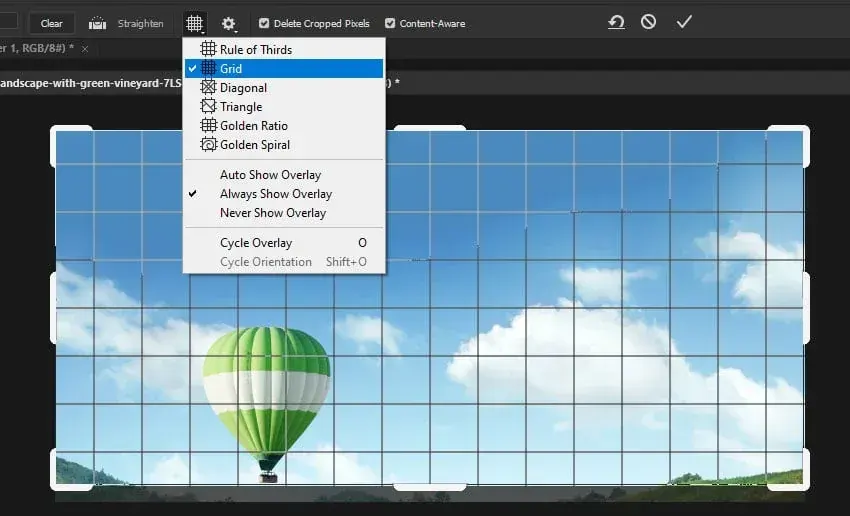
Cropping photos means trimming the edges of an image after capture to improve composition, remove distractions or change the frame shape. A good crop strengthens the subject and balance, keeps enough pixels for the final use, and respects the destination aspect ratio.
Why It Matters
Even careful photographers shoot frames that could be stronger. A subject sits too small in the frame, a bright scrap of paper intrudes at the edge, or the horizon tilts slightly. A thoughtful crop can turn a good photograph into a better one without a reshoot.
Cropping is also a learning tool. Reviewing how your best images were trimmed shows what you wish you had done in the camera, and that feedback improves your next shoot.
Beginner Cropping Photos Step By Step
Reasons To Crop
– Remove distractions at the edges, such as a bright patch or a partial person.
– Make the subject larger and more important.
– Straighten a tilted horizon.
– Change the shape for print or a platform, such as square or 4:5.
– Create more negative space around a subject.
A Simple Crop Routine
1. Look at the whole photo and decide what the picture is about.
2. Straighten the horizon or vertical lines first.
3. Trim the edges that do not help the subject, starting with the brightest distractions.
4. Try a few ratios, such as 3:2, 4:5 and 1:1, and judge which feels best.
5. Check the edges for tangents, where a line just touches the frame.
6. Keep a copy of the original uncropped version.
Where To Place The Subject
Use overlays such as the rule of thirds grid, but let the picture guide you. A subject looking or moving into the frame needs room ahead of it. A centered subject can be strong if the scene is symmetrical. See rule of thirds and lead room for these ideas.
Common Mistakes
– Cropping so tightly that the file becomes too small to print.
– Cutting through joints, such as ankles, wrists or knees, in a portrait.
– Leaving a bright distraction because it is only a little visible.
– Applying the same crop to every photo and losing the variety of framing.
– Forgetting that a crop changes the visual weight and balance of the image.
Tools To Use
Most editors have a non-destructive crop tool, which hides the trimmed pixels without removing them. Lightroom, Photoshop, Capture One and free tools like Darktable all do this. Use the overlay options and aspect lock to speed up decisions.
Handy for this: Wide-Angle Zoom Lens — take in the whole scene. (affiliate link)
Advanced Resolution, Ratios And Intent When Cropping Photos
How Much Resolution Remains
Every crop reduces pixel count. A 24 megapixel image of 6000 by 4000 pixels cropped to the middle half of the width and height leaves about 6 megapixels, or 3000 by 2000 pixels. That is plenty for web and for an 8 by 10 inch print at around 250 pixels per inch, but it is not enough for a large wall print. Plan by the final use. See pixel pitch and megapixels for how sensor resolution relates to detail.
Aspect Ratios And Intent
Each ratio carries a feel. The 3:2 frame is natural for landscapes and street scenes. A 4:5 portrait frame suits people and fills a phone screen. Square suits symmetric or minimal subjects, and 16:9 works for cinematic or wide scenes. Browse the options in aspect ratios and choose before you crop, since a wrong ratio can ruin balance.
Crop For Negative Space And Balance
Instead of always going tighter, sometimes the right crop adds empty space by extending the canvas or trimming from the opposite side. Negative space around a subject gives it breathing room and a quiet mood, and a mismatched crop can leave an image feeling heavy on one side. For more on that idea, read negative space and visual weight and balance.
Avoid Tangents And Awkward Edges
A tangent happens when a line or shape just kisses the frame edge and draws the eye to the wrong place. Move the crop a few pixels in or out to either overlap or separate clearly. Check each corner and edge at full size, and look at where limbs, branches and horizon lines meet the border. The lesson on tangents explains the common patterns.
Cropping Versus Composing In Camera
Cropping is a rescue tool, not a plan. It changes the image but not the perspective, depth of field or lens look, which come from your position and lens. It also reduces the sharpness at a given print size. If you find you crop most images to the same ratio, set your camera’s grid or crop mode to match and frame it properly at capture. See fill the frame for working closer, and the Photoshop crop tool for a technical walkthrough.
Sets And Consistency
When you publish a series, a consistent ratio and crop style give the set unity. Decide on a ratio first, then crop each image to it, judging each frame separately so the subject remains well placed. Review the full series together as thumbnails to catch awkward jumps.
Cropping Portraits And People
Be careful where a crop slices a person. Avoid cutting at the joints: ankles, knees, wrists and elbows look awkward at the edge. Crop through the middle of a limb segment, or include the whole joint. For headshots, a common approach leaves a little space above the head and crops just below the chin or at the chest. Leave space in front of a gaze, so the subject looks into the frame and not at the edge.
Cropping Landscapes
A landscape often improves by removing a boring foreground or an empty sky. Decide which part carries the interest, and give it about two thirds of the frame. Panoramic crops, such as 2:1 or 3:1, can make a wide scene feel more dramatic when the main interest runs along a horizontal band, but they cut resolution quickly and can feel empty if the foreground has no detail.
Crop To Fix Perspective And Lines
When you correct converging verticals in architecture, the image shape changes and the corners go blank. Crop to remove the blank areas, or extend the canvas and fill them. Keeping the crop locked to the same ratio while straightening helps you stay in control of the final size. Always straighten before the final trim, since rotation uses extra edge pixels.
Reviewing Your Crops
Come back to a crop the next day. Fresh eyes spot an awkward edge or a subject that feels cramped. Print or view the image at the size it will be used, since a crop that works large can fail as a small thumbnail and the other way around. Keep the uncropped master so you can try another version later.
Try It
- Pick five photos you like but feel are slightly off, and duplicate them.
- Straighten each, then crop three versions: tight, medium and with extra negative space.
- View them as small thumbnails to see which version reads best.
- Export the favorite and note what you could change in camera next time.
Common Questions
Is cropping photos bad practice?
No. Cropping is a normal part of editing. It works best when you use it to improve composition rather than to rescue every frame, and when enough pixels remain for the final use.
How much can I crop before quality suffers?
It depends on your sensor and output. A 24 megapixel image cropped to a quarter of its area still gives 6 megapixels, which prints well at 8 by 10 inches but not at poster size.
What crop ratio is best?
There is no best ratio. Use 3:2 for natural camera framing, 4:5 for portraits and social feeds, 1:1 for symmetry, and 16:9 for wide, cinematic scenes.
Should I crop before or after other edits?
Most editors crop early so that adjustments such as vignettes and gradients apply to the final frame. Non-destructive tools let you change the crop at any time.
Related Lessons
- Rule Of Thirds Composition for placing a subject in the frame.
- Aspect Ratios to choose the right shape for the image.
- Negative Space for cropping to give subjects room.
- Tangents In Composition to avoid awkward edge contacts.
- Photoshop Crop Tool And Canvas Size for the technical side of cropping.
Gear That Helps With This
Hand-picked kit that makes this lesson easier to put into practice.
Some links are affiliate links: if you buy through them we may earn a small commission at no extra cost to you. How this works.