
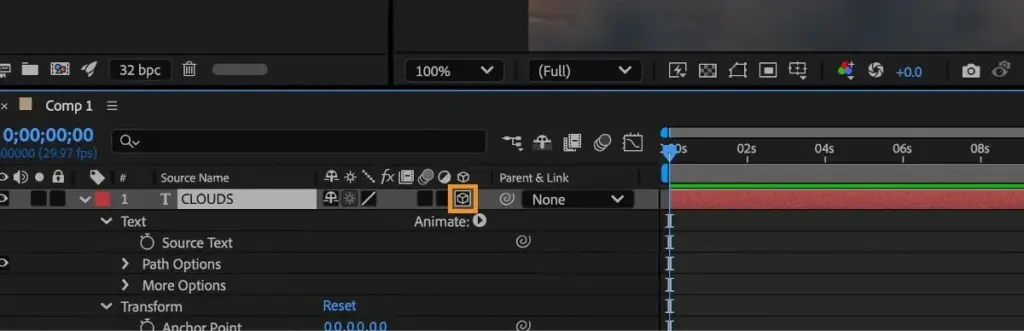
3D layers in After Effects are flat layers given a depth position, so they can move, rotate and scale in three dimensions. Adding a camera lets you move through the scene with perspective, parallax and depth of field. This approach, often called 2.5D, creates convincing depth from photos, text and shapes without a full 3D program.
Why It Matters
Flat motion graphics can feel limited. Layers slide left and right, but they never seem to exist in a space. With 3D layers and a camera, a still photo can have parallax, text can fly past the viewer and a title can orbit around an object.
It is also faster than building a scene in a separate 3D application. After Effects handles layers, lights and cameras in the same timeline you already use, so it is a good way to add depth to titles, product videos and photo animations.
Beginner Working With 3D Layers
Turn A Layer Into 3D
In the timeline, click the cube icon in the 3D Layer column for any layer. The layer gets a Z axis, so it now has position in X, Y and Z, plus rotation on all three axes and a new Material Options group.
The Three Axes
– X moves left and right.
– Y moves up and down.
– Z moves toward or away from the camera.
Moving a layer on Z changes its apparent size because of perspective, so distant layers look smaller.
Create A Camera
Choose Layer, then New, then Camera. A one-node camera looks in a direction and is simple to move. A two-node camera has a point of interest it always looks at, so it orbits easily. Pick a preset based on lens length: a 35mm preset gives a normal look, and a 15mm preset gives a dramatic wide angle. See focal length explained to understand what these numbers mean.
Camera Tools
Use Orbit, Pan and Track tools from the toolbar to move the camera in the viewer. They create changes you can keyframe in the camera’s position and point of interest.
Common Mistakes
– Forgetting to turn on the 3D switch for a layer, so it ignores the camera.
– Placing layers too close together on Z, which hides parallax.
– Using a camera that moves too fast and makes viewers feel unwell.
– Parenting layers without a plan, which leads to confusing motion.
Handy for this: Fast Prime Lens — creamy backgrounds, low light. (affiliate link)
Advanced Building Convincing Depth In After Effects
Plan Your Layers
Separate a scene into foreground, middle ground and background. Spread them along the Z axis, and scale each one up so it still fills the frame. Closer layers should move more than farther ones when the camera moves, creating parallax. This is how a still photograph, cut into layers, appears to have depth. Use precompose to group elements, then place the group as one 3D layer.
Control With A Null
A null object is an invisible layer used as a controller. Make the camera a child of a 3D null, and animate the null for smooth moves such as a slow push-in or an orbit. This keeps keyframes clean and easy to adjust. The process is explained in parenting and null objects. Use one null for position and another for rotation if needed.
Lights And Shadows
3D layers respond to lights. Add a light from Layer, then New, then Light. Point, spot, parallel and ambient lights each give a different effect. In Material Options you can set a layer to cast shadows and accept lights. Soft shadows and subtle falloff make layers feel part of one space. Keep lights simple, since too many slow previews.
Depth Of Field
Turn on depth of field in the camera settings, set the focus distance and adjust the aperture. Layers off the focus plane blur, imitating a real lens. Animate the focus distance for a rack focus effect. Pair this with motion blur for a realistic look in moving shots, and compare with real bokeh to guide your taste.
Smooth Camera Moves
Smooth moves come from careful easing. Select camera keyframes and use ease in and ease out, then refine them in the graph editor. A gentle curve feels natural, while linear motion looks mechanical. Read keyframes and the graph editor for control. Short moves of one to three seconds usually feel better than a long, constant drift.
Combine With Tracking
For video footage, you can combine 3D layers with tracked data to place text or graphics in a scene. See motion tracking for the basics. A tracked camera lets 3D layers appear anchored to the footage.
Performance And Previews
Many 3D layers with lights and shadows can slow previews. Lower the preview resolution, use draft mode and turn off shadows while animating. Render at full quality when finished. For output settings, see the render queue.
Text And Shape Layers
Text and shape layers work well in 3D because they stay sharp when scaled. Use shape layers for lines, panels and backgrounds that sit at different depths. Add subtle shadows, and avoid placing text on a steep angle that is hard to read.
Summary
Turn on 3D, build layered scenes, control the camera with a null, add simple lights and ease every move. These steps turn flat artwork into a believable space.
Common Project Types
Typical uses include animated titles that fly through a scene, product shots with a slow orbit, photo animations with parallax and lower thirds that sit at an angle. In a photo animation, cut the subject out with a mask, rebuild the background behind it and move each piece to a different depth. In a title sequence, place letters at different Z distances and move the camera between them for a bold reveal.
Avoiding Common Problems
Layers that cut through each other can show jagged edges, so keep them separate on the Z axis. Very large rotations can make text unreadable, so limit angles when words must be clear. If a layer looks soft after a move toward the camera, scale it up before animating or use a higher resolution source. Check the composition at full resolution before rendering to catch these issues.
Camera Settings To Know
The angle of view, focal length, aperture and focus distance all affect the look. A wide setting exaggerates movement and perspective, while a longer setting feels calmer. Choose settings to match the style of the video, and keep them consistent between shots in the same project so the scenes feel like part of one world.
Try It
- Import a photo, and make three copies placed in foreground, middle and background layers with simple cutouts.
- Turn on the 3D switch for each layer and move them to different Z positions.
- Add a two-node camera, then animate a slow push forward over three seconds.
- Turn on depth of field and set the focus on the middle layer.
Common Questions
What are 3D layers in After Effects?
They are normal layers with a 3D switch turned on, giving them a Z position and 3D rotation so a camera and lights can affect them.
What is the difference between one-node and two-node cameras?
A one-node camera looks in a set direction, while a two-node camera always aims at a point of interest, which makes orbiting simpler.
Why do my layers not react to the camera?
The 3D switch is probably off for that layer. Turn it on, and check that the camera is active and above the layers.
Is After Effects 3D the same as a real 3D program?
No. It is a 2.5D method that places flat layers in space, which is fast and flexible, but it does not model complex objects.
Related Lessons
- Parenting And Null Objects for smooth camera control.
- Motion Blur In After Effects for realistic movement.
- Keyframes And The Graph Editor to ease moves.
- Precompose to group elements.
- Motion Tracking to place 3D layers in footage.
Gear That Helps With This
Hand-picked kit that makes this lesson easier to put into practice.
Some links are affiliate links: if you buy through them we may earn a small commission at no extra cost to you. How this works.