
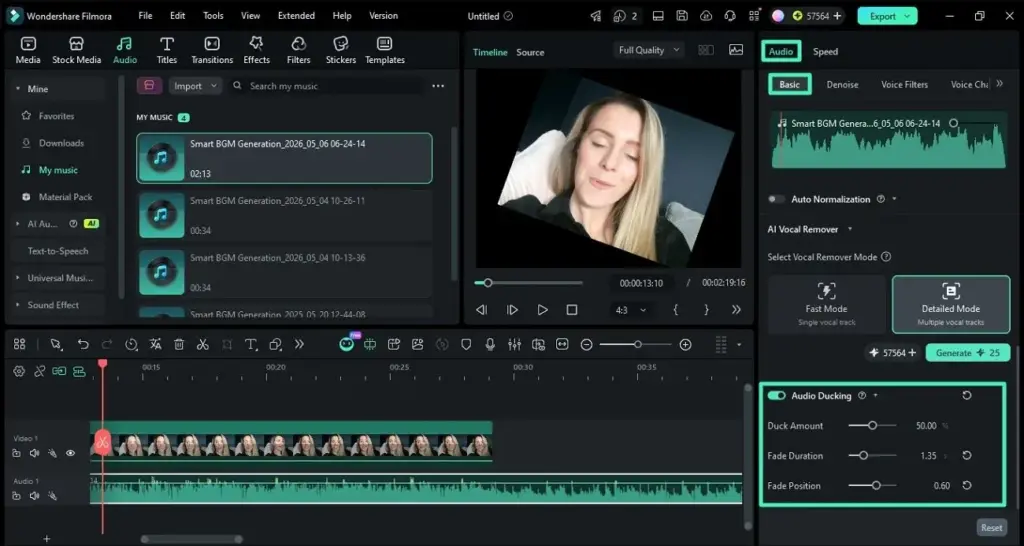
Filmora audio ducking automatically lowers the volume of background music when a voice track is speaking, then raises it again in the gaps. You select the music clip, turn on ducking, choose the voice track as the trigger, and adjust how much the music drops, so dialogue stays clear without manual keyframes.
Why It Matters
Music that is too loud buries speech, and viewers quickly lose interest when they cannot understand the words. Lowering music by hand with keyframes works, but it takes a lot of time.
Ducking does the work automatically, and a good mix with the right levels is one of the quickest ways to make a video sound professional.
Beginner Filmora Audio Ducking For Beginners
Put your voice on one audio track and your music on another. In Filmora, select the music clip, and open the audio settings panel. Turn on the ducking option, and the music will drop whenever the program detects speech in the other tracks.
Steps
- Place voice or narration on its own track and music on a different track.
- Select the music clip in the timeline.
- Open the audio panel and enable the ducking control.
- Adjust the amount, which sets how many decibels the music drops.
- Play through the clip and listen to the changes in volume.
Typical Levels
| Element | Starting Level |
|---|---|
| Voice | Peaks around minus 6 to minus 3 decibels |
| Music under speech | About minus 18 to minus 24 decibels |
| Music alone | About minus 12 to minus 6 decibels |
| Sound effects | Between voice and music, depending on importance |
Manual Alternatives
You can also add keyframes on the music volume line to lower the level under a voice, and raise it afterward. This gives you control of the timing for specific moments such as a drum hit or a scene change. Learn about this approach in Filmora keyframing. Many editors use automatic ducking first, then fix a few spots by hand.
Good Habits
- Choose music without busy vocals under speech, since singing competes with talking.
- Use the fade controls so volume changes sound smooth.
- Listen on headphones and on small speakers, since they show different problems.
- Watch the meters so the total level does not clip.
- Keep levels consistent from one clip to the next.
Common Mistakes
- Using the same track for voice and music, so ducking cannot tell them apart.
- Setting the dip too small and still struggling to understand speech.
- Setting the dip too large, so music disappears and returns with a noticeable pumping effect.
- Skipping the final listen at normal volume.
A Short Listening Checklist
Can you understand every word at a low volume? Does music return smoothly after speech? Do any peaks make the sound distort? Answer these three questions and you have caught most mix problems.
Handy for this: Camera Gimbal — smooth handheld footage. (affiliate link)
Advanced Mixing Principles And Repeatable Settings
How Ducking Works
Ducking uses a detector that looks at the level of the voice track and reduces the volume of the music while the voice is above a threshold. The attack is how fast the music drops, and the release is how fast it returns. Short attacks catch the first words, and moderate releases avoid pumping. If your version exposes the settings, set a fast attack, a release of about half a second to a second, and a gain reduction of around 10 to 15 decibels.
Clean The Voice First
Ducking depends on a clean voice signal. Background noise or room echo can trigger it at the wrong times, or fail to trigger it. Remove noise, trim breaths and long pauses with silence detection, and keep levels even. Also see Filmora music and audio for more on tracks and effects, and clean audio with a phone if you record on a phone.
Build A Balanced Mix
- Set voice first, because it carries the message.
- Add music and bring it up until it supports, but does not fight with, the voice.
- Add sound effects and ambience at levels that keep them present but quiet.
- Check that important effects do not collide with the same frequencies as the voice.
- Use an equalizer to cut a little of the midrange in the music where voices sit.
Loudness And Delivery
For online video, a common loudness target is around minus 14 to minus 16 LUFS for the whole mix, with peaks below minus 1 decibel. Filmora provides meters, and you can use the audio mixer to adjust each track. Keep the mix consistent across a series. Compare with the process in Premiere speech enhancement and auto ducking for other editors.
Troubleshooting
If music dips too early or late, adjust the timing of clips, or use a manual keyframe fix. If ducking triggers on breaths or noise, clean the voice track or add a gate before it. If the music pumps, lengthen the release. If the music disappears under quiet speech, reduce the amount of dip.
Saving A Routine
Set up a project template with tracks named Voice, Music and Effects and ducking turned on, so each new video starts with a good structure. Note your usual level settings and apply them from the start. A repeatable routine means that mixing takes minutes, and that every video sounds consistent.
Finally, always listen to the entire video once from start to end without stopping. Problems with loudness jumps and uneven dips are easy to hear in a straight listen, and easy to fix while the project is still open.
When To Skip Ducking
Some scenes work better with a fixed low music level, such as a long interview with continuous background music. Others need no music under speech at all. Use ducking where speech and music alternate, and use fixed levels where speech is continuous, since constant dipping can distract from the voice.
Try It
- Place a voice clip on one track and a music clip on another in Filmora.
- Select the music clip and turn on audio ducking.
- Play the section with speech and adjust the amount until the voice is easy to understand.
- Listen on headphones and on a phone speaker, then export a short test.
Common Questions
Does Filmora audio ducking work automatically?
Yes. After you enable it for a music clip, it lowers the music when it detects speech on other tracks, so you do not need to add keyframes.
Why does my music still sound too loud?
The dip amount may be too small, or the base music level is too high. Lower the music clip volume and increase the ducking amount.
Can I use ducking for sound effects?
It is mainly meant for music under speech, but you can lower effects manually with keyframes if they cover important words.
What loudness should I aim for?
For online video, a mix around minus 14 to minus 16 LUFS with peaks below minus 1 decibel is common. Check the requirements of the platform you use.
Related Lessons
- Filmora Music And Audio for the other audio tools.
- Filmora Silence Detection to remove pauses.
- Filmora Keyframing for manual volume changes.
- Auto Ducking for the same task in other editors.
- Audio Levels for setting loudness and peaks.
Gear That Helps With This
Hand-picked kit that makes this lesson easier to put into practice.
Some links are affiliate links: if you buy through them we may earn a small commission at no extra cost to you. How this works.