
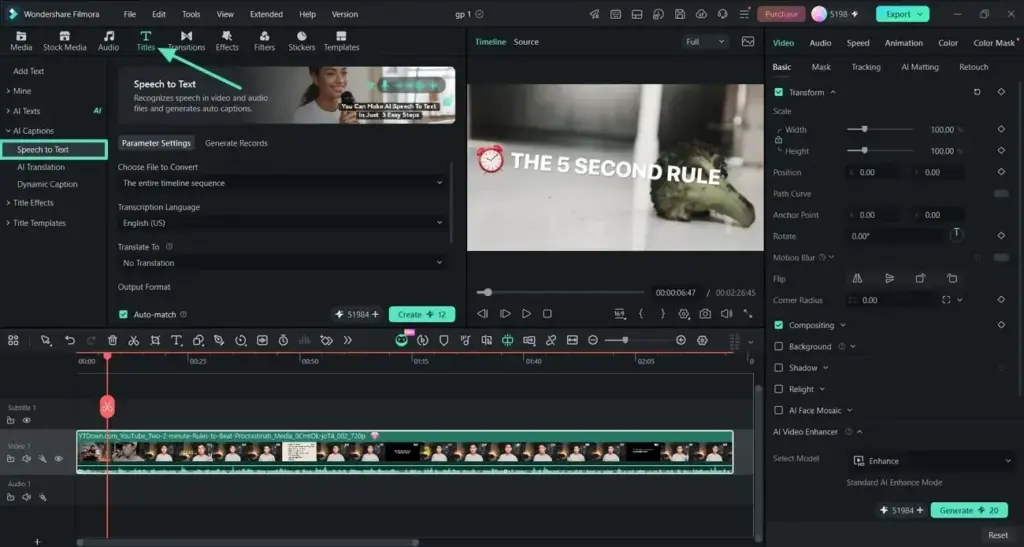
Filmora auto captions use speech recognition to turn spoken words in your clip into timed subtitles. You choose the language, generate the text, correct any errors in the caption list, style the look, and then either burn the captions into the video or export them as a separate subtitle file.
Why It Matters
Most social video is watched with the sound off, and captions also help viewers who are deaf or hard of hearing, or who watch in a second language. Captions can raise watch time and make a video accessible.
Typing subtitles by hand takes hours. Automatic captions create a first draft in minutes, so you spend your time on corrections and design instead.
Beginner Filmora Auto Captions For Beginners
The caption tools live in the Titles or Captions area, depending on your version of Filmora. The names of menus can differ slightly between releases, but the workflow stays the same.
Generating Captions
- Place your clip with speech on the timeline and select it.
- Open the auto caption or speech to text tool and choose the spoken language.
- Choose the range, such as the selected clip or the whole timeline.
- Start the generation and wait for the text track to appear.
- Play the video and read the captions as they go by.
Correcting Mistakes
No speech recognition is perfect. Names, technical terms, accents and background noise cause errors. Open the caption list or double-click a caption to edit the text. Fix spelling, punctuation and obvious misheard words. Split long captions so each one holds one short thought, and merge fragments that are too short to read.
Styling Captions
- Choose a clear font with good contrast, such as a bold sans-serif.
- Use a size that stays readable on a phone, usually larger than you think.
- Add an outline, shadow or background box so text stays readable on any scene.
- Place captions in the lower third, away from faces and important graphics.
- Apply the style to all captions at once so they match.
Exporting
You can burn captions into the picture, which means they are always visible, or export a separate subtitle file such as SRT. A separate file lets platforms such as YouTube show the captions as an option and in multiple languages. Burned-in captions are better for short social clips. See Filmora export settings for the render options.
Common Mistakes
- Skipping the proofreading step and publishing recognition errors.
- Using captions that are too long to read in the time they are on screen.
- Placing text over the subject face or other graphics.
- Choosing the wrong spoken language, which creates nonsense text.
A Quick Daily Routine
Record, trim, generate captions, proofread once at normal speed, style, then export. Doing the steps in the same order every time makes captions a ten-minute task instead of an hour.
Choosing Caption Styles For Different Platforms
Short vertical videos often use large centered words, with one to three words on screen at a time and a highlighted current word. Longer tutorials work better with calm, two-line subtitles in the lower third. Corporate and educational videos should favor high contrast, a plain font and consistent placement. Pick one style for each channel and reuse it, because consistent captions look professional and viewers learn where to look.
Also think about safe areas. Platforms place buttons, titles and progress bars over the lower part of vertical videos, so keep captions above those zones. Preview the video in the platform app before posting, and move the captions up if the interface covers them. A few pixels can decide whether the last word is readable.
Fixing Common Recognition Problems
- If every word is wrong, check the selected language and the audio track first.
- If only names are wrong, fix them once and use find and replace across the list.
- If numbers and symbols look odd, retype them in the format you prefer, such as digits for prices.
- If two speakers overlap, split their lines so each caption holds one speaker.
- If background music hurts accuracy, lower it or generate captions from the voice track alone.
Handy for this: Camera Gimbal — smooth handheld footage. (affiliate link)
Advanced Faster Workflows And Cleaner Results
Prepare The Audio First
Recognition accuracy depends on audio quality. Clean up noise and balance voices before you generate captions. Remove long pauses, which you can do with silence detection, and keep music quieter than speech, using audio ducking. Clear speech at a steady level gives noticeably better text.
Reading Speed And Timing
A comfortable reading speed is around 15 to 17 characters per second for adult viewers. Keep lines to about 32 to 42 characters and no more than two lines. Each caption should stay on the screen for at least one second and usually no longer than six. If the recognition makes a long caption, split it at a natural phrase break, not in the middle of a name or a verb phrase.
Editing Habits That Save Time
- Do one full pass for text, then a second pass for timing and style.
- Use keyboard shortcuts to step through captions and to play the selection.
- Create and save a caption style you like, so every project starts with the same look.
- Keep a short list of names and terms that the recognition often gets wrong, and use find and replace for them.
- Work on a copy of the project before heavy edits.
Multiple Languages
Captions can be translated into other languages if your version offers translation. Always check translated text with a native speaker if the content matters, because automatic translation can miss tone and idioms. Export each language as its own subtitle file with a clear name.
Captions With Other Edits
If you cut or move clips after generating captions, the timing can shift. Finish the edit first and then generate captions, or make sure the captions are linked to the clips they belong to. For vertical content, combine captions with auto reframe and check that the text stays inside the safe area. Compare with the approach in CapCut auto captions if you work in more than one editor.
Accessibility
Good captions include more than speech. Mark important sounds in brackets, such as music or laughter, if they matter to the story. Make sure text contrasts well with the background and does not flash quickly. These habits make your videos easier for everyone to follow, and a clean subtitle file also helps with search and indexing on video platforms.
Quality Checks Before Publishing
Watch the finished video with sound off and read every caption in context. Check the first and last caption for timing, make sure no caption covers an on-screen graphic, and look at the video on a phone, since small screens reveal readability problems quickly.
Try It
- Place a short clip with clear speech on the Filmora timeline.
- Run the auto caption tool and choose the language that is spoken.
- Fix every error and split any caption that is too long to read quickly.
- Apply a bold style with an outline, then export once with burned-in captions and once with an SRT file.
Common Questions
Are Filmora auto captions free?
Features and limits depend on your plan and version. Some versions limit the minutes of transcription or require credits, so check your account before a large project.
How accurate are automatic captions?
Accuracy is good for clear speech in a common language and drops with noise, strong accents or technical words. Always proofread before publishing.
Can I edit the timing of captions?
Yes. You can drag caption edges on the timeline to change when they start and end, or edit them in the caption list.
Should I burn captions in or use a subtitle file?
Burn them in for social clips that need to be visible everywhere. Use a separate SRT file for platforms that support selectable subtitles and multiple languages.
Related Lessons
- Filmora Export Settings to export captioned video correctly.
- Filmora Titles for styling text that looks good.
- Filmora Silence Detection to clean pauses before captioning.
- CapCut Auto Captions for comparing another editor workflow.
- Premiere Captions to see the same task in Premiere Pro.
Gear That Helps With This
Hand-picked kit that makes this lesson easier to put into practice.
Some links are affiliate links: if you buy through them we may earn a small commission at no extra cost to you. How this works.