
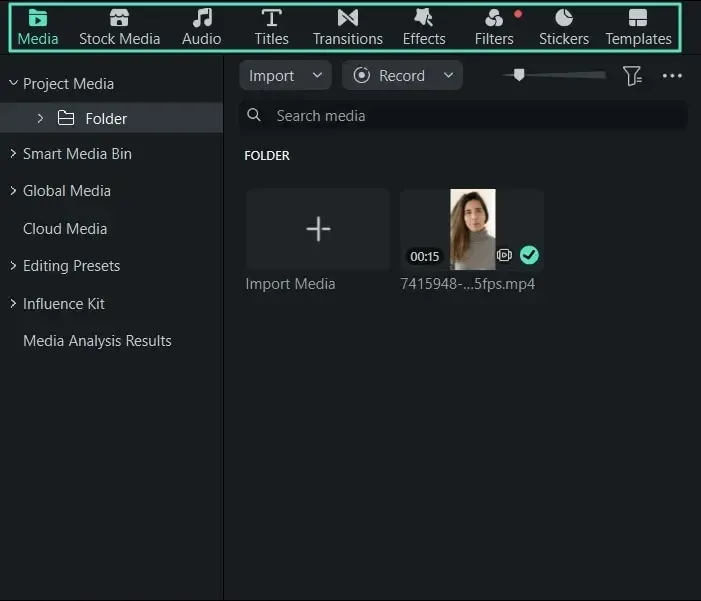
The Filmora media library is the panel where all imported clips, photos, audio and project assets are stored before you place them on the timeline. Learning to import, group and search the library keeps even large projects manageable and saves time hunting for the right clip.
Why It Matters
A project can easily grow to hundreds of clips, including camera footage, music, sound effects, titles and graphics. Without organization, you spend more time looking for files than editing. A tidy library makes it faster to build a rough cut and easier to return to a project weeks later.
Good organization also protects your work. Filmora does not copy your media into the project file by default. It points to the original files on your drive, so moving or renaming them can break the links.
Beginner Importing And Organizing In The Filmora Media Library
Open the media tab to see the library. It has a folder tree on the left and a thumbnail view on the right, with tabs for project media, stock content and effects.
Importing Footage
- Click the import button or choose File, then Import Media, and select files or a whole folder.
- Alternatively, drag files from the file explorer into the library.
- Wait while thumbnails and previews are generated.
- Check that each clip plays, and look for any marked as missing.
- Save the project so links to the files are stored.
Organizing With Folders
| Folder idea | Contents | Why it helps |
|---|---|---|
| A-roll | Main interviews or primary footage | Quick access to the story |
| B-roll | Cutaways and scenery | Easy to find coverage |
| Audio | Music, voice, effects | Separates sound from picture |
| Graphics | Logos, titles, images | Keeps design assets together |
| Selects | Best clips from each shoot | Speeds up the rough cut |
Useful Library Features
- Create folders and drag clips into them for grouping.
- Switch between thumbnail and list view to see durations and file details.
- Use the search box to find clips by name.
- Mark favorites with a star or flag to find your best takes.
- Sort by name, date or duration to scan quickly.
Common Mistakes
- Importing everything at once with no names, so the library fills with similar clips.
- Moving the source files after importing, which causes missing media warnings.
- Skipping folders, then scrolling through hundreds of thumbnails.
- Forgetting to preview clips before using them.
A Quick Organization Exercise
Import ten clips from a recent shoot. Create folders for A-roll, B-roll and audio, drag each clip to the right folder, and mark your three best clips with a favorite flag. You can now build a rough cut by working only from the selects.
Handy for this: Camera Gimbal — smooth handheld footage. (affiliate link)
Advanced Naming, Relinking, Proxies And Project Structure
Naming And File Structure On Disk
The library only shows what is on your drives, so structure on disk matters. Keep one parent folder per project with subfolders for video, audio, graphics and exports. Rename clips before importing with a consistent pattern, such as date, location and number. See file naming convention and folder structure, which applies equally to video. A clear structure makes backups simple, as described in the 3-2-1 backup strategy.
Relinking Missing Media
If you move a folder or rename a clip, Filmora marks the clip as missing. Right click the clip and choose Relink, then select the new file location. Filmora often finds other missing files in the same folder at once. To avoid the problem, finish organizing files before you start editing and keep external drives connected using the same drive letter.
Proxy Files For Smooth Editing
High resolution footage, such as 4K or high bitrate files, can make playback choppy on modest computers. Filmora can create proxy files, which are small copies used while editing and replaced by the originals on export. Generate them in the library by right clicking a clip. Learn the workflow in Filmora proxy editing.
Setting Up The Project Before Import
Project settings such as frame rate and resolution affect how clips behave on the timeline. Set them early to match your main footage. Read Filmora project settings and video frame rates for guidance. Mixed frame rate clips are another reason to plan ahead, as described in conforming frame rate.
Using Markers And Selects
Mark in and out points on a clip in the preview window before adding it to the timeline, so you place only the useful part. Add markers for noteworthy moments such as the best line in an interview. Keeping a selects folder with only the clips you plan to use shortens the search later. See shot lists and storyboards for planning coverage before the shoot.
Stock Media And Templates
The library also contains built-in stock footage, music and effects, which are downloaded when used. Keep imported and stock assets distinct by using separate folders. Check licensing for any stock content before publishing. Templates and presets can be organized in the same way, as covered in Filmora templates.
Archiving A Finished Project
When a project is done, gather the media into one folder, save the project file with it, and copy it to your backup drives. Remove unused clips from the library to keep the project file small. Consider keeping only the final export and the project folder for older work.
Handling Footage From Several Cameras
When a project uses clips from a phone, a camera and a drone, give each source its own subfolder both on disk and in the library. Different devices record at different frame rates and resolutions, and keeping them apart makes it easy to spot which clips need conforming or cropping. Add the camera name to the file name, such as drone or cam-a, so the source is clear even in search results.
Keeping The Library Fast
A library with thousands of items can slow down thumbnails and searches. Remove clips you will not use, close projects you are not working on, and store the project cache on a fast drive. Clearing the render cache after a project finishes frees space, and regenerating it later takes only a few minutes. If a clip looks corrupted in the library, re-copy it from the original card before spending time on troubleshooting.
Sharing A Project With Another Editor
To move a project to another computer, copy the whole project folder, including media, to the new machine, then open the project file and relink if prompted. Filmora’s packaging features can collect the media for you. Test by opening the copied project before deleting the original so nothing is lost.
Try It
- Create a new folder structure on disk for a project, with video, audio and graphics.
- Import clips, then group them into folders inside the Filmora library.
- Mark your five best clips as favorites and search for one by name.
- Move one source file, observe the missing media warning, and relink it.
Common Questions
Where does Filmora store imported media?
It does not copy the files. The library references the original files on your drive, so you must keep them in place or relink them if they move.
How do I fix missing media in Filmora?
Right click the missing clip, choose Relink, and select the file at its new location. Other missing files in the same folder are often relinked at the same time.
Can I organize clips into folders?
Yes. Create folders in the media library and drag clips into them. This helps with large projects and has no effect on your original files on disk.
Should I use proxies for 4K footage?
If playback is choppy, yes. Proxies are lightweight copies that make editing smooth, and Filmora uses the original files for export.
Related Lessons
- Filmora Project Settings to set the right frame rate and resolution.
- Filmora Proxy Editing for smoother playback with large files.
- File Naming Convention to keep clips easy to find.
- Video Offload Workflow to copy footage safely from cards.
- 321 Backup Strategy to protect your project files.
Gear That Helps With This
Hand-picked kit that makes this lesson easier to put into practice.
Some links are affiliate links: if you buy through them we may earn a small commission at no extra cost to you. How this works.