
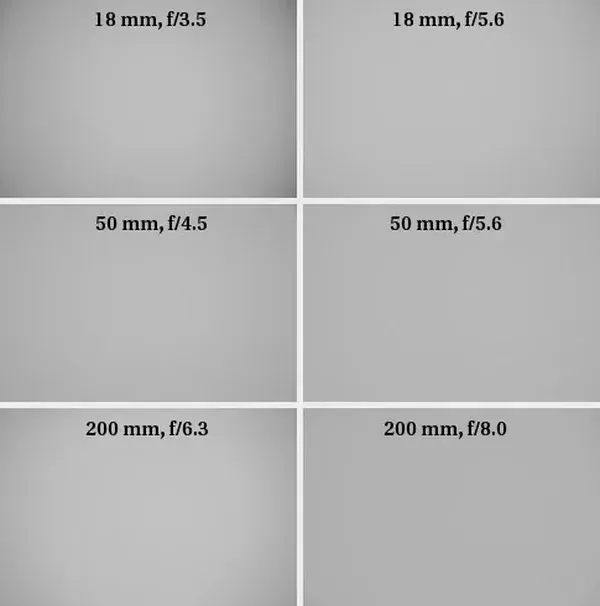
Lens vignetting is a darkening of the image corners compared with the center. It comes from the design of the lens, the physical barrel blocking some light at wide apertures, and the angle at which light reaches the sensor. It is usually strongest wide open and fades as you stop down.
Why It Matters
Corner darkening can look natural and pleasing, drawing the eye to the center, or it can look like a flaw in a sky or a flat background. Knowing the cause helps you decide whether to fix it or keep it.
It also affects exposure. A shot with heavy vignetting can need different editing between the center and the edges, especially in panoramas and product images.
Beginner Lens Vignetting For Beginners
Vignetting shows up most in bright, even areas such as sky, walls and studio backgrounds. It is more obvious at wide apertures, on full-frame lenses used on full-frame cameras, and with some wide-angle lenses.
Three Main Types
| Type | Cause | Fixed By |
|---|---|---|
| Optical vignetting | Lens barrel blocks light from off-axis angles | Stopping down the aperture |
| Natural vignetting | Light falls off with the angle to the sensor edge | Correction in editing, tilt-shift or lens design |
| Pixel vignetting | Sensor pixel wells shade light at steep angles | Camera and lens design, software correction |
| Mechanical vignetting | Filters, hoods or adapters block the corners | Remove or use slimmer accessories |
How Aperture Changes It
At a wide aperture, rays from the edges of the frame are partly cut off by the lens barrel, so corners get less light. Stopping down by one or two stops reduces the effect, since the opening gets smaller and the barrel no longer blocks as much. Many lenses show strong vignetting at f/1.4 and almost none at f/4.
Correcting It
- Turn on lens corrections in your editing software, which use a profile for your lens.
- If the profile is missing, use the manual vignetting slider with a positive amount to lighten corners.
- Check the sky and other even areas after you correct, so you do not create bright halos.
- Apply the same correction to all images in a series.
When To Keep It
- Portraits, where darker edges can focus attention on the face.
- Vintage or moody scenes where the look is part of the style.
- Landscapes with a bright sky, if the edges add depth rather than muddy tones.
Common Mistakes
- Stacking thick filters on a wide lens and getting black corners.
- Correcting by lifting exposure so far that corner noise becomes visible.
- Forgetting that in-camera JPEG corrections may differ from raw processing.
- Adding an editing vignette on top of lens vignetting without checking the total effect.
Quick Decision Guide
If the corners distract, stop down or correct. If the center feels stronger with darker edges, keep it. When shooting a series that will be combined, correct it consistently so that the tones match from frame to frame.
Handy for this: ND And Polarizing Filters — control light and glare. (affiliate link)
Advanced Optics, Mapping And Verification
The Cos Fourth Law
Natural illumination falls off roughly with the fourth power of the cosine of the angle between the ray and the optical axis. For wide-angle views, light arriving at a high angle has a long path and strikes the sensor at a slant, so the corners receive much less light. Retrofocus wide-angle designs and shifted exit pupils reduce this, but cannot remove it. Learn about the lens types in wide-angle lenses.
Sensor Design And Microlenses
Modern sensors use microlenses and offset them toward the edges to catch steep rays. Mirrorless cameras with short flange distances can have steep ray angles, which makes lens and sensor design more closely tied. See flange distance and backside illuminated sensors for related design choices. Adapted lenses may show stronger vignetting because they were not designed for those ray angles.
Measuring Vignetting
- Photograph an evenly lit white or gray surface, such as a flat panel or a clean wall under diffuse light.
- Use raw files with no lens correction applied.
- Measure brightness at the center and at the corners in stops, in your editing program or an analysis tool.
- Repeat at several apertures to build a table for your lens.
- Compare against the lens profile in your software to see how well it is corrected.
A drop of one stop at the corners is common for a fast lens wide open, and above two stops is strong. The numbers help you decide on stop-down settings and give a base for flat-field work in panoramas and tethered product shots.
Flat-Field Correction
For critical work, such as astrophotography, microscopy or product photos with matched backgrounds, take a flat-field frame with the same lens, aperture and focus distance and use it to divide out the pattern. This corrects both vignetting and dust shadows, and it works well with the stacking methods in astro image stacking.
Software Handling
Raw converters apply profile-based correction before other edits, which means the vignette slider in the effects panel works on a corrected image. Post-crop vignetting adds a creative effect based on the cropped frame, not the lens. For masks that darken the edges selectively, look at Lightroom masks and the lens profile section in lens profiles.
Creative Use
Add a subtle vignette of about a third of a stop to guide the eye, and use a radial mask with feathering to avoid an obvious ring. In black and white work, stronger edges feel natural. Always judge the result at full screen and in a small preview, since a vignette that looks subtle on a monitor can look heavy on a phone.
Edge Cases
Zoom lenses change vignetting across the focal range, and some profiles only match certain focus distances. Teleconverters and extension tubes add their own effects, as in teleconverters. For video, in-camera vignette correction can be applied only to certain codecs, so check that the setting you prefer is available before the shoot.
Try It
- Photograph a plain wall or the sky at the widest aperture of your fastest lens.
- Repeat at two stops smaller, with the same exposure and focus.
- Compare the corners with the center in your editor and note how much brighter the second frame looks at the edges.
- Try turning lens corrections on and off and decide which look you prefer.
Common Questions
Is lens vignetting a defect?
Not necessarily. It is a normal optical behavior, and many photographers like the look. It becomes a problem when it is uneven or too strong for the subject.
Does stopping down remove vignetting?
It reduces optical vignetting, usually by a stop or two of aperture, but natural and pixel vignetting remain to some degree.
Why do my corners get dark with a filter?
Thick or stacked filters can block light at wide angles, causing mechanical vignetting. Use thin filters or remove them when shooting very wide.
Will lens corrections add noise to corners?
Yes, lifting dark corners amplifies noise, so very strong corrections can look grainy. Shoot at lower ISO or use noise reduction if needed.
Related Lessons
- Lens Aberrations for other optical flaws that appear near the edges.
- Lens Distortion to learn about shape changes that corrections also handle.
- Lightroom Lens Profiles for automatic corrections.
- Wide-Angle Lenses for the lenses most prone to dark corners.
- Aperture And F-Stops to see how stopping down changes the result.
Gear That Helps With This
Hand-picked kit that makes this lesson easier to put into practice.
Some links are affiliate links: if you buy through them we may earn a small commission at no extra cost to you. How this works.